Mastering the art of sewing requires a keen understanding of your machine’s settings, and one critical element is thread tension. If you’re wondering how to achieve the perfect tension on your Brother sewing machine, you’ve come to the right place.
In this comprehensive guide, How To Adjust Tension On Brother Sewing Machine, We will walk you through the step-by-step process of adjusting the tension, ensuring that your stitches are impeccable and your sewing projects are a resounding success. Say goodbye to uneven stitches and frustration as we demystify the intricacies of tension adjustment on your Brother sewing machine.
How To Adjust Tension On Brother Sewing Machine Detailed Answer

How to Adjust Tension on a Brother Sewing Machine: A Step-by-Step Guide
Proper tension adjustment on your Brother sewing machine is crucial for achieving flawless stitches in your sewing projects. Tension issues can lead to uneven stitches or thread breakage, affecting the overall quality of your work.
Follow these detailed steps to ensure your Brother sewing machine’s tension is perfectly calibrated for optimal sewing results. “How To Adjust Tension On Brother Sewing Machine“
Step 1: Understand Tension Settings
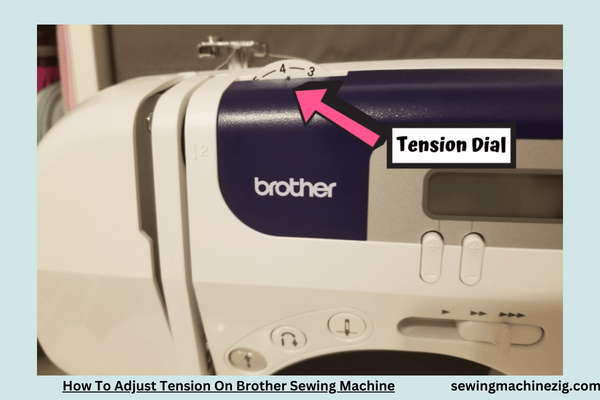
Begin by familiarizing yourself with the tension settings on your Brother sewing machine. Locate the tension dial, usually positioned on the front of the machine near the needle.
Step 2: Gather Necessary Tools
To make the adjustment, gather essential tools, including your sewing machine manual, small screwdriver, and a scrap piece of fabric for testing.
Step 3: Consult the Manual
Refer to your Brother sewing machine manual for specific instructions on tension adjustment. The manual provides valuable insights into your machine’s unique features and settings.
Step 4: Thread the Machine Correctly
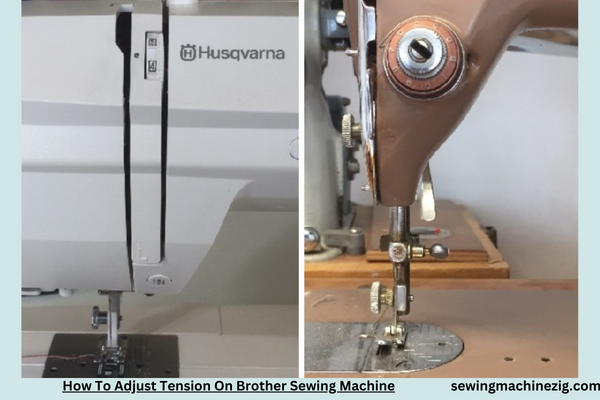
Ensure proper threading by following the threading guide in the manual. Incorrect threading is a common cause of tension issues. Make sure the thread passes through all necessary points, including the tension disks.
Step 5: Set the Tension Dial to Default
Turn the tension dial to the default setting. The default setting is usually in the middle range. This acts as a starting point for adjustments.
Step 6: Test on Scrap Fabric
Place a scrap piece of fabric under the presser foot and sew a few inches using a straight stitch. Examine the stitches. If they appear balanced, your tension is likely correct. If not, proceed to the next step.
Step 7: Gradual Adjustment
For fine-tuning, make small adjustments to the tension dial. If the stitches are too tight (causing puckering), decrease the tension. If they are too loose (resulting in loopy stitches), increase the tension.
Step 8: Test and Repeat
After each adjustment, sew a few inches on scrap fabric and inspect the stitches. Repeat the process until you achieve the desired stitch quality.
Step 9: Check Bobbin Tension
Ensure the bobbin is correctly threaded and inserted. The bobbin tension also contributes to overall stitch quality. Consult your manual for specific instructions on adjusting bobbin tension if necessary.
Step 10: Experiment with Different Fabrics
Tension adjustments may vary depending on the fabric. Experiment with different fabric types and make slight tension adjustments as needed for optimal results.
Step 11: Maintenance
Regularly clean your sewing machine, including the tension disks, to prevent lint buildup that can impact tension. Refer to the manual for maintenance guidelines.
By following these step-by-step instructions, you’ll master the art of adjusting the tension on your Brother sewing machine, ensuring consistent and professional-looking stitches in all your sewing endeavors. Whether you’re a beginner or an experienced sewist, a well-calibrated tension setting is the key to sewing success.
How To Adjust Sewing Machine Tension Singer

Sewing machine tension plays a pivotal role in achieving impeccable stitches, and mastering the art of adjustment is key for sewists, especially those using Singer machines.
In this detailed step-by-step guide, we’ll walk you through the process of adjusting sewing machine tension on Singer models, ensuring that your stitches are perfectly balanced for a professional finish.
Step 1: Understand Your Singer Machine
Familiarize yourself with your specific Singer sewing machine model. The location of the tension adjustment dial and the overall structure may vary between models, so consulting your machine’s manual is crucial.
Step 2: Gather Necessary Tools
Ensure you have the tools needed for adjustment: a scrap piece of fabric, the thread you plan to use for your project, and a small screwdriver. These tools will help you test and fine-tune the tension accurately.
Step 3: Select the Right Thread and Needle
Choose the thread and needle that match the fabric you intend to sew. The correct pairing of thread and needle contributes to smoother sewing and makes tension adjustments more effective.
Step 4: Thread the Machine Correctly
Proper threading is the foundation of good tension. Follow the threading path indicated in your Singer machine’s manual. Ensure the thread passes through all the necessary guides and tension discs.
Step 5: Set the Tension to Default
Before making adjustments, set your machine’s tension to the default or recommended setting. This allows you to start from a standard baseline and make precise modifications.
Step 6: Test on Scrap Fabric
Place a scrap piece of the fabric you’ll be working with under the presser foot. Sew a few inches, examining the stitches. Ideally, your stitches should be even on both sides of the fabric. If not, it’s time to adjust.
Step 7: Locate the Tension Adjustment Dial
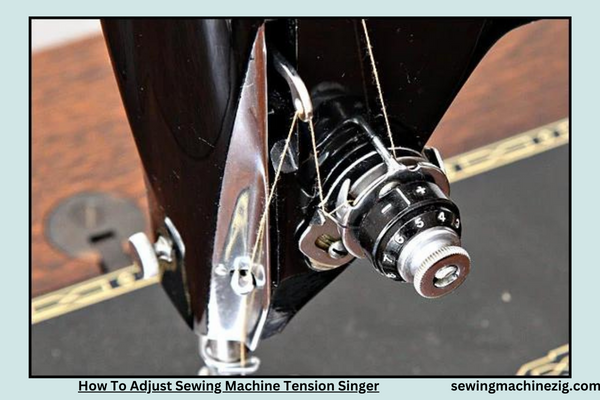
Identify the tension adjustment dial on your Singer machine. It’s typically located on the front near the needle or on the top. Refer to your manual for the exact location on your model.
Step 8: Increase or Decrease Tension
For tighter stitches, turn the tension dial slightly clockwise. For looser stitches, turn it counterclockwise. Make small adjustments and test on scrap fabric until you achieve the desired stitch appearance.
Step 9: Check Upper and Lower Tension
Balancing both upper and lower tension is essential. If adjustments to the upper tension do not yield the desired results, you may need to check and adjust the bobbin tension. Consult your manual for instructions on bobbin tension adjustments.
Step 10: Keep Testing and Adjusting
Continue testing on scrap fabric and adjusting until you achieve balanced and even stitches. Patience is key during this process, as it may take several iterations to find the perfect tension setting.
Step 11: Stitch on Your Project Fabric
Once you’re satisfied with the tension on scrap fabric, test your settings on the actual fabric you’ll be using for your project. This ensures that the tension is perfect for the specific combination of fabric, thread, and needle.
Step 12: Document Your Settings
Take note of the tension settings that work well for different fabrics and projects. Creating a reference chart in your sewing space can save time and effort in the future.
By following these detailed steps, you’ve successfully adjusted the sewing machine tension on your Singer model. Consistent practice and understanding of your machine’s nuances will empower you to tackle various sewing projects with confidence, achieving impeccable stitches every time.
What Should Sewing Machine Tension Be Set At?

Mastering Precision: A Step-by-Step Guide on What Should Sewing Machine Tension Be Set At?
Setting the correct tension on your sewing machine is pivotal for achieving impeccable stitches and ensuring the success of your sewing projects. The optimal tension can vary based on factors like fabric type, thread weight, and specific stitching techniques.
In this detailed guide, we’ll navigate the intricacies of determining what sewing machine tension should be set at, providing you with a comprehensive step-by-step process.
Step 1: Consult Your Machine’s Manual
Begin by consulting the user manual for your sewing machine. The manual is a treasure trove of information, offering guidance on recommended tension settings for various fabrics and stitches. Familiarize yourself with the specifics tailored to your machine model.
Step 2: Gather Essential Tools
Before adjusting tension, gather essential tools: a scrap piece of fabric, the thread you intend to use, and a small screwdriver. These tools will aid in testing and fine-tuning the tension accurately.
Step 3: Understand the Basics of Tension
Sewing machine tension involves finding the right balance between the upper and lower threads. Balanced tension ensures that stitches lock properly in the fabric, resulting in uniform and professional-looking seams.
Step 4: Set to Default Tension
Commence by setting your machine’s tension to the default or recommended setting. This serves as a starting point, providing a baseline for adjustments, and can be a reference point for future sewing projects.
Step 5: Thread the Machine Correctly
Proper threading is paramount for achieving the correct tension. Follow the threading path outlined in your machine’s manual, ensuring that the thread passes through all necessary guides and tension discs.
Step 6: Test on Scrap Fabric
Place a scrap piece of the fabric you plan to use under the presser foot. Sew a few inches and carefully inspect the stitches. They should exhibit even tension on both sides of the fabric. If inconsistencies arise, adjustments are needed.
Step 7: Make Incremental Adjustments
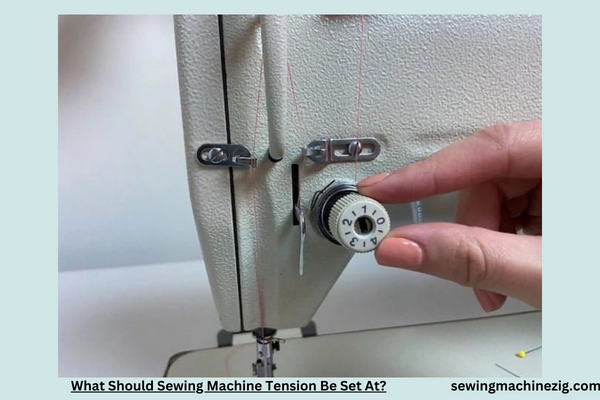
If the stitches are too tight, make incremental adjustments by turning the tension dial slightly counterclockwise. For loose stitches, turn the dial clockwise. Make these adjustments gradually, testing on scrap fabric after each change.
Step 8: Check Upper and Lower Tension
Ensure a harmonious balance between upper and lower tensions. If modifying the upper tension doesn’t yield desired results, consider checking and adjusting the bobbin tension. Refer to your machine’s manual for specific instructions on bobbin tension adjustments.
Step 9: Consider Fabric Characteristics
The type and thickness of the fabric you’re working with can influence the ideal tension setting. Thicker fabrics often require looser tension, while lighter fabrics may need tighter tension. Adjust accordingly based on the characteristics of your fabric.
Step 10: Test on Project Fabric
Once satisfied with the tension on scrap fabric, proceed to test your settings on the actual fabric for your project. This ensures that the tension is perfectly calibrated for the specific combination of fabric, thread, and needle.
Step 11: Document Your Settings
Maintain a record of the tension settings that work well for different fabrics and projects. Creating a reference chart in your sewing space can save time and effort in the future and facilitate consistent, high-quality stitching.
By diligently following these step-by-step instructions, you’ve mastered the art of setting sewing machine tension. Regular practice and a deep understanding of your machine’s nuances will empower you to tackle diverse sewing projects with confidence, ensuring flawless stitches and professional-looking results every time.
Conclusion
In conclusion, How To Adjust Tension On Brother Sewing Machine, Mastering the art of adjusting the tension on your Brother sewing machine is essential for achieving impeccable stitches and flawless projects.
By following the step-by-step guide, How To Adjust Tension On Brother Sewing Machine, you can confidently navigate the tension adjustment process, ensuring a balanced and professional finish to your sewing endeavors. Remember, a well-adjusted tension not only enhances stitch quality but also contributes to the overall performance and longevity of your Brother sewing machine. So, dive into the world of precise tension control and elevate your sewing experience today. “How To Adjust Tension On Brother Sewing Machine“
FAQS
Q1: How do I adjust the tension on my Brother sewing machine?
A1: To adjust the tension on your Brother sewing machine, start by setting the machine to the normal tension setting. Then, test on scrap fabric. If the stitches are too tight or too loose, use the tension dial. Turn clockwise to tighten and counterclockwise to loosen. Make incremental adjustments until achieving the desired stitch quality. How To Adjust Tension On Brother Sewing Machine
Q2: What should I do if the upper thread tension is too tight on my Brother sewing machine?
A2: If the upper thread tension is too tight, decrease it by turning the tension dial counterclockwise in small increments. Test on scrap fabric until achieving the right balance for smooth and even stitches. How To Adjust Tension On Brother Sewing Machine
Q3: How can I fix loose upper thread tension on my Brother sewing machine?
A3: If the upper thread tension is too loose, adjust by turning the tension dial clockwise gradually. Test on scrap fabric to ensure that the stitches are balanced and not too tight.
Q4: Is adjusting bobbin tension necessary on a Brother sewing machine?
A4: Typically, adjusting bobbin tension on a Brother sewing machine is unnecessary for regular sewing. Focus on the upper thread tension using the tension dial. Bobbin tension adjustments are usually factory-set and rarely need changes. “How To Adjust Tension On Brother Sewing Machine“
Q5: Can the fabric type affect tension adjustment on a Brother sewing machine?
A5: Yes, different fabrics may require tension adjustments. Thicker fabrics might need a looser tension, while finer fabrics may require a tighter setting. Always test on a scrap piece of the actual fabric before starting your sewing project. “How To Adjust Tension On Brother Sewing Machine“
Q6: What should I do if tension issues persist after adjustments on my Brother sewing machine?
A6: If tension issues persist, rethread both the upper thread and the bobbin, ensuring correct threading. If problems persist, consult the machine’s manual for specific troubleshooting steps or consider seeking assistance from a Brother-authorized technician. “How To Adjust Tension On Brother Sewing Machine“


