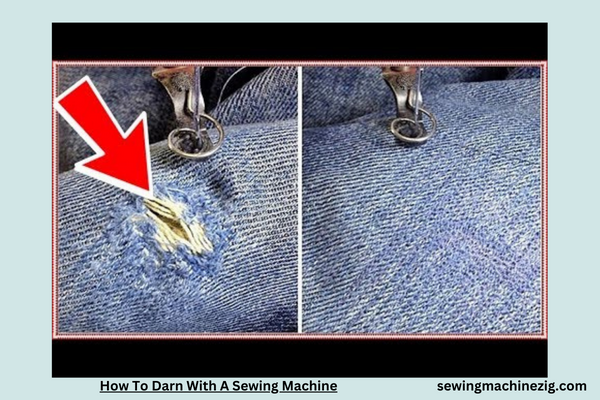
Embarking on the journey of mending and reviving well-loved garments takes a stitch in time to a whole new level—especially when armed with a sewing machine. Darning, the art of repairing fabric with precision, becomes an efficient and creative process when paired with the right machine.
“How To Darn With A Sewing Machine”, Is a delicate knit to sturdy denim, understanding How To Darn With A Sewing Machine opens a realm of possibilities for extending the life of your wardrobe. Join me as we thread through the intricacies of this textile-saving technique, transforming your sewing machine into a tool for mending memories.
How To Darn With A Sewing Machine Detailed Answer
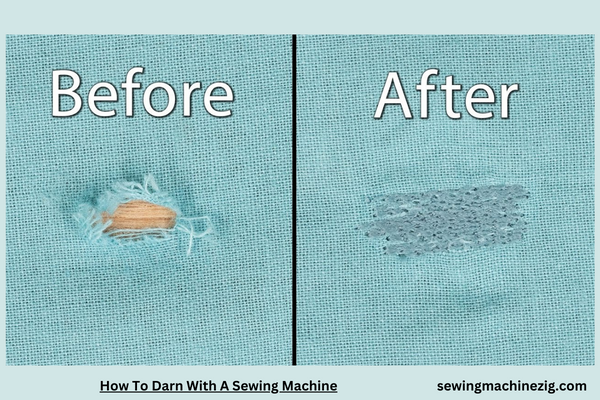
Embarking on the art of darning with a sewing machine opens up a world of possibilities for mending and revitalizing your cherished textiles. Let’s delve into a comprehensive step-by-step guide on “How To Darn With A Sewing Machine” blending creativity and functionality seamlessly:
Gather Essential Supplies:
- Begin by assembling your supplies, including a sewing machine, darning foot, matching thread, and the garment or fabric in need of repair.
Assess the Damage:
- Identify the area in need of darning. Whether it’s a small hole, a frayed edge, or a worn-out section, understanding the extent of the damage guides your drawing approach.
Select the Right Darning Foot:
- Equip your sewing machine with a darning foot. This specialized foot allows for free-motion stitching, enabling you to maneuver the fabric easily during the darning process.
Match Thread and Fabric:
- Choose a thread that closely matches the color and weight of the fabric you’re drawing. This ensures a seamless integration of the repair into the existing textile.
Secure the Fabric:
- Place the damaged area under the needle, ensuring it is securely positioned. If possible, hoop the fabric to provide stability during the darning process.
Set the Stitch Length:
- Adjust your sewing machine’s stitch length to a medium setting. This allows for effective darning without creating overly tight or loose stitches.
Practice Free-Motion Stitching:
- Familiarize yourself with free-motion stitching by practicing on a scrap piece of fabric. Get comfortable moving the fabric smoothly beneath the needle while maintaining control over the sewing machine.
Begin Darning:
- Start darning by stitching back and forth over the damaged area, gradually expanding beyond the edges of the hole or worn section. Ensure the stitches overlap for a sturdy repair.
Experiment with Patterns:
- Explore different darning patterns to add a decorative touch to your repairs. From simple grid patterns to more intricate designs, let your creativity shine through.
Continue Until Satisfied:
- Continue the darning process until the damaged area is adequately reinforced. Check the fabric’s integrity by gently pulling on all sides to ensure a secure mend.
Secure Loose Threads:
- Trim any loose threads and secure the ends by backstitching or tying knots. This step ensures a polished finish to your drawing project.
Press and Enjoy:
- Give your repaired fabric a gentle press with an iron to set the stitches and enjoy the satisfaction of breathing new life into your beloved textiles.
By following this detailed guide on “How To Darn With A Sewing Machine,” you’ll master the art of textile restoration. Let your sewing machine be the instrument that seamlessly weaves together functionality and creativity, transforming worn-out fabrics into stories of resilience and craftsmanship.
What Is The Technique Of Darning?
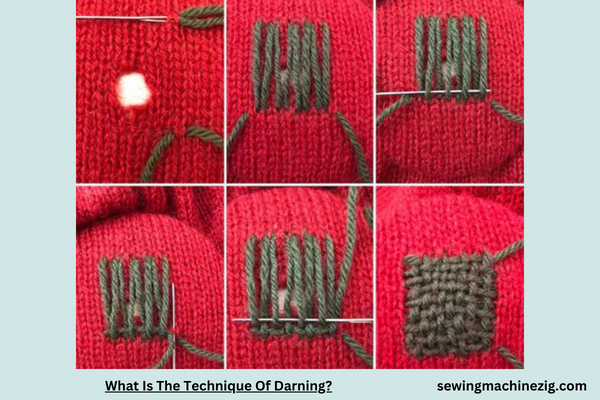
Let’s dive into a comprehensive step-by-step guide on “How To Darn With A Sewing Machine,” exploring the intricacies of this valuable skill for mending and reinforcing fabrics:
Understanding Darning:
Begin by grasping the essence of darning. It’s a traditional sewing technique primarily used to repair holes or worn areas in fabrics, such as socks, sweaters, or other knitwear.
Gathering Essential Tools:
Assemble the necessary tools for darning with a sewing machine. You’ll need a darning needle suitable for machine use, matching thread, and a hoop or embroidery hoop to stabilize the fabric.
Selecting the Right Fabric:
Assess the fabric in need of repair, ensuring it’s suitable for machine darning. Fabrics like wool, cotton, or knit materials are often ideal for this technique.
Choosing Thread for Darning:
Opt for a machine-compatible thread that matches the color and weight of the fabric. This ensures a seamless blend with the surrounding material, making the darned area less noticeable.
Preparing the Fabric:
Secure the fabric in an embroidery hoop or on a flat surface, providing stability for machine darning without distorting the surrounding fabric.
Starting with Basic Weaving:
Initiate machine darning by guiding the needle in a basic over-and-under pattern across the hole. This foundational weaving creates a mesh, serving as the base for subsequent machine-darning stitches.
Creating a Framework:
Extend the machine darning weave slightly beyond the damaged area, building a framework around the hole. This establishes a strong foundation for the sewing machine’s subsequent darning stitches.
Darning Stitch Techniques:
Explore different machine darning stitch techniques based on the type of hole or damage. Common stitches include the running stitch, duplicate stitch, or the classic woven darn. Adjust your machine darning technique according to the specific needs of the fabric.
Matching the Weave:
Pay attention to matching the machine’s darning weave with the surrounding fabric. Mimic the original pattern to seamlessly integrate the darned area, ensuring a cohesive and natural appearance.
Gradual Build-Up of Stitches:
Gradually build up the machine darning stitches, layer by layer, until the hole is fully covered. This incremental approach ensures that the darned area is sturdy and blends harmoniously with the fabric.
Securing Loose Ends:
Machine darning should include securing any loose ends or knots to prevent unraveling. Double-check the tension of your machine’s darning stitches to ensure consistency throughout the darned section.
Final Inspection:
Inspect the machine-darned area closely, running your fingers over it to ensure a smooth and even surface. The goal is not only to mend the hole but also to restore the fabric’s strength and integrity using the sewing machine.
Ironing and Finishing:
Optionally, iron the machine-darned area to set the stitches and smooth out any wrinkles. This step contributes to the overall polished look of the repaired fabric done with the sewing machine.
Repeated Practice for Mastery:
Enhance your machine-darning skills through repeated practice. Each project offers an opportunity to refine your technique and adapt it to different fabrics and types of damage using the sewing machine.
Preserving Garments with Darning:
Embrace machine darning as a sustainable and eco-friendly approach to preserving beloved garments. By mastering this technique with the sewing machine, you extend the life of your clothing, reducing the need for frequent replacements.
By following these detailed steps on “How To Darn With A Sewing Machine,” you’ll acquire the skills needed to proficiently mend and revive your fabrics. Whether you’re a beginner or an experienced crafter, machine darning provides a practical and creative solution for preserving the longevity of your textiles.
What Is Webbing For Sewing
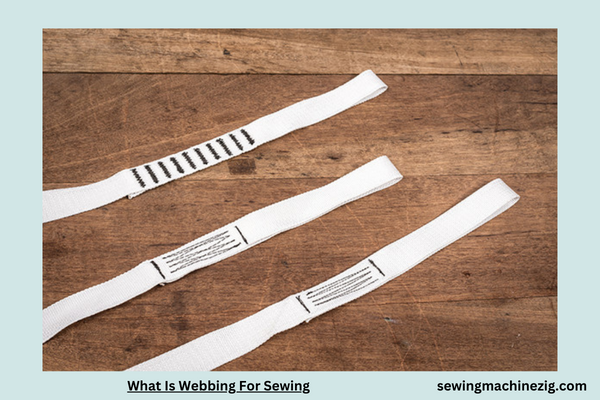
Let’s delve into a detailed step-by-step guide on “What Is Webbing For Sewing,” exploring the intricacies of this essential material and its applications in the sewing realm:
Understanding Webbing:
- Begin by grasping the fundamental concept of webbing. Webbing is a strong, woven fabric strip commonly made from materials like nylon, polyester, cotton, or polypropylene.
Types of Webbing:
- Explore the different types of webbing available for sewing. Common variations include nylon webbing, polyester webbing, cotton webbing, and polypropylene webbing. Each type possesses unique characteristics suitable for specific applications.
Applications in Sewing:
- Recognize the versatile applications of webbing in sewing projects. It is widely used for creating straps, handles, belts, and reinforcement for various items such as bags, backpacks, dog collars, and outdoor gear.
Choosing the Right Webbing:
- When selecting webbing for sewing, consider factors like the intended use, load-bearing requirements, and the overall aesthetic of your project. Nylon webbing is known for its strength and durability, while polyester webbing offers excellent resistance to UV rays.
Determining Width and Thickness:
- Pay attention to the width and thickness of the webbing, as these factors influence its strength and suitability for specific applications. Thicker and wider webbing is often chosen for heavy-duty projects, while thinner options may be suitable for lighter items.
Matching Colors and Styles:
- Enhance the visual appeal of your sewing projects by selecting webbing that complements the color and style of the fabric. Many webbing options come in a variety of colors, allowing you to coordinate with the overall design.
Preparing Webbing for Sewing:
- Before incorporating webbing into your sewing project, cut the desired length and seal the ends to prevent fraying. You can use methods like heat sealing, sewing, or applying fray check to ensure a neat and durable finish.
Attaching Webbing to Fabric:
- Explore different methods for attaching webbing to fabric. Common techniques include sewing, riveting, or using hardware such as buckles and D-rings for added functionality. Sewing webbing securely is crucial for long-lasting results.
Reinforcing Stress Points:
- Identify stress points in your sewing project where additional strength is needed. Use webbing to reinforce these areas, preventing wear and tear over time. This is especially important in items subjected to heavy loads or constant movement.
Creating Adjustable Straps:
- Utilize webbing to craft adjustable straps for bags, backpacks, or other accessories. Incorporate hardware like sliders or adjuster buckles to allow users to customize the length of the straps according to their preferences.
Adding Decorative Elements:
- Elevate the aesthetic appeal of your sewing projects by incorporating webbing as a decorative element. Experiment with different weaving patterns or colors to create visually appealing and unique designs.
Maintaining Durability:
- Prioritize durability when working with webbing. Ensure that your sewing techniques, thread choice, and reinforcement methods align with the strength requirements of the project to guarantee long-lasting results.
Exploring Specialty Webbing:
- Be aware of specialty webbing options designed for specific purposes, such as seatbelt webbing for automotive projects or tubular webbing for climbing gear. Understanding these variations expands your choices for tailored applications.
Experimenting with Sewing Techniques:
- Explore various sewing techniques when working with webbing, including straight stitches, bar tacks, or box stitches. The choice of technique depends on the specific requirements of your project and the type of webbing used.
Regular Maintenance and Inspection:
- After completing your sewing project with webbing, encourage users to perform regular inspections and maintenance. This proactive approach helps identify any signs of wear or damage, allowing for timely repairs and ensuring the continued functionality of the item.
By following these detailed steps, you’ll gain a comprehensive understanding of “What Is Webbing For Sewing” and its diverse applications in sewing projects. Whether you’re crafting outdoor gear, bags, or accessories, incorporating webbing adds strength, durability, and a touch of creativity to your creations.
Conclusion
To conclude, mastering the technique of darning with a sewing machine opens a realm of possibilities for mending and preserving fabrics.
By understanding the step-by-step process, from selecting the right materials to executing various stitches, you can confidently breathe new life into your worn textiles. “How To Darn With A Sewing Machine” unveils a valuable skill that not only repairs but also adds a creative touch to your sewing repertoire. Embrace this technique for sustainable and aesthetically pleasing fabric maintenance.
FAQS
Q: Can I use a sewing machine for darning tasks?
A: Yes, a sewing machine can be a valuable tool for darning. Modern machines often come with darning features or free-motion capabilities that make the process efficient and precise.”How To Darn With A Sewing Machine“
Q: What type of needle is best for machine darning?
A: When machine darning, opt for a needle suitable for the fabric you’re working on. For general fabrics, a universal needle works well, but for denser materials like denim, a heavy-duty or jeans needle is more appropriate.”How To Darn With A Sewing Machine“
Q: Is hand darning different from machine darning in terms of technique?
A: The basic principles of darning remain similar, but the techniques slightly differ. Machine darning often involves free-motion stitching or using a darning foot, while hand darning allows for more intricate control over the stitching pattern.
Q: Can I darn delicate fabrics with a sewing machine?
A: Yes, you can darn delicate fabrics with a sewing machine. Adjusting the machine settings, using a finer needle, and practicing on scrap fabric beforehand will help ensure a delicate and precise darn.
Q: What types of fabric are suitable for machine darning?
A: Machine darning works well on a variety of fabrics, including cotton, denim, and synthetics. Adjust the machine settings based on the fabric’s thickness and use appropriate threads for optimal results.”How To Darn With A Sewing Machine“

