Embarking on the world of sewing opens doors to a myriad of techniques that transform your creations from ordinary to extraordinary, and mastering “How to Do a Rolled Hem on a Sewing Machine” is a game-changer. This technique imparts a professional finish to the edges, making it ideal for garments, linens, and lightweight fabrics.
In this comprehensive guide, we’ll unravel the step-by-step process of achieving a flawless rolled hem, empowering you to add a touch of finesse to your sewing projects with ease and precision.
How To Do A Rolled Hem On A Sewing Machine Detailed Answer

Achieving a beautifully finished edge with a rolled hem on a sewing machine is a skill that adds a touch of elegance to your projects.
Follow this step-by-step guide “How To Do A Rolled Hem On A Sewing Machine” to master the art of creating a flawless rolled hem with ease.
Materials Needed:
- Sewing machine
- Fabric
- Matching thread
- Iron
Step 1: Choose the Right Foot:
Select a rolled hem foot for your sewing machine. This foot is designed to help guide the fabric smoothly as you sew.
Step 2: Set Up Your Machine:
Thread your sewing machine with the matching thread and install the rolled hem foot. Adjust the machine settings for a straight stitch.
Step 3: Prepare the Fabric:
Fold and press the fabric edge by 1/4 inch towards the wrong side. Then, fold it again by another 1/4 inch to encase the raw edge.
Step 4: Stitch the First Fold:
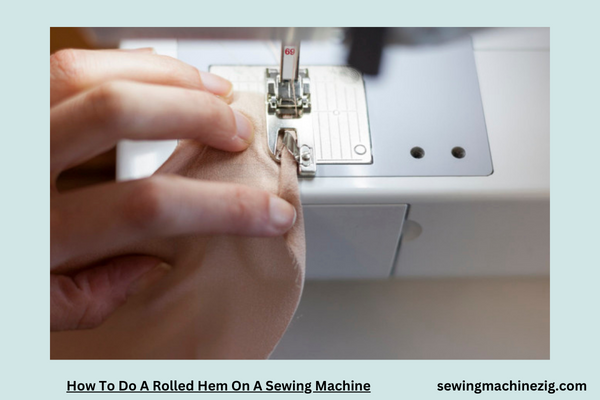
With the wrong side facing up, guide the fabric into the rolled hem foot. Begin stitching slowly, ensuring the needle catches the folded edge securely.
Step 5: Guide the Fabric:
As you sew, gently guide the fabric into the curved section of the rolled hem foot. This helps the fabric fold neatly for a professional-looking edge.
Step 6: Continue Stitching:
Continue stitching along the folded edge, keeping a steady pace. The foot will automatically create a narrow and neat hem as you sew.
Step 7: Secure the End:
When you reach the end of your fabric or desired length, backstitch to secure the rolled hem in place.
Step 8: Press the Hem:
After sewing, press the rolled hem with a hot iron. This sets the stitches and gives your hem a crisp and polished finish.
Step 9: Repeat as Needed:
Repeat the process for all edges requiring a rolled hem. Take your time to ensure consistency and precision.
Tips:
- Practice on scrap fabric to get comfortable with the technique.
- Choose a lightweight fabric for your first attempts.
- Experiment with thread colors to create subtle or contrasting hems.
Common Challenges and Solutions:
- Skipped Stitches: Ensure your needle is suitable for lightweight fabrics and replace it if needed.
- Uneven Hem: Practice guiding the fabric evenly to achieve a consistently rolled hem.
By following these steps and practicing the technique, you’ll master the art of creating a perfect rolled hem on your sewing machine.
Whether you’re hemming garments, linens, or decorative pieces, the rolled hem adds a professional touch to your creations, showcasing your sewing prowess with every meticulously crafted edge. “How To Do A Rolled Hem On A Sewing Machine“
HOW TO USE A ROLLED HEM FOOT
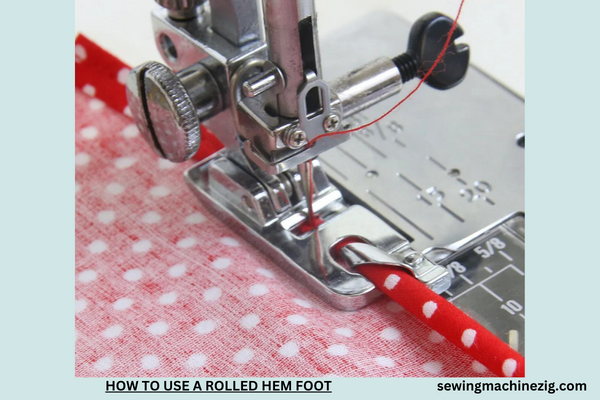
A rolled hem foot is a nifty attachment that can transform the way you finish fabric edges, giving them a neat and professional look.
Follow these easy steps to learn how to use a rolled hem foot with your sewing machine.
Step 1: Attach the Rolled Hem Foot
Begin by selecting the rolled hem foot compatible with your sewing machine model. It usually has a narrow channel on the underside. Lift the presser foot on your machine and gently attach the rolled hem foot, ensuring it snaps securely into place.
Step 2: Thread Your Sewing Machine
Thread your sewing machine with a thread color that complements your fabric. For a rolled hem, you can use a single thread or a matching color on the top and bobbin. Refer to your machine’s manual for specific threading instructions.
Step 3: Set Up Your Machine
Adjust your machine settings for a straight stitch. Set the stitch length to a medium setting. Some machines have a specific setting for a rolled hem stitch; consult your manual for guidance.
Step 4: Fold the Fabric Edge
Fold the edge of your fabric over twice to the wrong side, creating a narrow hem. The first fold can be about the width of the rolled hem you desire, and the second fold will be enclosed within the foot.
Step 5: Position the Fabric Under the Foot
Place the fabric under the rolled hem foot, aligning the folded edge with the guide in the foot. The fabric should be gently fed into the foot’s channel.
Step 6: Lower the Presser Foot
Lower the presser foot using the lever. This action engages the fabric and the rolled hem foot, allowing for smooth and precise stitching.
Step 7: Start Sewing
Begin sewing slowly, guiding the fabric through the rolled hem foot. The foot will automatically fold and stitch the fabric edge as you move forward. Keep a steady pace to maintain an even and polished rolled hem.
Step 8: Adjust Needle Position (if needed)
If your sewing machine allows, adjust the needle position to ensure the stitching is centered along the folded edge. Consult your machine’s manual for instructions on needle adjustments.
Step 9: Finish and Secure the Hem
Continue sewing until you reach the end of your fabric or the desired length of the rolled hem. Backstitch a few stitches to secure the hem in place.
Step 10: Press the Hem
After sewing, press the rolled hem with an iron. This sets the stitches and gives your fabric a crisp and professional appearance. Using a rolled hem foot with your sewing machine is a fantastic way to achieve beautifully finished edges. With a bit of practice, you’ll master this technique and add a polished touch to your sewing projects. “How To Do A Rolled Hem On A Sewing Machine“
Conclusion
In conclusion, learning How To Do A Rolled Hem On A Sewing Machine adds a touch of finesse to your creations. This versatile technique enhances the edges of fabrics, providing a polished and professional finish. With practice, you’ll confidently navigate the process, creating beautifully hemmed garments, linens, and accessories.
The rolled hem’s simplicity and elegance make it a go-to choice for sewers looking to elevate their projects. Mastering this skill opens the door to a world of refined and stylish sewing possibilities.
FAQS
Q1: What is a rolled hem, and why use a sewing machine for it?
A1: A rolled hem is a narrow, neat edge finish used in sewing. Using a sewing machine for a rolled hem ensures precision and efficiency, making it ideal for delicate fabrics and decorative edges.
Q2: Can I perform a rolled hem on any sewing machine?
A2: Many sewing machines, especially those with a rolled hem foot, can execute this technique. Consult your machine’s manual to confirm its compatibility and for specific instructions.
Q3: What settings should I use on my sewing machine for a rolled hem?
A3: Set your machine to a narrow stitch width, adjust the tension for your fabric, and engage the rolled hem function if your machine has one. Refer to your manual for precise settings. “How To Do A Rolled Hem On A Sewing Machine“
Q4: Are there specific fabrics suitable for a rolled hem?
A4: Rolled hems work well on lightweight and sheer fabrics like chiffon and silk. Experiment with a scrap piece to ensure the desired result before working on your project. “How To Do A Rolled Hem On A Sewing Machine“
Q5: Can beginners achieve a rolled hem successfully?
A5: Yes, beginners can master the rolled hem with practice. Start with scrap fabric to familiarize yourself with the technique and your sewing machine’s settings for optimal results. “How To Do A Rolled Hem On A Sewing Machine“

