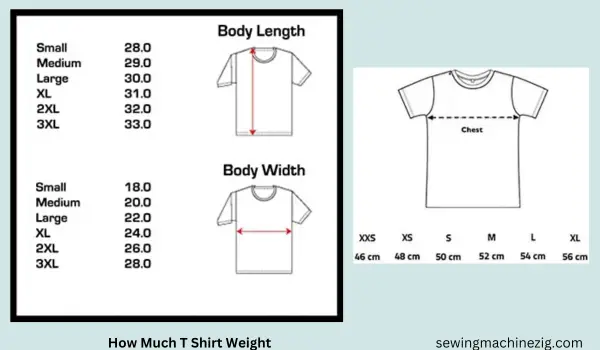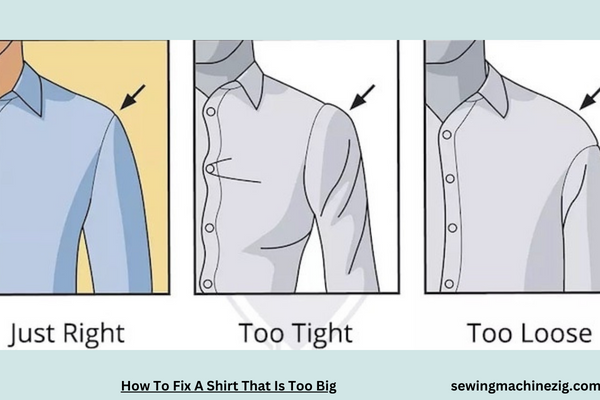
Embarking on the sartorial challenge of wardrobe refinement, one often encounters the predicament of an oversized shirt. Navigating the realm of tailoring without professional intervention becomes paramount when seeking a personalized fit.
This guide unravels the art of remediation, addressing the query: “How To Fix A Shirt That Is Too Big?” Unleash your inner seamster with techniques ranging from strategic tucks to inconspicuous alterations. Each stitch and fold becomes a transformative gesture in the journey towards a bespoke silhouette. Join this sartorial odyssey, decoding the secrets of at-home tailoring and bidding farewell to the baggy shirt dilemma.
How To Fix A Shirt That Is Too Big Detailed Answer
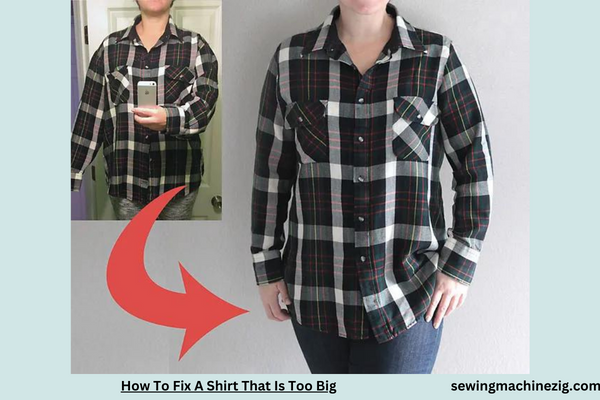
Discovering that a favorite shirt is too big can be disheartening, but fear not! In this step-by-step guide, we’ll delve into effective methods to transform an oversized shirt into a perfectly fitted masterpiece. Join us on a journey of tailoring triumph, where resizing your shirt becomes a satisfying and empowering DIY endeavor. “How To Fix A Shirt That Is Too Big“
Step 1: Assess the Fit
Before diving into alterations, carefully assess the fit of the oversized shirt. Identify areas that need adjustment, whether it’s the sleeves, shoulders, torso, or length. This initial assessment guides the specific alterations you’ll perform.
Step 2: Gather Necessary Supplies
- Tailor’s Chalk or Fabric Marker:
- Use tailor’s chalk or a fabric marker to mark the areas that require adjustment.
- Measuring Tape:
- Measure the desired dimensions to ensure precision in resizing.
- Pins:
- Secure the fabric in place during fitting and adjustments.
- Sewing Machine or Needle and Thread:
- Choose a sewing machine for a quicker and more durable result, or opt for a needle and thread if you prefer hand-sewing.
- Scissors:
- Use sharp scissors for accurate cutting during the resizing process.
Step 3: Resize the Sleeves
- Mark Desired Length:
- Use tailor’s chalk to mark the desired sleeve length. Ensure both sleeves are marked evenly.
- Secure with Pins:
- Fold the sleeves along the marked lines and secure them with pins. This allows for a precise fit.
- Sew or Hand-Stitch:
- If using a sewing machine, stitch along the marked lines. For hand-sewing, use a backstitch for durability.
Step 4: Adjust the Shoulder Width
- Mark the New Shoulder Seam:
- Use tailor’s chalk to mark the new shoulder seam, ensuring it maintains a natural and comfortable fit.
- Pin and Secure:
- Pin along the new shoulder seam, securing the excess fabric to be trimmed.
- Cut and Sew:
- Carefully cut the excess fabric along the marked line and sew the new shoulder seam. Be attentive to maintain symmetry.
Step 5: Resize the Torso
- Mark the New Side Seams:
- Identify the desired width for the torso and mark new side seams with tailor’s chalk.
- Pin and Fit:
- Pin along the new side seams, allowing for a snug fit without being too tight. Try on the shirt to ensure comfort.
- Sew or Hand-Stitch:
- If using a sewing machine, stitch along the marked lines. For hand-sewing, use a running stitch for flexibility.
Common Issues and Solutions:
- Uneven Resizing:
- Issue: The shirt appears uneven after resizing.
- Solution: Double-check your measurements and marks before sewing. Ensure symmetry in alterations to achieve a balanced fit.
- Fabric Fraying:
- Issue: The fabric starts to fray after alterations.
- Solution: Use sharp scissors to minimize fraying, and consider reinforcing seams with a zigzag stitch or serger to prevent further fraying.
- Unintended Tightness:
- Issue: The shirt becomes too tight in the resized areas.
- Solution: Release some of the stitches or create small slits along the seams to allow for more flexibility and comfort.
- Visible Stitching Lines:
- Issue: Sewing lines are visible and detract from the shirt’s aesthetics.
- Solution: Choose thread that closely matches the fabric color to make stitching less noticeable. Alternatively, opt for decorative stitching if it complements the shirt’s style.
Step 6: Resize the Hem
- Mark New Hemline:
- Use tailor’s chalk to mark the new hemline. Ensure the length is consistent around the shirt.
- Pin and Secure:
- Fold the fabric along the marked hemline and secure it with pins for an even hem.
- Sew or Hand-Stitch:
- Stitch the new hem using a sewing machine or hand-sew, maintaining an even distance from the edge for a polished finish.
Step 7: Final Fitting
- Try On the Shirt:
- After completing the alterations, try on the shirt to ensure it fits comfortably and meets your expectations.
- Make Additional Adjustments (if needed):
- If any areas still feel too loose or tight, make additional adjustments as necessary. It’s easier to refine the fit at this stage.
Step 8: Press and Finish
- Press the Seams:
- Use an iron to press the seams and hems, giving the shirt a crisp and polished appearance.
- Inspect for Loose Threads:
- Inspect the shirt for any loose threads and trim them for a clean finish.
- Optional Embellishments:
- Consider adding embellishments or decorative elements to enhance the shirt’s style, such as embroidery, patches, or fabric paint.
Step 9: Launder Carefully
- Follow Care Instructions:
- Adhere to the care instructions on the shirt’s label when laundering. This ensures the longevity of your alterations.
- Avoid Excessive Heat:
- When ironing the shirt, use a moderate heat setting to prevent damage to the fabric or alterations.
Step 10: Addressing Additional Issues
- Shrinkage Concerns:
- If the shirt is made of a fabric prone to shrinking, consider pre-washing it before resizing to minimize post-alteration shrinkage.
- Color Bleeding:
- Be cautious with colored shirts to prevent color bleeding during the resizing process. Wash them separately or use color-catching sheets.
- Stretchy Fabrics:
- When working with stretchy fabrics, use a stretch stitch or a zigzag stitch to maintain flexibility in the seams.
Summary: Embracing DIY Tailoring
Fixing a shirt that is too big is a rewarding venture that allows you to personalize your wardrobe. By following this comprehensive guide and addressing common issues along the way, you embark on a journey of DIY tailoring mastery. May your resized shirts become a testament to your sewing skills and fashion-forward creativity. Happy tailoring!
How To Fix Shirt Too Big In Shoulders
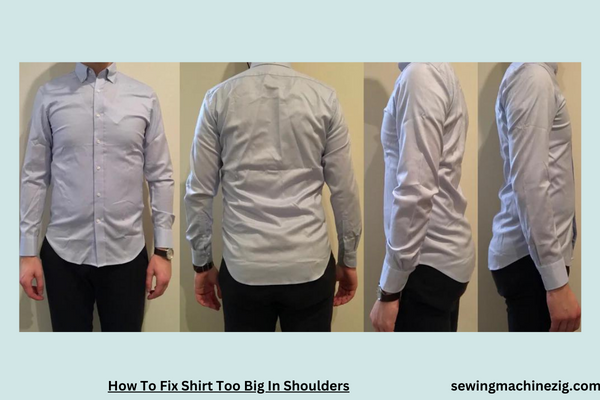
Discovering that your favorite shirt is too big in the shoulders can be a style setback, but fear not! In this step-by-step guide, we’ll unravel the mystery of resizing shoulders, and transforming an ill-fitting garment into a tailored masterpiece. Join us on a journey of sartorial sleight of hand, where fixing a shirt too big in the shoulders becomes a satisfying and empowering DIY endeavor. “How To Fix A Shirt That Is Too Big“
Step 1: Assess the Fit and Pinpoint the Issue
Before embarking on alterations, carefully assess the fit of the shirt and pinpoint the specific shoulder areas that need adjustment. Whether it’s a drop in the shoulder seam or excess fabric causing a baggy look, understanding the issue is crucial for effective resizing.
Step 2: Gather Necessary Supplies
- Tailor’s Chalk or Fabric Marker:
- Use tailor’s chalk or a fabric marker to mark the areas that need adjustment.
- Measuring Tape:
- Measure the desired dimensions to ensure precision in resizing.
- Pins:
- Secure the fabric in place during fitting and adjustments.
- Seam Ripper:
- Use a seam ripper to carefully remove stitches if major alterations are needed.
- Sewing Machine or Needle and Thread:
- Choose a sewing machine for a quicker and more durable result, or opt for a needle and thread if you prefer hand-sewing.
- Scissors:
- Use sharp scissors for accurate cutting during the resizing process.
Step 3: Pinch and Pin for a Quick Fit Check
- Identify Excess Fabric:
- Pinch the excess fabric at the top of the shoulder to simulate the desired fit. This step gives you a quick preview of how the adjustments will affect the overall look.
- Secure with Pins:
- Pin along the pinched fabric to hold it in place. This will be your guide for alterations.
Step 4: Determine the New Shoulder Seam
- Mark the New Shoulder Seam:
- Use tailor’s chalk or a fabric marker to mark the new shoulder seam. The mark should follow the natural slope of your shoulder for a comfortable fit.
- Double-Check Symmetry:
- Ensure that the marks on both shoulders are symmetrical to maintain a balanced appearance.
Common Issues and Solutions:
- Uneven Resizing:
- Issue: The shirt appears uneven after resizing.
- Solution: Double-check your measurements and marks before sewing. Ensure symmetry in alterations to achieve a balanced fit.
- Unexpected Tightness:
- Issue: The shirt becomes too tight in the resized shoulder area.
- Solution: Release some of the stitches or create small slits along the seams to allow for more flexibility and comfort.
- Visible Stitching Lines:
- Issue: Sewing lines are visible and detract from the shirt’s aesthetics.
- Solution: Choose thread that closely matches the fabric color to make stitching less noticeable. Alternatively, opt for decorative stitching if it complements the shirt’s style.
- Fabric Bulging:
- Issue: Excess fabric causes a bulging effect after alterations.
- Solution: Ensure that the fabric is distributed evenly along the new shoulder seam. Make additional adjustments to eliminate any bunching or bulging.
Step 5: Seam Rip and Resew (if necessary)
- Use Seam Ripper:
- If major alterations are needed, carefully use a seam ripper to remove the existing shoulder seam. Take your time to avoid damaging the fabric.
- Adjust and Resew:
- Make the necessary adjustments according to your markings, and then sew the new shoulder seam using a sewing machine or hand-sewing techniques.
Step 6: Refit and Adjust as Needed
- Try On the Shirt:
- After completing the alterations, try on the shirt to ensure the new shoulder fit is comfortable and aesthetically pleasing.
- Make Additional Adjustments (if needed):
- If the fit is not perfect, make additional adjustments as necessary. This could include refining the shoulder slope or tweaking the seam for optimal comfort.
Step 7: Reinforce Shoulder Seams for Durability
- Double Stitch or Zigzag:
- To ensure the longevity of your alterations, consider double stitching or using a zigzag stitch along the new shoulder seam. This reinforces the seam and prevents it from unraveling over time.
Step 8: Press and Finish
- Press the Seams:
- Use an iron to press the new shoulder seams and ensure a clean and polished appearance.
- Inspect for Loose Threads:
- Inspect the shirt for any loose threads and trim them for a neat finish.
- Optional Embellishments:
- Consider adding embellishments or decorative elements to enhance the shirt’s style, such as embroidery, patches, or fabric paint.
Step 9: Launder Carefully
- Follow Care Instructions:
- Adhere to the care instructions on the shirt’s label when laundering. This ensures the longevity of your alterations.
- Avoid Excessive Heat:
- When ironing the shirt, use a moderate heat setting to prevent damage to the fabric or alterations.
Step 10: Addressing Additional Issues
- Shrinkage Concerns:
- If the shirt is made of a fabric prone to shrinking, consider pre-washing it before resizing to minimize post-alteration shrinkage.
- Color Bleeding:
- Be cautious with colored shirts to prevent color bleeding during the resizing process. Wash them separately or use color-catching sheets.
- Stretchy Fabrics:
- When working with stretchy fabrics, use a stretch stitch or a zigzag stitch to maintain flexibility in the seams.
Summary: Mastering the Art of Shoulder Resizing
Fixing a shirt too big in the shoulders is a skillful maneuver that allows you to tailor your wardrobe to perfection. By following this comprehensive guide and addressing common issues along the way, you embark on a journey of mastering the art of shoulder resizing. May your shirts fit flawlessly, and your DIY alterations be marked by success. Happy tailoring! “How To Fix A Shirt That Is Too Big“
How To Fix Too Big T Shirts
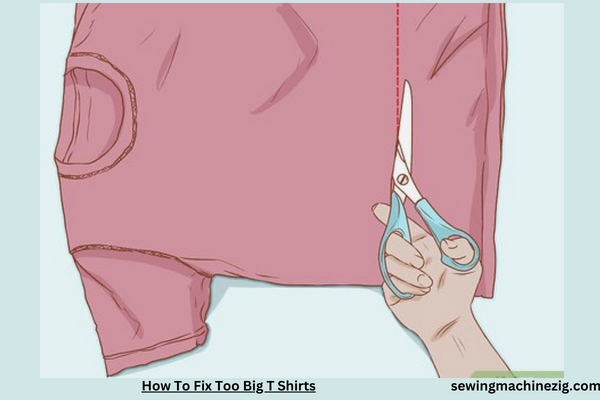
Discovering that your favorite T-shirt is too big can be a wardrobe woe, but fear not!
In this step-by-step guide, we’ll unravel the secrets of resizing T-shirts, turning oversized garments into perfectly fitted wardrobe staples. Join us on a journey of transformative tailoring, where fixing too big T-shirts becomes a satisfying and empowering DIY endeavor.
Step 1: Assess the Fit and Identify the Issues
Before diving into alterations, carefully assess the fit of the T-shirt and identify the specific areas that need adjustment. Whether it’s a loose torso, oversized sleeves, or a baggy neckline, understanding the issues is crucial for effective resizing.
Step 2: Gather Necessary Supplies
- Tailor’s Chalk or Fabric Marker:
- Use tailor’s chalk or a fabric marker to mark the areas that need adjustment.
- Measuring Tape:
- Measure the desired dimensions to ensure precision in resizing.
- Pins:
- Secure the fabric in place during fitting and adjustments.
- Seam Ripper:
- Use a seam ripper to carefully remove stitches if major alterations are needed.
- Sewing Machine or Needle and Thread:
- Choose a sewing machine for a quicker and more durable result, or opt for a needle and thread if you prefer hand-sewing.
- Scissors:
- Use sharp scissors for accurate cutting during the resizing process.
Step 3: Resize the Torso for a Streamlined Fit
- Mark the New Side Seams:
- Identify the desired width for the torso and mark new side seams with tailor’s chalk.
- Pin and Fit:
- Pin along the new side seams, allowing for a snug fit without being too tight. Try on the T-shirt to ensure comfort.
- Sew or Hand-Stitch:
- If using a sewing machine, stitch along the marked lines. For hand-sewing, use a running stitch for flexibility.
Common Issues and Solutions:
- Uneven Resizing:
- Issue: The T-shirt appears uneven after resizing.
- Solution: Double-check your measurements and marks before sewing. Ensure symmetry in alterations to achieve a balanced fit.
- Unexpected Tightness:
- Issue: The T-shirt becomes too tight after resizing.
- Solution: Release some of the stitches or create small slits along the seams to allow for more flexibility and comfort.
- Visible Stitching Lines:
- Issue: Sewing lines are visible and detract from the T-shirt’s aesthetics.
- Solution: Choose thread that closely matches the fabric color to make stitching less noticeable. Alternatively, opt for decorative stitching if it complements the T-shirt’s style.
- Neckline Adjustments:
- Issue: The neckline is too wide or too tight after resizing.
- Solution: Adjust the neckline by either reshaping it or adding fabric if necessary. Ensure the neckline maintains its original style while offering a better fit.
Step 4: Resize the Sleeves for a Tailored Look
- Mark Desired Length:
- Use tailor’s chalk to mark the desired sleeve length. Ensure both sleeves are marked evenly.
- Secure with Pins:
- Fold the sleeves along the marked lines and secure them with pins. This allows for a precise fit.
- Sew or Hand-Stitch:
- If using a sewing machine, stitch along the marked lines. For hand-sewing, use a backstitch for durability.
Step 5: Adjust the Shoulder Seams for Comfort
- Mark the New Shoulder Seams:
- Identify the new shoulder seam by pinching excess fabric for a comfortable fit.
- Secure with Pins:
- Pin along the new shoulder seam, securing the excess fabric to be trimmed.
- Cut and Sew:
- Carefully cut the excess fabric along the marked line and sew the new shoulder seam. Be attentive to maintain symmetry.
Step 6: Refit and Adjust as Needed
- Try On the T-Shirt:
- After completing the alterations, try on the T-shirt to ensure the new fit is comfortable and aesthetically pleasing.
- Make Additional Adjustments (if needed):
- If any areas still feel too loose or tight, make additional adjustments as necessary. It’s easier to refine the fit at this stage.
Step 7: Reinforce Seams for Durability
- Double Stitch or Zigzag:
- To ensure the longevity of your alterations, consider double stitching or using a zigzag stitch along the new seams. This reinforces the seams and prevents them from unraveling over time.
Step 8: Press and Finish
- Press the Seams:
- Use an iron to press the seams and ensure a clean and polished appearance.
- Inspect for Loose Threads:
- Inspect the T-shirt for any loose threads and trim them for a neat finish.
- Optional Embellishments:
- Consider adding embellishments or decorative elements to enhance the T-shirt’s style, such as embroidery, patches, or fabric paint.
Step 9: Launder Carefully
- Follow Care Instructions:
- Adhere to the care instructions on the T-shirt’s label when laundering. This ensures the longevity of your alterations.
- Avoid Excessive Heat:
- When ironing the T-shirt, use a moderate heat setting to prevent damage to the fabric or alterations.
Step 10: Addressing Additional Issues
- Shrinkage Concerns:
- If the T-shirt is made of a fabric prone to shrinking, consider pre-washing it before resizing to minimize post-alteration shrinkage.
- Color Bleeding:
- Be cautious with colored T-shirts to prevent color bleeding during the resizing process. Wash them separately or use color-catching sheets.
- Stretchy Fabrics:
- When working with stretchy fabrics, use a stretch stitch or a zigzag stitch to maintain flexibility in the seams.
Summary: Mastering T-Shirt Tailoring
Fixing too big T-shirts is a skillful maneuver that allows you to tailor your wardrobe to perfection. By following this comprehensive guide and addressing common issues along the way, you embark on a journey of mastering T-shirt tailoring. May your T-shirts fit flawlessly, and your DIY alterations be marked by success. Happy tailoring! “How To Fix A Shirt That Is Too Big“
Conclusion
In conclusion, conquering How To Fix A Shirt That Is Too Big transforms a fashion setback into a triumph of personalized tailoring. Armed with simple yet effective techniques, you reshape your garment to align with your unique style and comfort.
From adjusting seams to refining the silhouette, this DIY endeavor empowers you to turn oversized shirts into custom-fit masterpieces. So, embrace the art of alterations, let your creativity guide the process, and wear your perfectly tailored shirt with pride, showcasing your skill and style. “How To Fix A Shirt That Is Too Big“
FAQS
Q1: How can I fix a shirt that is too big without altering its appearance?
A1: To maintain the shirt’s original appearance, consider using fabric tape or adhesive hemming tape. Attach the tape inside the seams to create a temporary fix, allowing the shirt to be adjusted without permanent alterations. “How To Fix A Shirt That Is Too Big“
Q2: Can I shrink a shirt that is too big by washing it in hot water?
A2: Shrinking a shirt in hot water may reduce its size temporarily, but it’s not a reliable or precise method. The fabric might shrink unevenly, and the effect may not be long-lasting. Consider other alteration methods for a more tailored fit. “How To Fix A Shirt That Is Too Big“
Q3: Is it possible to tailor a shirt that is too big at home?
A3: Tailoring a shirt at home is achievable with basic sewing skills. You can take in the side seams or use darts to create a more fitted silhouette. Follow online tutorials or consult a sewing guide for step-by-step instructions. “How To Fix A Shirt That Is Too Big“
Q4: Can I use safety pins to temporarily fix a shirt that is too big?
A4: Safety pins can be a quick and temporary solution. Gather excess fabric on the inside of the shirt and secure it with safety pins. This makeshift alteration allows for easy adjustments and removal when needed. “How To Fix A Shirt That Is Too Big“
Q5: Should I consider professional alterations for a shirt that is too big?
A5: Professional alterations by a tailor provide a precise and permanent solution for a shirt that is too big. A tailor can adjust the seams, shoulders, and overall fit to create a customized look that complements your body shape. “How To Fix A Shirt That Is Too Big“
Q6: What other accessories can I use to camouflage a shirt that is too big?
A6: Stylish belts, scarves, or statement accessories can divert attention from the oversized fit. Experiment with accessories to add a touch of personal style while addressing the fit issue. “How To Fix A Shirt That Is Too Big“


