Delving into the world of sewing unveils a spectrum of possibilities, but encountering issues like sewing machine timing misalignment can be a setback. Efficiently stitching fabric relies heavily on precise machine timing. If you find yourself grappling with stitches gone awry, fear not.
This guide navigates the intricacies of How To Fix Sewing Machine Timing, offering a comprehensive approach to troubleshooting and realigning your machine. Unravel the mysteries behind timing adjustments, empowering yourself to troubleshoot and rejuvenate your sewing machine, ensuring smooth stitches and frustration-free crafting sessions.
How To Fix Sewing Machine Timing Detailed Answer

Encountering issues with sewing machine timing can be disheartening, but fear not – mastering How To Fix Sewing Machine Timing is a valuable skill that can save both time and frustration.
In this detailed step-by-step guide, we’ll walk you through the process of troubleshooting and realigning your machine, ensuring that the delicate dance of components remains in perfect harmony. “How To Fix Sewing Machine Timing“
Step 1:
Diagnose the Problem Before delving into the timing adjustments, it’s crucial to diagnose the issue. Symptoms of timing problems include skipped stitches, thread breakage, or uneven stitches. Identify the specific problem to tailor your approach.
Step 2:
Gather Necessary Tools To embark on the timing adjustment journey, gather essential tools such as a screwdriver, tweezers, and your sewing machine’s user manual. Familiarize yourself with the machine’s internal components to navigate the process confidently.
Step 3:
Disconnect the Machine Prior to making any adjustments, disconnect the sewing machine from the power source. This ensures your safety and prevents accidental needle movement during the fixing process.
Step 4:
Remove the Needle Plate and Bobbin Case Expose the inner workings of your sewing machine by removing the needle plate and the bobbin case. This step provides clear visibility of the timing mechanisms and facilitates easy access for adjustments.
Step 5:
Locate the Timing Marks Refer to your sewing machine’s manual to identify the timing marks on the various components. These marks act as reference points for aligning the needle, hook, and other critical elements of the timing system.
Step 6:
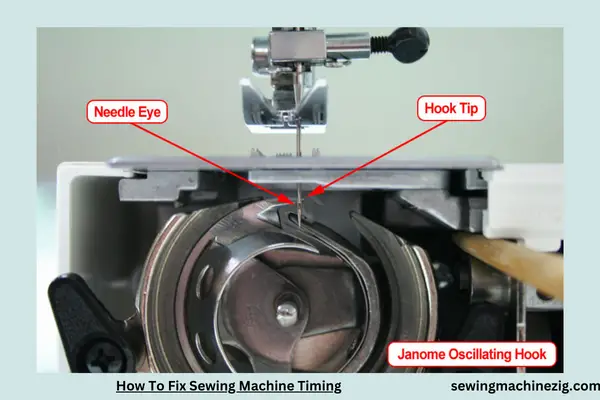
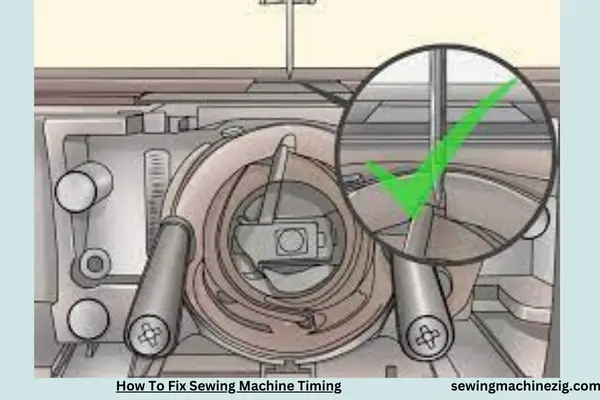
Align the Needle and Hook Using the timing marks as a guide, carefully align the needle and hook. This precision ensures that they engage at the correct moment during the stitching process, preventing issues like missed stitches or needle breakage.
Step 7:
Check the Needle Bar Height Verify the height of the needle bar according to the manufacturer’s specifications. Incorrect needle bar height can lead to timing issues, so make adjustments as needed to achieve the recommended height.
Step 8:
Reassemble the Machine Once the timing adjustments are complete, reassemble the sewing machine by reinstalling the needle plate and bobbin case. Ensure all components are securely in place before moving on to the next step.
Step 9:
Test with Scrap Fabric Before resuming your regular sewing projects, conduct a test with scrap fabric. Observe the stitches for consistency and ensure that the timing adjustments have resolved the initial issue.
Step 10:
Fine-Tune as Necessary If the test reveals any lingering problems, fine-tune the timing adjustments as needed. Small tweaks may be necessary to achieve optimal synchronization between the needle and hook.
Mastering How To Fix Sewing Machine Timing is a valuable skill that empowers you to troubleshoot and maintain your machine.
By following these detailed steps, you can navigate the intricacies of timing adjustments with confidence, ensuring that your sewing machine operates seamlessly and produces impeccable stitches for all your creative endeavors.
What Causes A Sewing Machine To Get Out Of Time?

Discovering that your sewing machine is out of time can be a perplexing setback in your crafting journey.
In this comprehensive guide, we will delve into the intricacies of what causes a sewing machine to get out of time and provide step-by-step insights on diagnosing, understanding, and resolving this issue.
Step 1:
Recognize the Symptoms Before delving into the causes, it’s crucial to recognize the symptoms of a sewing machine being out of time. Common signs include skipped stitches, uneven stitches, or the needle hitting the bobbin case.
Step 2:
Check for Needle Damage Examine the needle for any signs of damage, such as bending or bluntness. A damaged needle can throw off the machine’s timing, leading to stitching irregularities. Replace the needle with a new one suited for your fabric type.
Step 3:
Inspect the Bobbin Case The bobbin case plays a pivotal role in the timing of your sewing machine. Remove the bobbin and inspect the case for any damages, snags, or debris. Clean the bobbin area thoroughly, ensuring smooth movement.
Step 4:
Verify Needle Position Check the needle position concerning the hook or shuttle. Misalignment can lead to timing issues. Refer to your sewing machine manual to understand the correct needle position and adjust it accordingly.
Step 5:
Examine the Hook Timing The hook, responsible for catching the thread from the needle, must be precisely timed. Consult your machine’s manual to locate the timing marks and ensure the hook aligns correctly with the needle as it descends.
Step 6:
Assess the Needle Bar Height The needle bar height impacts the interaction between the needle and hook. Verify that the needle bar is at the recommended height according to your sewing machine’s specifications. Adjust if necessary.
Step 7:
Confirm Timing Marks Most sewing machines have timing marks that indicate the correct alignment of essential components. Identify these marks and ensure that the needle, hook, and other critical parts align precisely according to the manufacturer’s guidelines.
Step 8:
Align the Feed Dogs Misaligned feed dogs can contribute to timing issues. Confirm that the feed dogs are level and moving smoothly. Lubricate the mechanism if needed and make adjustments to ensure proper alignment.
Step 9:
Tighten Loose Parts Check for any loose screws, nuts, or bolts in the timing mechanism. Tighten them securely to prevent movement that can throw off the timing alignment during operation.
Step 10:
Test the Machine After making adjustments, conduct a test run on scrap fabric to evaluate the stitching quality. Pay attention to the stitches’ consistency, ensuring that the needle and bobbin interact seamlessly.
Understanding what causes a sewing machine to get out of time is the first step towards efficient troubleshooting and resolution.
By following these detailed steps, you can navigate the complexities of timing issues, restoring precision to your sewing machine and ensuring a seamless crafting experience.
Conclusion
In conclusion, unraveling the mystery of How To Fix Sewing Machine Timing is a journey toward mastery and precision in stitching.
By carefully adjusting the alignment of the needle and bobbin, one can restore perfect synchronization. This newfound skill empowers sewists to troubleshoot and rejuvenate their machines, ensuring smooth, accurate stitches. As you delve into the intricacies of sewing machine timing, the satisfaction of reviving a misaligned mechanism becomes a testament to your craftsmanship and elevates your sewing experience to new heights. “How To Fix Sewing Machine Timing“
FAQS
Q1: What are the signs that my sewing machine timing is off?
A1: Signs include skipped stitches, uneven stitching, or the needle hitting the bobbin case. If you notice these issues, it’s an indication that your sewing machine timing may be misaligned.
Q2: Can I fix sewing machine timing issues at home?
A2: Yes, you can attempt to fix sewing machine timing at home. Follow your machine’s manual and use basic tools, but if the problem persists, consider seeking professional assistance.
Q3: How often does sewing machine timing need adjustment?
A3: Timing issues are uncommon with regular maintenance, but if you encounter problems, check the timing. Otherwise, it’s advisable to have your machine serviced annually.
Q4: Can using the wrong needle affect sewing machine timing?
A4: Yes, using the wrong needle can impact timing. Ensure you are using the correct needle size and type recommended for your sewing machine and fabric.
Q5: Is fixing sewing machine timing a complicated process?
A5: While it requires precision, fixing sewing machine timing is manageable with patience and careful following of instructions. Refer to your machine’s manual for guidance.
Q6: Can sewing machine timing issues be caused by bobbin problems?
A6: Yes, a misaligned or damaged bobbin case can contribute to timing issues. Regularly clean and maintain the bobbin area to prevent potential problems.


