In the symphony of sewing, the humble bobbin plays a vital role, holding the secret to smooth stitches. If you’re a sewing enthusiast wondering How To Put A Bobbin In A Sewing Machine, fear not – the process is a fundamental skill for every stitch artisan.
This guide demystifies the simple yet essential art of bobbin placement, guiding you through the steps to ensure seamless threading and optimal tension. Mastering this skill is your key to unlocking the full potential of your sewing machine, making each project a harmonious blend of precision and creativity.
How To Put A Bobbin In A Sewing Machine Detailed Answer
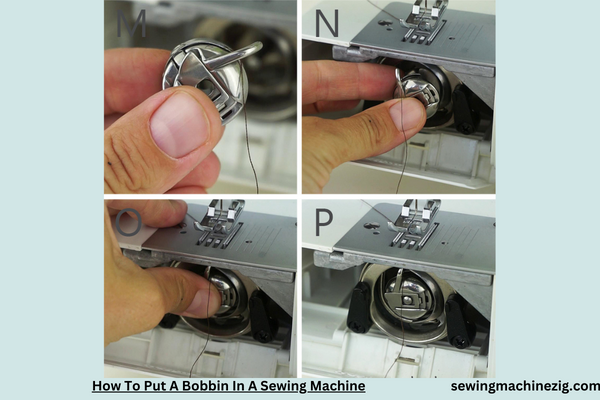
The journey of sewing begins with a fundamental step – putting a bobbin in your sewing machine. This seemingly simple task holds the key to unlocking the stitches that will bring your fabric creations to life.
In this detailed guide, “How To Put A Bobbin In A Sewing Machine” We’ll unravel the process of putting a bobbin in your sewing machine, making it both attractive and uniquely accessible to beginners and seasoned crafters alike.
Step 1: Embrace the Bobbin – The Heart of Stitching
Before diving into the details, take a moment to embrace the significance of the bobbin in the world of stitching. The bobbin is the unsung hero, tucked away in the depths of your sewing machine, yet holding the heart of every stitch that adorns your fabric. Understanding its role is the first step to mastering the art of sewing.
Step 2: Gather Your Supplies – The Sewing Ritual Begins
Begin your sewing ritual by gathering the essential supplies. Besides your sewing machine, you’ll need the appropriate bobbin for your machine model, matching thread, and a spool of thread for the upper thread. This is the moment where anticipation blends with preparation, setting the stage for a successful sewing venture.
Step 3: Identify Your Bobbin Type – Variety in Simplicity
Not all bobbins are created equal. Identify the type of bobbin your sewing machine requires. Common types include top-loading, front-loading, and drop-in bobbins. Consult your sewing machine manual or inspect the bobbin compartment to determine the correct type for your machine.
Step 4: Wind the Bobbin – A Symphony of Thread
Before you put the bobbin in your sewing machine, it needs to be wound with thread. Choose a thread color that complements your fabric. Place the thread spool on the designated pin, guide the thread through the bobbin winding tension discs, and engage the winding mechanism. Listen to the gentle hum as the bobbin winds, creating a symphony of thread in preparation for stitching.
Step 5: Insert the Wound Bobbin – Ready for Action
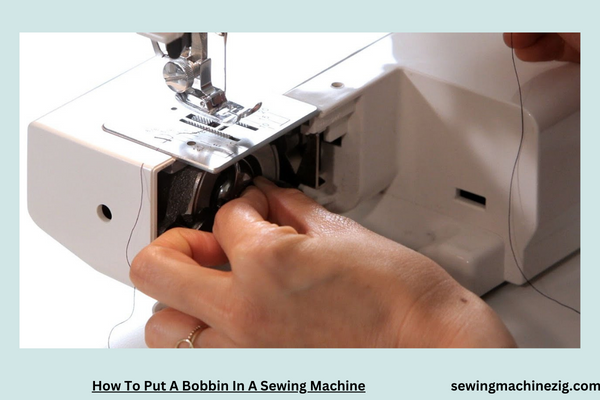
Once the bobbin is wound, it’s time to insert it into the bobbin case or bobbin compartment. Refer to your sewing machine manual for specific instructions on inserting the bobbin. Ensure the bobbin rotates counterclockwise when you pull the thread. This ensures proper tension and smooth stitching.
Step 6: Thread the Bobbin Case – Guiding the Thread Home
Guiding the thread through the bobbin case is a critical step. Follow the threading path specified in your manual, usually passing the thread through tension discs and a channel. Hearing the subtle clicks as the thread finds its way home in the bobbin case is a reassuring sign that your machine is gearing up for seamless stitching.
Step 7: Insert the Bobbin Case – A Perfect Fit
Insert the threaded bobbin case into its designated spot in the sewing machine. Ensure it clicks securely into place. This step not only prepares your machine for stitching but also guarantees a perfect fit, allowing the upper and lower threads to work in harmony.
Step 8: Pull the Thread Through – Connecting the Threads
Once the bobbin case is securely in place, pull the thread through the channel until it reaches the top. This step is about creating a connection between the upper and lower threads, forming the foundation for the stitches that will soon adorn your fabric.
Step 9: Raise the Bobbin Thread – Ready to Sew
Before you start sewing, raise the bobbin thread to the surface. Hold the upper thread with your left hand and turn the handwheel toward you with your right hand. As the needle descends and then rises, it will catch the bobbin thread. Pull both threads toward the back of the machine, leaving them ready for action.
Step 10: Test Your Stitches – A Prelude to Creativity
Before you dive into your actual sewing project, take a moment to test your stitches on a scrap piece of fabric. This step is not just about ensuring the technical aspects are in order but also a prelude to the creativity that will unfold as you bring your sewing vision to life.
Step 11: Troubleshoot Tension Issues – Fine-Tuning for Perfection
If you notice tension issues or uneven stitches during your test, it’s time to troubleshoot. Check that the bobbin is inserted correctly, the thread is properly guided through the tension discs, and there are no tangles. Fine-tune the tension settings if necessary, ensuring a smooth and professional finish to your stitches.
Step 12: Celebrate Your Setup – The Beginning of Sewing Magic
With the bobbin securely in place, the upper thread threaded, and the machine tested, celebrate your setup. Every successful insertion of the bobbin is a milestone in your sewing journey. It’s the beginning of the sewing magic that transforms fabric into personalized creations.
Mastering the Art of the Bobbin
In summary, “How To Put A Bobbin In A Sewing Machine” is a guide, infused with the essence of simplicity and creativity, invites you to master the art of the bobbin. From the anticipation of winding the bobbin to the satisfaction of testing your stitches, each step contributes to the symphony of sewing.
As you embark on your sewing ventures, may every bobbin insertion be a moment of pride, signaling the start of a journey filled with stitches that tell your unique story.
How To Load A Top Loading Bobbin Sewing Machine
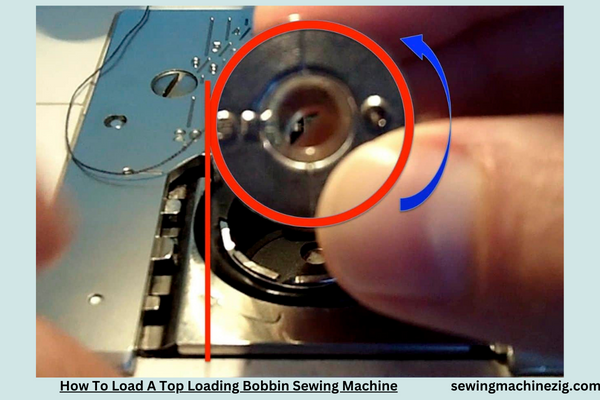
Embarking on a sewing project with a top-loading bobbin sewing machine marks the beginning of a creative journey. Loading the bobbin correctly is a fundamental step in ensuring smooth and beautiful stitches.
In this comprehensive guide, we’ll delve into the intricacies of loading a top-loading bobbin, making the process both attractive and uniquely accessible to beginners and experienced sewists alike.
Step 1: Appreciate the Simplicity – The Heartbeat of Stitching
Before delving into the details, take a moment to appreciate the simplicity of the top-loading bobbin system. This design, often characterized by its user-friendly features, streamlines the bobbin-loading process. Understanding its mechanism is the first step to mastering the art of stitching with ease.
Step 2: Gather Your Supplies – A Sewing Adventure Begins
Prepare for your sewing adventure by gathering the necessary supplies. Alongside your top-loading bobbin sewing machine, you’ll need a suitable bobbin, matching thread, and your chosen fabric. This moment of preparation sets the stage for a seamless and enjoyable sewing experience.
Step 3: Identify Your Bobbin Type – Variety in Unity
Not all bobbins are created equal, and top-loading machines may have specific requirements. Identify the type of bobbin your machine uses. The most common types include plastic or metal bobbins. Check your sewing machine manual or inspect the bobbin compartment to determine the correct type.
Step 4: Wind the Bobbin – A Prelude to Stitching
Before loading the bobbin, it needs to be wound with thread. Choose a thread color that complements your fabric, and follow the threading path specified in your machine manual. Engage the winding mechanism and listen to the hum as the bobbin fills with thread. This is a prelude to the stitching symphony about to unfold.
Step 5: Open the Bobbin Compartment – Access to the Heart
Locate the bobbin compartment on your top-loading sewing machine. This compartment is often easily accessible on the front or side of the machine. Open it with care, revealing the heart of your sewing machine – the bobbin area. Treat this moment with the reverence it deserves, as you’re about to introduce the powerhouse of stitches.
Step 6: Insert the Wound Bobbin – A Perfect Fit
With the bobbin compartment open, it’s time to insert the wound bobbin. Hold the bobbin so that the thread unwinds counterclockwise, following the arrow or guide in the bobbin case. Slide the bobbin into its designated spot until it clicks securely into place. This step ensures a perfect fit, allowing the thread to flow smoothly during stitching.
Step 7: Guide the Thread into the Bobbin Slot – Thread Path Magic
Once the bobbin is in place, guide the thread into the bobbin slot or tension guide. Follow the threading path illustrated in your sewing machine manual. This magical path ensures proper tension and smooth delivery of thread from the bobbin during stitching.
Step 8: Pull the Thread Through the Bobbin Case – Connection Established
With the thread guided into the bobbin slot, pull it through the bobbin case until it reaches the top. This step establishes the connection between the upper and lower threads, setting the stage for the synchronized dance of stitches that will adorn your fabric.
Step 9: Close the Bobbin Compartment – Securing the Heart
Once the thread is properly guided, close the bobbin compartment, securing the heart of your sewing machine. Take a moment to ensure that everything is in place and that the bobbin is correctly seated. This step is akin to closing the doors to a treasure chest, ready to unveil the riches of beautifully stitched creations.
Step 10: Raise the Bobbin Thread – Preparing for Sewing
Before you start sewing, raise the bobbin thread to the surface. Hold the upper thread with your left hand, and turn the handwheel toward you with your right hand. As the needle descends and then rises, it will catch the bobbin thread. Pull both threads toward the back of the machine, leaving them ready for action.
Step 11: Test Your Stitches – A Prelude to Creativity
Before diving into your actual sewing project, take a moment to test your stitches on a scrap piece of fabric. This step is not just about ensuring the technical aspects are in order but also a prelude to the creativity that will unfold as you bring your sewing vision to life.
Step 12: Troubleshoot Tension Issues – Fine-Tuning for Perfection
If you notice tension issues or uneven stitches during your test, it’s time to troubleshoot. Check that the bobbin is inserted correctly, the thread is properly guided through the tension discs, and there are no tangles. Fine-tune the tension settings if necessary, ensuring a smooth and professional finish to your stitches.
The Artistry of Top-Loading Bobbins
In summary, loading a top-loading bobbin in your sewing machine is not just a technical step; it’s an art form. This guide, infused with the essence of simplicity and creativity, invites you to master the art of the top-loading bobbin.
From appreciating its design to securing it in place and testing stitches, each step contributes to the symphony of sewing. As you embark on your sewing ventures, may every bobbin loading be a moment of pride, signaling the start of a journey filled with stitches that tell your unique story.
Singer Simple 3337 6 Inserting A Bobbin
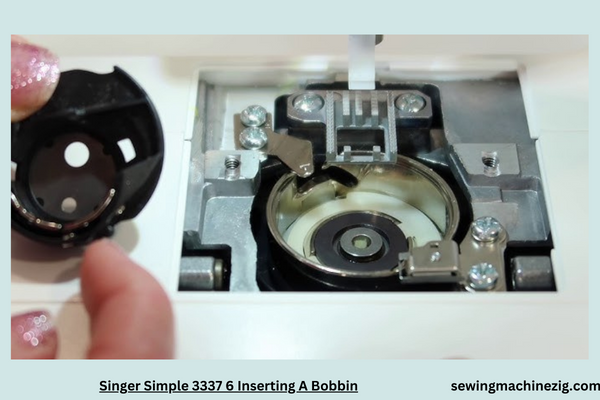
Embarking on a sewing journey with the Singer Simple 3337 is an exciting endeavor, and understanding how to correctly insert a bobbin is the key to unlocking the full potential of this user-friendly machine.
In this detailed guide, we’ll unravel the process of inserting a bobbin into the Singer Simple 3337, making it both attractive and uniquely accessible to users of all skill levels.
Step 1: Welcome to the Singer Simple 3337 – Your Partner in Creativity
Before delving into the details of bobbin insertion, take a moment to welcome the Singer Simple 3337 as your partner in creativity. This sewing machine, known for its user-friendly features and versatility, is designed to make your sewing projects a joyous experience. Understanding its components and mechanisms sets the stage for a seamless sewing adventure.
Step 2: Gather Your Supplies – A Symphony of Sewing Awaits
Prepare for your sewing symphony by gathering the necessary supplies. Alongside the Singer Simple 3337, you’ll need the appropriate bobbin for your machine, matching thread, and your chosen fabric. This moment of preparation is akin to tuning your instruments before a musical performance, ensuring a harmonious sewing experience.
Step 3: Identify the Bobbin Type – Variety in Compatibility
The Singer Simple 3337 is designed to work with Class 15 transparent bobbins. Identify the correct bobbin type for your machine by consulting the user manual or checking the markings on the bobbin case. This compatibility ensures optimal performance and stitch quality.
Step 4: Wind the Bobbin – Setting the Stage
Before inserting the bobbin, it needs to be wound with thread. Follow the threading path illustrated in your Singer Simple 3337 manual, engage the bobbin winding mechanism, and listen to the soothing hum as the bobbin fills with thread. This step sets the stage for a seamless stitching performance.
Step 5: Open the Bobbin Cover – Unveiling the Heart
Locate the bobbin cover on the Singer Simple 3337, usually situated on the front or side of the machine. Gently open the cover, unveiling the heart of your sewing machine – the bobbin area. Treat this moment with the anticipation it deserves, as you’re about to introduce the powerhouse of stitches.
Step 6: Insert the Wound Bobbin – Precision in Placement
With the bobbin cover open, it’s time to insert the wound bobbin into the bobbin case. Hold the bobbin so that the thread unwinds counterclockwise, following the arrow or guide in the bobbin case. Slide the bobbin into its designated spot until it clicks securely into place. This step ensures precision in bobbin placement, allowing for smooth thread delivery.
Step 7: Guide the Thread into the Bobbin Slot – Thread Path Magic
Once the bobbin is in place, guide the thread into the bobbin slot or tension guide. Follow the threading path illustrated in your Singer Simple 3337 manual, ensuring the thread is properly seated in the tension discs. This magical path guarantees proper tension and the smooth delivery of thread during stitching.
Step 8: Pull the Thread Through – Connection Established
With the thread guided into the bobbin slot, pull it through the tension guide until it reaches the top. This step establishes the connection between the upper and lower threads, setting the stage for the synchronized dance of stitches that will adorn your fabric.
Step 9: Close the Bobbin Cover – Securing the Heart
Once the thread is properly guided, close the bobbin cover, securing the heart of your Singer Simple 3337. Take a moment to ensure that everything is in place and that the bobbin is correctly seated. This step is akin to closing the doors to a treasure chest, ready to unveil the riches of beautifully stitched creations.
Step 10: Raise the Bobbin Thread – Preparing for Sewing
Before you start sewing, raise the bobbin thread to the surface. Hold the upper thread with your left hand, and turn the handwheel toward you with your right hand. As the needle descends and then rises, it will catch the bobbin thread. Pull both threads toward the back of the machine, leaving them ready for action.
Step 11: Test Your Stitches – A Prelude to Creativity
Before diving into your actual sewing project, take a moment to test your stitches on a scrap piece of fabric. This step is not just about ensuring the technical aspects are in order but also a prelude to the creativity that will unfold as you bring your sewing vision to life.
Step 12: Troubleshoot Tension Issues – Fine-Tuning for Perfection
If you notice tension issues or uneven stitches during your test, it’s time to troubleshoot. Check that the bobbin is inserted correctly, the thread is properly guided through the tension discs, and there are no tangles. Fine-tune the tension settings if necessary, ensuring a smooth and professional finish to your stitches.
A Harmonious Sewing Experience
In, inserting a bobbin into the Singer Simple 3337 is not just a technical step; it’s a harmonious part of your sewing experience. This guide, infused with the essence of simplicity and creativity, invites you to master the art of bobbin insertion. From appreciating the machine’s design to securing the bobbin in place and testing stitches, each step contributes to the symphony of sewing.
As you embark on your sewing ventures with the Singer Simple 3337, may every bobbin insertion be a moment of pride, signaling the start of a journey filled with stitches that tell your unique story.
Conclusion
In conclusion, mastering How To Put A Bobbin In A Sewing Machine is a fundamental skill that propels your sewing endeavors. This simple yet crucial step, when executed with precision, ensures the smooth interplay of upper and lower threads, laying the foundation for impeccable stitches.
As you confidently place the bobbin in its designated spot, your sewing machine transforms into a reliable partner, ready to bring your creative visions to life. Embrace the art of bobbin placement, and let each stitch tell a story of craftsmanship and precision. “How To Put A Bobbin In A Sewing Machine“
FAQs: How To Put A Bobbin In A Sewing Machine
Q1: How do I put a bobbin in a sewing machine?
A1: To insert a bobbin, first, ensure your machine is threaded correctly. Place the filled bobbin on the bobbin winder spindle, disengage the clutch, wind thread around the bobbin, secure it in place, and engage the clutch again. “How To Put A Bobbin In A Sewing Machine“
Q2: Can I use any bobbin in my sewing machine, or does it require a specific type?
A2: Sewing machines often require a specific bobbin type. Refer to your machine’s manual to determine the correct size and style of bobbin for optimal performance. “How To Put A Bobbin In A Sewing Machine“
Q3: How do I know if the bobbin is correctly inserted into the sewing machine?
A3: After inserting the bobbin, pull the thread. The bobbin should rotate counterclockwise when properly placed. Consult your machine’s manual for a visual guide on correct insertion. “How To Put A Bobbin In A Sewing Machine“
Q4: Should I wind a bobbin with the same thread as the top thread?
A4: It’s recommended to use the same thread in the bobbin as the one used for the top thread. This promotes even tension and ensures consistent stitching. “How To Put A Bobbin In A Sewing Machine“
Q5: Can I wind a bobbin without disengaging the sewing machine clutch?
A5: No, it’s crucial to disengage the clutch when winding a bobbin to prevent unnecessary wear on the machine’s gears. Refer to your manual for specific instructions. “How To Put A Bobbin In A Sewing Machine“
Q6: How much thread should I wind onto the bobbin?
A6: Wind enough thread onto the bobbin to accommodate your sewing project. Avoid overfilling, as it may cause tension issues. Refer to your manual for recommended bobbin capacity. “How To Put A Bobbin In A Sewing Machine“

