Bringing new life to an antique Singer sewing machine is a rewarding endeavor for both collectors and sewing enthusiasts. These timeless relics hold a unique charm and history that’s worth preserving. Restoring an antique Singer sewing machine requires a delicate touch and a passion for craftsmanship.
In this comprehensive guide, How To Restore Antique Singer Sewing Machine, We’ll explore the intricate steps involved in restoring these vintage gems. From cleaning and oiling to refurbishing the exterior, we’ll provide you with the expertise and knowledge needed to breathe new life into your beloved antique Singer sewing machine, turning it into a functional and beautiful piece of history.
How To Restore Antique Singer Sewing Machine Detailed Answer
Restoring an antique Singer sewing machine is like breathing new life into a piece of history. These beautiful relics hold the charm of a bygone era, and with a little love and care, you can make them sing once again.
In this detailed step-by-step guide, we will walk you through the art of restoring an antique Singer sewing machine, enabling you to revive its former glory and unlock its sewing potential.
Step 1: Initial Assessment
Begin your restoration journey by carefully examining your antique Singer sewing machine. Take note of any visible damage, rust, missing parts, or wear and tear. This initial assessment will guide your restoration plan.
Step 2: Gather Your Tools and Materials
Before you start, ensure you have the necessary tools and materials at hand. These may include screwdrivers, pliers, sewing machine oil, cleaning brushes, rust removers, replacement parts, and more.
Step 3: Cleaning and Dusting
Start by gently cleaning the machine to remove accumulated dust, dirt, and grime. Use a soft brush and a mild cleaning solution to wipe down the exterior and accessible parts.
Step 4: Disassembly
To access and restore all the internal components, you’ll need to disassemble the sewing machine. Document the disassembly process with photographs, which will be invaluable during reassembly.
Step 5: Rust Removal
Address any rust issues by using a rust remover or a mixture of vinegar and baking soda. Be patient and thorough when removing rust, as it may have built up over the years.
Step 6: Cleaning the Parts
Clean all the parts individually using sewing machine oil and a soft cloth. Pay special attention to the moving parts, such as gears and levers, and ensure they are well-lubricated for smooth operation.
Step 7: Belt Replacement
Inspect the drive belt, which may have deteriorated with time. Replace it with a new one to ensure the sewing machine’s functionality is restored.
Step 8: Reassembly
Reassemble the sewing machine carefully, using the photographs taken during disassembly as a reference. Verify that all parts are securely in place and properly aligned.
Step 9: Tension Adjustment
Adjust the tension settings to ensure the machine sews evenly and produces consistent stitches. Refer to your manual or consult a sewing machine technician for guidance.
Step 10: Test Sewing
Before you embark on actual sewing projects, practice sewing on scrap fabric to become familiar with the machine’s behavior and ensure it’s functioning correctly.
Step 11: Cabinet Restoration (If Applicable)
If your antique Singer sewing machine is housed in a cabinet, consider restoring the cabinet as well. Sand, refinish, or paint it as needed to complete the restoration.
Step 12: Ongoing Maintenance
To preserve your restored antique Singer sewing machine, establish a regular maintenance routine. Clean and oil it as recommended, and keep it covered when not in use to prevent dust and dirt accumulation.
Step 13: Showpiece or Workhorse
After a successful restoration, your antique Singer sewing machine can serve as both a functional workhorse for sewing projects and a cherished showpiece in your home. It not only brings history to life but also showcases its timeless beauty and craftsmanship.
Restoring an antique Singer sewing machine is a journey that requires patience and attention to detail. By following this step-by-step guide, How To Restore Antique Singer Sewing Machine, You can breathe new life into a vintage gem, celebrating the artistry and craftsmanship of a bygone era while also enjoying its practical sewing capabilities.
How Do You Clean An Antique Sewing Machine?
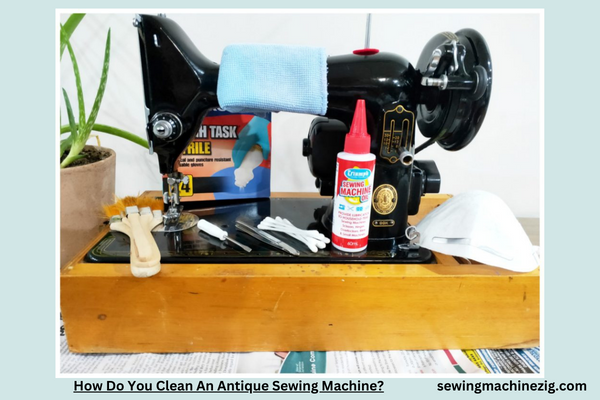
Antique sewing machines are not just functional tools; they are also pieces of history and, often, works of art. How To Restore Antique Singer Sewing Machine requires a delicate touch to preserve its beauty and ensure it continues to sew gracefully. In this comprehensive step-by-step guide, we will walk you through the process of How To Restore Antique Singer Sewing Machine while emphasizing the importance of maintaining its authenticity and charm.
Step 1: Gather Your Supplies
Before you begin How To Restore Antique Singer Sewing Machine, assemble the necessary supplies:
- Soft lint-free cloths
- A soft-bristle brush
- Sewing machine oil
- Toothbrush
- Q-tips
- A small screwdriver set
- A can of compressed air
- Mild dish soap
- Warm water
- Distilled white vinegar
- Metal polish (optional)
- Metal protectant (optional)
Step 2: Preparation and Safety
Ensure your workspace is clean and well-lit. Lay a soft cloth or towel on your work surface to protect the machine’s finish. Also, unplug or remove any electrical components, such as the foot pedal, to avoid accidents.
Step 3: Dusting and Debris Removal
Begin by using a soft-bristle brush and a can of compressed air to gently remove loose dust and debris from the exterior and interior of the machine. Pay attention to crevices, nooks, and crannies, as they tend to accumulate dirt over time.
Step 4: Dismantling (if necessary)
Depending on the complexity of your antique sewing machine, you may need to partially dismantle it for thorough cleaning. Consult your machine’s manual or seek guidance from experts to ensure you dismantle it correctly.
Step 5: Cleaning the Exterior
Dip a soft cloth in warm soapy water (using mild dish soap) and wring it out until it’s just damp. Wipe down the exterior of the sewing machine, including the cabinet or case. Avoid using excessive water, as it may damage the finish.
Step 6: Cleaning the Metal Parts
For brass or metal parts, dampen a cloth with a mixture of warm water and distilled white vinegar (equal parts). Gently clean the metal surfaces, being careful not to scrub too hard, as it can damage the patina.
Step 7: Cleaning the Interior
Use a toothbrush, Q-tips, and a soft cloth to clean the interior components, removing any built-up dirt, oil residue, or old grease. Apply sewing machine oil sparingly to lubricate moving parts, following the manufacturer’s recommendations in your sewing machine’s manual.
Step 8: Removing Rust (if necessary)
If you encounter rust on metal parts, use a mixture of baking soda and water to create a paste. Apply the paste to the rusted areas and gently scrub with a soft cloth or toothbrush. Rinse and dry thoroughly. For stubborn rust, consider a rust remover product.
Step 9: Polishing and Protecting (optional)
For a shiny finish, you can use a metal polish on any metal parts, but be sure to use it sparingly. Follow up with a metal protectant to maintain the shine and protect against future tarnish.
Step 10: Reassembly
Carefully reassemble your antique sewing machine, ensuring that all parts are securely in place and properly aligned. Take your time and double-check your work to prevent any accidental damage during reassembly.
Step 11: Ongoing Maintenance
To keep your antique sewing machine in top condition, establish a regular maintenance routine. Wipe it down with a clean cloth, oil the moving parts as needed, and protect it from dust when not in use.
How To Restore Antique Singer Sewing Machine is a labor of love that requires patience and attention to detail. By following this step-by-step guide, you can bring new life to your vintage treasure while preserving its authenticity and charm. Remember that each antique sewing machine is unique, and the cleaning process may vary, so always prioritize gentle care and maintenance to ensure your timeless piece continues to sew gracefully.
What Can I Do With An Old Antique Sewing Machine?
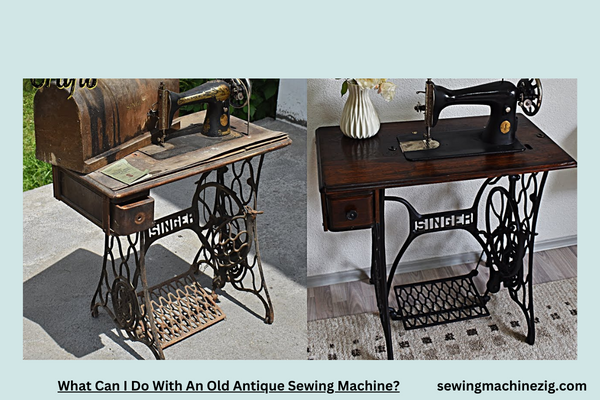
How To Restore Antique Singer Sewing Machine is a valuable endeavor that can breathe new life into these timeless pieces of history. Old antique sewing machines are not just relics of the past; they can be charming and functional pieces with a world of creative potential.
In this comprehensive guide, we will explore the various possibilities and projects you can undertake with an old antique sewing machine while emphasizing the importance of restoration and maintenance to keep these vintage treasures alive.
Step 1: Restoration and Maintenance
Before diving into creative projects, it’s essential to ensure that your antique Singer sewing machine is in good working condition. To bring it back to life, perform the necessary restoration and maintenance tasks:
- Clean out dust and debris that may have accumulated over the years.
- Inspect and replace any worn-out or damaged parts.
- Thoroughly oil the machine to make it operational, following the manufacturer’s recommendations for oiling and maintenance.
Step 2: Decorative Display
Antique Singer sewing machines often feature intricate and ornate designs, making them ideal for decorative purposes. After restoring and maintaining your machine, consider using it as a charming centerpiece in your home decor. It can be a conversation starter in your living room, foyer, or crafting space, adding a touch of vintage elegance to your surroundings.
Step 3: Functional Sewing
While antique sewing machines may not be as technologically advanced as modern ones, they are still capable of basic sewing tasks. Use them for repairs, alterations, or simple sewing projects. Antique Singer machines are excellent for creating a vintage touch in your sewing endeavors, combining functionality with a touch of nostalgia.
Step 4: Vintage Fashion
Antique Singer sewing machines can inspire your fashion creations. Explore vintage and historical sewing patterns to make clothing with a timeless appeal. Whether it’s a Victorian-style dress or a 1920s flapper costume, your restored antique Singer sewing machine can help you achieve an authentic look, bridging the gap between past and present fashion.
Step 5: Upholstery and Home Decor
Revamp your home with custom upholstery projects using your antique Singer sewing machine. These machines are well-suited for sewing or repairing curtains, pillow covers, tablecloths, and upholstery for chairs and sofas. The vintage charm of your Singer machine can add a unique touch to your decor, seamlessly blending the old with the new.
Step 6: Quilting and Patchwork
Old Singer sewing machines with a strong, straight stitch are excellent for quilting and patchwork. After restoring your machine, create stunning quilts or patchwork blankets with a touch of nostalgia. Your antique Singer machine’s durability can handle multiple layers of fabric, ensuring that your quilting projects are a testament to both history and artistry.
Step 7: Repurposing and Upcycling
Give new life to old items with repurposing and upcycling projects. Restored antique Singer sewing machines can be used to transform old clothing into trendy, upcycled fashion pieces or to repurpose vintage materials into unique accessories. The craftsmanship and precision of these machines can breathe new life into worn-out items.
Step 8: Vintage Crafts
Explore vintage-inspired crafts like lace-making, heirloom embroidery, or intricate needlework with your antique Singer sewing machine. It can help you create beautiful handcrafted items that capture the essence of a bygone era. After restoration, these machines can be instrumental in preserving and continuing traditional crafting techniques.
Step 9: Educational Tool
Pass down the art of sewing and instill an appreciation for craftsmanship in younger family members or students by teaching sewing skills using an antique Singer sewing machine. These machines provide a hands-on educational experience that connects the past with the present, fostering a deeper understanding of sewing history and techniques.
Step 10: Restoration for Collectors
If you have multiple antique Singer sewing machines or are passionate about restoration, consider restoring old machines to their former glory. Showcase your collection or sell them to collectors who appreciate the art of antique Singer sewing machines. Restoration not only preserves these valuable machines but also adds to their historical significance.
An old antique Singer sewing machine is not just a relic; it’s a gateway to creativity, craftsmanship, and history. By restoring, maintaining, and repurposing these beautiful pieces, you can breathe new life into the past and continue their legacy for generations to come. What can I do with an old antique sewing machine? The possibilities are as boundless as your imagination, and How To Restore Antique Singer Sewing Machine is the first step to unlocking its potential.
Conclusion
In conclusion, the art of How To Restore Antique Singer Sewing Machine not only brings new life to these timeless relics but also preserves a piece of sewing history. Restoring and maintaining these machines is a labor of love that requires patience, skill, and attention to detail.
By following our comprehensive guide and emphasizing the importance of maintaining authenticity and charm, you can ensure that these vintage treasures continue to sew gracefully and inspire generations to come. Restoring antique Singer sewing machines is not just a hobby; it’s a dedication to craftsmanship and preserving the past.
FAQS
Q1: Why should I consider restoring my antique Singer sewing machine?
A1: Restoring your antique Singer sewing machine not only preserves its historical value but also ensures it continues to sew gracefully, allowing you to use it for various sewing projects.”How To Restore Antique Singer Sewing Machine“
Q2: Is it possible to restore an antique Singer sewing machine without professional help?
A2: Yes, many sewing enthusiasts restore antique Singer machines as DIY projects. By following comprehensive guides and tutorials, you can learn to restore and maintain these beautiful machines.
Q3: What are the essential steps to restore an antique Singer sewing machine?
A3: The key steps include cleaning out dust and debris, oiling the machine, replacing worn-out parts, and ensuring that it is in good working condition.
Q4: How can I maintain the authenticity and charm of my antique Singer sewing machine during restoration?
A4: To maintain authenticity, avoid over-polishing or altering the original design. Preserve any unique features and decorative elements that make your machine special.”How To Restore Antique Singer Sewing Machine“
Q5: Can a restored antique Singer sewing machine still be functional for sewing projects?
A5: Yes, after restoration, your Singer machine can be fully functional and used for sewing, alterations, and various creative projects.
Q6: What can I do with a restored antique Singer sewing machine once the restoration is complete?
A6: You can use it for functional sewing tasks, display it as a decorative piece, or even sell it to collectors who appreciate the art and history of antique Singer sewing machines.

