Embarking on a DIY journey to service your sewing machine can be a rewarding endeavor, adding a touch of self-sufficiency to your crafting repertoire. Delving into the intricacies of machine maintenance unveils a world of possibilities,
but where does one begin? In this guide, we will navigate the terrain of “How To Service Your Sewing Machine Yourself,” demystifying the process and empowering you to take charge of the well-being of your trusty stitching companion. Get ready to unravel the secrets of self-service and stitch your way to a smoothly operating sewing machine.
How To Service Your Sewing Machine Yourself Detailed Answer
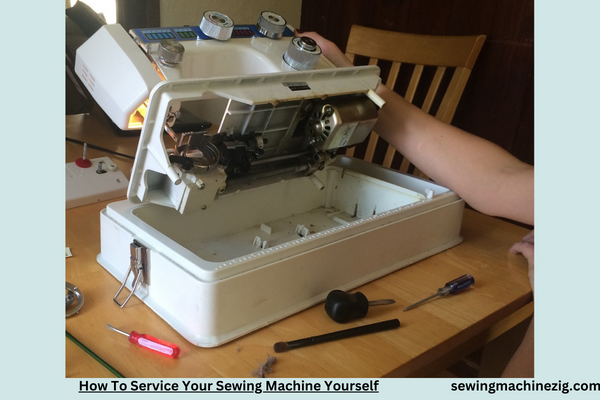
Embarking on the journey of servicing your sewing machine can be a rewarding and empowering experience, ensuring your trusty stitching companion operates smoothly for countless projects. By taking charge of the maintenance process, you not only extend the lifespan of your machine but also gain valuable insights into its intricate workings.
In this step-by-step guide,”How To Service Your Sewing Machine Yourself,” we will delve into the details of “How To Service Your Sewing Machine Yourself,” demystifying the process and empowering you to become your machine’s own mechanic.
Step 1: Gather Your Tools and Materials
Before diving into the service, gather the essential tools and materials. You’ll need a small screwdriver set, lint brush or compressed air, sewing machine oil, a soft cloth, and your sewing machine’s manual. Having all necessary items at hand ensures a smooth and efficient service.
Step 2: Start with Safety First
Begin by ensuring your sewing machine is unplugged to avoid any accidental starts. This step is crucial for your safety as well as for preventing any damage to the machine during the servicing process. Take a moment to review the manufacturer’s safety guidelines in your manual before proceeding.
Step 3: Clean the Exterior
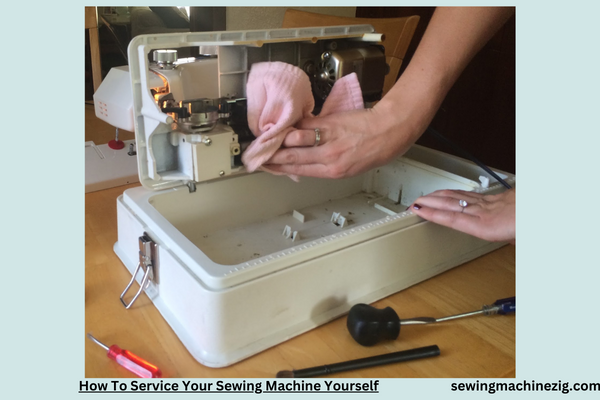
Use a soft cloth to wipe down the exterior of your sewing machine. This simple step not only enhances the machine’s appearance but also prevents dust and debris from entering internal components during the service. Pay attention to areas around buttons, dials, and the thread tension assembly.
Step 4: Remove Dust and Debris
Dust and lint can accumulate inside the machine, affecting its performance. Gently remove the machine’s throat plate and bobbin case to access these areas. Utilize a lint brush or compressed air to carefully remove accumulated lint. Be thorough but gentle to avoid causing any damage to the delicate components.
Tip: Refer to your sewing machine’s manual for specific instructions on removing and cleaning these parts.
Step 5: Oil Moving Parts
Proper lubrication is essential for the smooth operation of your sewing machine. Identify the points specified in your manual for oiling, typically indicated by red or yellow markings. Use only sewing machine oil, as other oils may damage the machine. Apply a small drop of oil to each designated point, ensuring you don’t over-lubricate.
Note: Some modern machines have self-lubricating components, so check your manual for specific instructions.
Step 6: Check and Adjust Tension
Proper thread tension is crucial for achieving high-quality stitches. Consult your manual for guidance on checking and adjusting the tension settings. Test the tension by sewing on a scrap piece of fabric, making adjustments as needed. Ensure both the upper and lower thread tensions are appropriately balanced for optimal results.
Step 7: Examine the Needle
A dull or bent needle can result in uneven stitches or even damage to your fabric. Check the needle for any signs of wear, and replace it if necessary. Ensure the needle is correctly inserted according to your machine’s manual, and make sure it is securely tightened.
Step 8: Align the Needle Position
Some sewing machines allow you to adjust the needle position. Check your manual for instructions on aligning the needle, especially if you’ve been experiencing issues with stitch alignment or if you’ve changed your needle recently. Proper alignment ensures precise stitching.
Step 9: Calibrate the Feed Dogs
The feed dogs are responsible for moving the fabric through the machine. If they become misaligned or covered in lint, it can affect the feeding mechanism. Consult your manual for instructions on accessing and cleaning the feed dogs, ensuring they move freely.
Step 10: Test Stitching on Scrap Fabric
After completing the servicing steps, test your machine on a scrap piece of fabric to ensure all adjustments have been successful. Pay attention to the stitching quality, tension, and overall performance. Make additional adjustments if necessary.
Step 11: Refer to Advanced Maintenance in Your Manual
Some sewing machines have additional features and maintenance steps that may require periodic attention. Consult your manual for advanced maintenance guidelines, such as belt adjustments, gear inspections, or other specific tasks unique to your machine model.
The Reward of DIY Sewing Machine Service
Servicing your sewing machine yourself not only saves you money on professional maintenance but also deepens your understanding of your machine’s intricacies.
By following these detailed steps, “How To Service Your Sewing Machine Yourself,” you’ve taken a proactive approach to ensure your sewing machine remains a reliable partner in your creative endeavors. Remember to perform regular check-ups and maintenance to keep your machine in optimal condition, ready to bring your sewing projects to life with precision and ease.
How To Do Basic Sewing Machine Maintenance
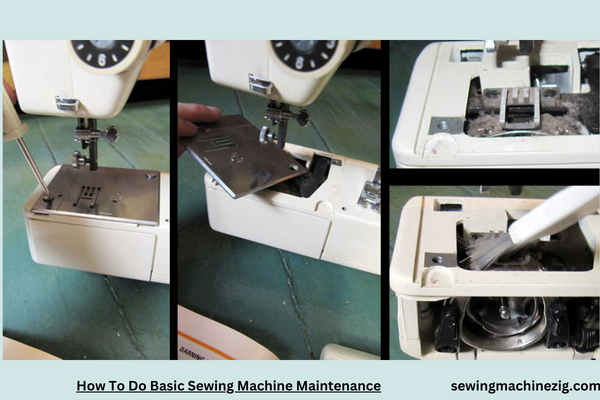
Maintaining a well-functioning sewing machine is essential for seamstresses looking to embark on a myriad of creative projects. Basic sewing machine maintenance ensures that your trusty apparatus operates smoothly, producing impeccable stitches with each use.
In this detailed step-by-step guide, we will explore the intricacies of “How To Do Basic Sewing Machine Maintenance,” empowering you to keep your sewing companion in optimal condition for years to come.
Step 1: Gather Your Maintenance Tools
Before diving into the maintenance process, gather essential tools to facilitate a seamless experience. You will need a small screwdriver, lint brush or compressed air, sewing machine oil, a soft cloth, and your sewing machine’s manual. Having these items within reach will ensure a smooth and efficient maintenance routine.
Step 2: Power Off and Unplug Your Sewing Machine
Safety should always be the priority. Start by turning off your sewing machine and unplugging it from the power source. This precautionary measure prevents accidental starts and ensures a safe environment for conducting maintenance tasks.
Step 3: Clean the Exterior
Begin by wiping down the exterior of your sewing machine using a soft cloth. This not only enhances the machine’s aesthetics but also prevents dust and debris from finding their way into internal components. Pay close attention to buttons, dials, and the thread tension assembly, cleaning these areas meticulously.
Step 4: Remove Dust and Lint Buildup
Dust and lint can accumulate in crucial parts of the machine, affecting its performance. Carefully remove the throat plate and bobbin case to access these areas. Employ a lint brush or compressed air to gently dislodge and remove accumulated lint. Refer to your machine’s manual for specific instructions on removing and cleaning these parts.
Step 5: Oil Moving Parts
Proper lubrication is vital for the smooth operation of your sewing machine. Consult your manual to identify the points requiring oiling, typically marked in red or yellow. Using sewing machine oil, apply a small drop to each designated point, ensuring not to over-lubricate. This step promotes the longevity of moving parts.
Step 6: Check and Adjust Tension Settings
Proper thread tension is crucial for achieving high-quality stitches. Consult your manual for guidance on checking and adjusting the tension settings. Sew a test piece to evaluate the tension, making adjustments as necessary. Ensuring both upper and lower thread tensions are balanced is key to optimal stitching results.
Step 7: Inspect and Replace the Needle
A dull or bent needle can lead to uneven stitches and potential fabric damage. Examine the needle for signs of wear and replace it if needed. Ensure the needle is correctly inserted according to your machine’s manual, and tighten it securely.
Step 8: Align the Needle Position
Some sewing machines allow for needle position adjustment. Check your manual for instructions on aligning the needle, especially if you’ve encountered stitch misalignment or have recently changed the needle. Proper alignment guarantees precise stitching.
Step 9: Calibrate the Feed Dogs
The feed dogs play a crucial role in moving fabric through the machine. Misalignment or lint accumulation can hinder their function. Refer to your manual for instructions on accessing and cleaning the feed dogs, ensuring they move freely for optimal fabric feeding.
Step 10: Test Stitching on Scrap Fabric
After completing the maintenance steps, conduct a test on a scrap piece of fabric. This ensures that all adjustments made are successful. Pay attention to stitching quality, tension, and overall machine performance. Make additional adjustments if necessary.
Step 11: Review Your Manual for Additional Maintenance
Most sewing machines have specific features and maintenance steps unique to their models. Refer to your manual for advanced maintenance guidelines, including belt adjustments, gear inspections, or other machine-specific tasks. Regularly consulting your manual will help you stay on top of any required maintenance.
The Art of Maintaining Sewing Excellence
By following this comprehensive guide “How To Service Your Sewing Machine Yourself,“on basic sewing machine maintenance, you’ve empowered yourself to keep your sewing machine in prime condition.
Regular upkeep ensures a reliable and efficient machine, ready to bring your creative visions to life with precision and ease. Cultivate the habit of performing basic maintenance regularly, and your sewing machine will remain a steadfast partner in your crafting endeavors for years to come.
Conclusion
In conclusion,”How To Service Your Sewing Machine Yourself,” mastering the art of “How To Service Your Sewing Machine Yourself” is a rewarding endeavor that empowers you to maintain and prolong the life of your valuable equipment.
By following the comprehensive steps How To Service Your Sewing Machine Yourself,” and embracing a DIY approach, you not only save on professional servicing costs but also deepen your understanding of your sewing machine’s intricacies. With regular self-service, you ensure that your trusted companion continues to stitch seamlessly, fostering a sustainable and efficient sewing experience for your creative pursuits.
FAQs for “How To Service Your Sewing Machine Yourself”
Q1: Why is it important to service my sewing machine regularly?
A1: Regular servicing prevents issues like thread jams, ensures smooth operation, and prolongs the machine’s lifespan.
Q2: How often should I service my sewing machine?
A2: Aim for servicing every 6 to 12 months, but frequency depends on usage. Heavy usage may require more frequent checks.
Q3: Can I service my computerized sewing machine myself?
A3: Yes, with caution. Follow your machine’s manual, focusing on cleaning, oiling, and checking for any visible issues.
Q4: What tools do I need for a basic sewing machine service?
A4: Essential tools include screwdrivers, lint brushes, oil, and a soft cloth for cleaning. “How To Service Your Sewing Machine Yourself,“
Q5: How can I troubleshoot common sewing machine issues during servicing?
A5: Refer to your machine’s manual for guidance on issues like tension problems, needle jams, or unusual noises. “How To Service Your Sewing Machine Yourself,“
Q6: Is it necessary to oil my sewing machine during servicing?
A6: Yes, lubrication is crucial for preventing friction and ensuring smooth movement. Follow your manual for oiling points. “How To Service Your Sewing Machine Yourself,“

