Achieving perfect stitches on your Singer sewing machine relies heavily on one critical factor: setting the tension correctly. Whether you’re a sewing novice or a seasoned pro, understanding how to set the tension on a Singer sewing machine is essential for smooth, professional-looking results.
In this comprehensive guide, we’ll walk you through the process of adjusting the tension on your Singer sewing machine, How To Set Tension On Singer Sewing Machine, and ensure that you can effortlessly tailor it to the needs of your specific sewing project. Join us as we demystify the tension-setting process and empower you to create flawless stitches with confidence.
How To Set Tension On Singer Sewing Machine Detailed Answer
Adjusting the tension on your Singer sewing machine is a crucial skill that can make a world of difference in the quality of your stitches. Whether you’re new to sewing or a seasoned pro, understanding How To Set Tension On Singer Sewing Machine is essential for achieving professional and consistent results.
In this comprehensive step-by-step guide, we will walk you through the process of adjusting the tension on your Singer sewing machine, ensuring your stitches are just right for every project.
Step 1: Understand the Basics
Before diving into tension adjustment, it’s essential to understand the basics. The tension on a sewing machine refers to the balance between the upper thread and the lower (bobbin) thread. Proper tension results in evenly formed stitches, while improper tension can lead to problems like puckering, loose stitches, or thread breakage.
Step 2: Reference Your Manual
Consult your Singer sewing machine’s manual for specific guidance on tension settings. Different Singer models may have variations in tension adjustment, so it’s essential to have your manual handy for reference.
Step 3: Thread the Machine
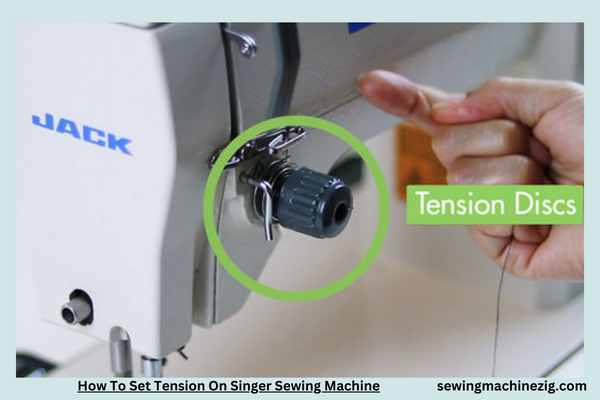
Start by threading your Singer sewing machine correctly. Proper threading is essential for achieving balanced tension. Follow the threading guide in your manual, ensuring the thread is securely placed in all necessary thread guides and tension disks.
Step 4: Set the Tension Dial
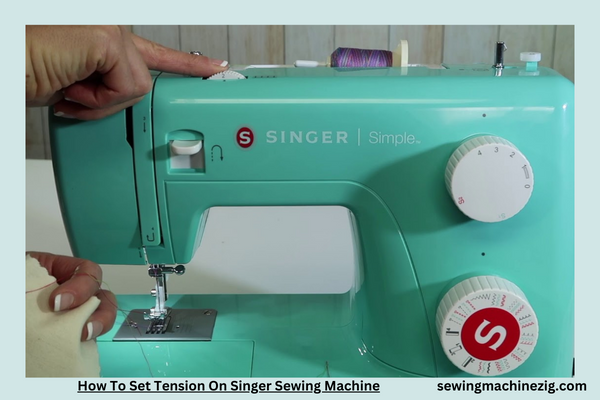
Locate the tension dial on your Singer sewing machine. The tension dial is typically located on the front or top of the machine, near the machine’s needle. Turn the dial to adjust the tension setting. Higher numbers increase the tension, while lower numbers decrease it.
Step 5: Test on Scrap Fabric
Before starting your actual sewing project, it’s advisable to test the tension settings on a piece of scrap fabric. This allows you to evaluate whether the stitches are balanced and determine if any further adjustments are needed.
Step 6: Balanced Tension
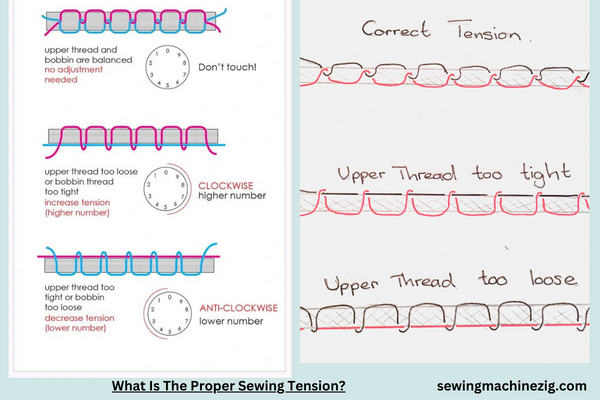
A balanced tension setting should result in stitches where the upper and lower threads meet at the midpoint of the fabric layers. When examining your stitches, look for the following signs:
- Loops on Top: If you see loops of the upper thread on the top side of the fabric, it indicates that the upper tension is too loose.
- Loops on Bottom: If you see loops of the bobbin thread on the bottom side of the fabric, it means the upper tension is too tight.
- Even Stitches: Balanced tension will produce even, consistent stitches on both sides of the fabric.
Step 7: Adjust as Needed
If you find that the stitches are not balanced, make small adjustments to the tension dial. Test the stitches on scrap fabric after each adjustment until you achieve the desired results.
Step 8: Record Your Settings
Once you have found the perfect tension setting for your project, make a note of it for future reference. This is especially useful if you frequently work with different fabrics and threads.
Step 9: Maintenance
Regularly clean and maintain your Singer sewing machine to ensure it functions correctly. Clean out lint, change the needle as needed, and oil the machine according to your manual’s recommendations.
Step 10: Troubleshooting
If you encounter persistent tension issues or if your sewing machine isn’t responding to adjustments, consult your manual for troubleshooting tips or seek assistance from a sewing machine technician.
Mastering the art of setting the tension on a Singer sewing machine is a fundamental skill for any sewist. By following this step-by-step guide and utilizing your machine’s manual, you can confidently adjust the tension to achieve perfect stitches, no matter the fabric or project you’re working on. So, now that you’ve learned How To Set Tension On Singer Sewing Machine, go ahead and make your sewing experience even more enjoyable and precise.
What Is The Proper Sewing Tension?
Proper sewing tension is essential for achieving high-quality and well-balanced stitches in your sewing projects. How To Set Tension On Singer Sewing Machine is a fundamental skill for any sewist.
Tension refers to the balance between the upper thread (the thread on top of the fabric) and the lower thread (from the bobbin below the fabric). When your sewing tension is set correctly, the stitches should appear uniform and even on both sides of the fabric.
Here’s how to determine and how to set tension on Singer sewing machine:
Check Your Sewing Machine Manual:
Start by consulting your sewing machine’s manual. Different machines may have specific recommendations for tension settings, so it’s essential to follow the manufacturer’s guidance.
Test on Scrap Fabric:
Before beginning your actual project, test the tension settings on a piece of scrap fabric. Use the same type of fabric and thread you plan to use in your project. This will help you fine-tune the tension and ensure it’s suitable for your specific materials.
Balanced Tension:
The goal is to achieve balanced tension. This means that the upper and lower threads meet in the middle of the fabric layers, and the stitches look the same on both sides. When checking your stitches, look for the following signs:
- Loops on Top: If you see loops of the upper thread on the top side of the fabric, it indicates that the upper tension is too loose.
- Loops on Bottom: If you see loops of the bobbin thread on the bottom side of the fabric, it means the upper tension is too tight.
- Even Stitches: Balanced tension will produce even, consistent stitches on both sides of the fabric.
Adjust the Tension Dial:
Most sewing machines have a tension dial that you can adjust. To correct tension issues, follow these guidelines:
- If the stitches are unbalanced with loops on top, increase the upper tension by turning the dial to a higher number.
- If the loops are on the bottom, decrease the upper tension by turning the dial to a lower number.
Bobbin Tension:
Don’t forget to check the bobbin tension. Some machines allow you to adjust the tension of the bobbin case. If your bobbin thread is too loose or too tight, it can affect the overall tension. Consult your manual for guidance on adjusting the bobbin tension.
Regular Maintenance:
To maintain proper sewing tension, it’s important to keep your sewing machine clean and well-maintained. Regularly clean out lint and debris, oil the machine as instructed in the manual, and change the needle when necessary.
Thread Quality:
The quality of your thread can also impact tension. Use good-quality thread suitable for your project, and make sure the thread is correctly threaded through the machine.
In conclusion, achieving proper sewing tension is a crucial skill for any sewist. By following these steps and practicing on scrap fabric, you can fine-tune your sewing machine’s tension to create high-quality, balanced stitches for all your sewing projects. Remember that it may take some trial and error to find the perfect tension settings, but with patience and practice, you’ll master this essential aspect of sewing.
Which Dial Is Tension On Sewing Machine?
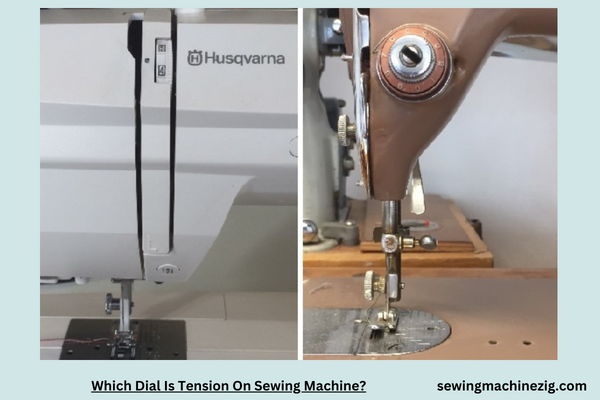
How to set tension on Singer sewing machine is a crucial skill for both beginners and experienced sewists. The sewing machine’s tension can sometimes be perplexing, but understanding which dial controls it is essential for achieving flawless stitches.
In this comprehensive guide, we will demystify sewing machine tension and provide clarity on the dial responsible for controlling it.
Step 1: Locate the Tension Dial
The tension dial on a sewing machine is a critical element that directly influences the quality of your stitches. You’ll typically find it positioned on the front or top of the sewing machine, in close proximity to the needle. The tension dial is often adorned with numbered settings or symbols, and it primarily governs the tension of the upper thread.
Step 2: What the Tension Dial Does
The tension dial holds the key to adjusting the tightness or looseness of the upper thread, a pivotal factor in achieving well-balanced stitches. Fine-tuning the tension dial empowers you to attain the desired stitch quality, adapting it to different fabrics and sewing techniques.
Step 3: Reading the Numbers
Most tension dials feature numerical markings. In some sewing machines, a higher number (e.g., 8 or 9) denotes increased tension, while a lower number (e.g., 2 or 3) signifies reduced tension. These numbers serve as your compass for navigating tension adjustments, tailored to the specifics of your sewing project.
Step 4: Adjusting Tension
To set the tension, you simply turn the dial to the appropriate number or symbol. If issues like loose or tight stitches arise during sewing, the tension can be fine-tuned by rotating the dial. Experimenting with different settings allows you to discover the perfect balance for your particular project.
Step 5: Tension for Different Fabrics
As you work with diverse fabrics, the ideal tension settings may vary. Lightweight fabrics such as chiffon or silk may demand reduced tension, while heavyweight materials like denim or canvas may necessitate increased tension. Through practice and experimentation, you’ll discern the right tension for each type of fabric.
Step 6: Tension for Special Techniques
Certain sewing techniques, like gathering or free-motion quilting, may require specific tension adjustments. Always refer to your sewing machine’s manual for precise recommendations when employing these techniques.
Step 7: Check Your Manual
Since sewing machine models can exhibit variations in design and tension dial labeling, your user manual is a valuable resource. It provides precise information on the location and settings of the tension dial for your particular machine.
Step 8: Practice and Experiment
Proficiency in setting the tension dial is honed through practice. Sewing on scrap fabric while experimenting with various tension settings is an effective way to develop the expertise needed to determine what works best for your projects.
Step 9: Monitor Stitch Quality
During sewing, it’s imperative to monitor the quality of your stitches. Properly balanced tension results in stitches where the upper and lower threads meet at the midpoint of the fabric layers. Keep an eye out for the following indicators:
- Loops on Top: Loops of the upper thread on the top side of the fabric suggest that the upper tension is too loose.
- Loops on Bottom: Loops of the bobbin thread on the underside of the fabric indicate that the upper tension is too tight.
- Even Stitches: Balanced tension yields even, consistent stitches on both sides of the fabric.
Step 10: Seek Assistance if Needed
In the event of persistent tension issues or uncertainty about your machine’s tension dial, don’t hesitate to seek assistance. Your local sewing machine dealer or a certified sewing machine technician can provide expert guidance and help troubleshoot any problems.
In conclusion, the tension dial on a sewing machine is a pivotal tool for achieving impeccable stitches. Acquiring the knowledge of how to set tension on Singer sewing machine grants you greater control over your sewing projects, elevating the quality of your stitching. Remember that practice, experimentation, and consulting your machine’s manual are your trusted companions on your journey to mastering the art of sewing machine tension.
Conclusion
In conclusion, understanding how to set tension on Singer sewing machine is a fundamental skill for any sewist. Achieving the perfect balance between upper and lower thread tension is essential for creating professional-quality and well-balanced stitches.
By following our step-by-step guide, How to set tension on Singer sewing machine. And practicing the art of tension adjustment, you can confidently fine-tune your Singer sewing machine to suit a variety of fabrics and projects. With patience and practice, you’ll master this crucial aspect of sewing, ensuring your creations are a testament to precision and craftsmanship.
FAQS
Q1: What is the purpose of adjusting the tension on a Singer sewing machine?
A1: Adjusting the tension on a Singer sewing machine is essential to achieve balanced stitches. It ensures that the upper and lower threads meet at the midpoint of the fabric layers, creating even and consistent stitches.”How To Set Tension On Singer Sewing Machine“
Q2: How can I tell if the tension on my Singer sewing machine needs adjustment?
A2: You may need to adjust the tension if you observe issues like loops on the top or bottom side of the fabric or uneven stitches. These signs indicate an imbalance in tension.
Q3: Where can I find the tension dial on my Singer sewing machine?
A3: The tension dial is typically located on the front or top of the machine, near the needle. It controls the upper thread tension.“How to set tension on Singer sewing machine“
Q4: Is it necessary to consult my Singer sewing machine’s manual for tension adjustment?
A4: Yes, it’s highly recommended to consult your machine’s manual. Different Singer models may have variations in tension adjustment, so following the manufacturer’s guidance is crucial.
Q5: Can I use the same tension settings for all types of fabrics?
A5: No, the ideal tension setting may vary with different fabrics. Lightweight fabrics may require lower tension, while heavy fabrics may need higher tension. It’s essential to adjust the tension according to your specific materials.
Q6: What should I do if I encounter persistent tension issues on my Singer sewing machine?
A6: If tension problems persist, consult your Singer sewing machine’s manual for troubleshooting tips. If the issue remains unresolved, seek assistance from a sewing machine technician or a local sewing machine dealer.

