In the vibrant tapestry of sewing, the choice of thread can be as diverse as the projects themselves. When it comes to larger spools, navigating their integration into the sewing machine becomes an essential skill. “How To Use Large Spools Of Thread On Sewing Machine” unfolds a chapter where practicality meets creativity.
Beyond the mechanical nuances, we’ll explore the intricacies of handling bulkier threads, ensuring not just efficient stitching but also a seamless fusion of function and artistic expression in every project undertaken with these sizable spools.
How To Use Large Spools Of Thread On Sewing Machine Detailed Answer

Using large spools of thread can be a game-changer in your sewing projects, offering extended stitching capacity and minimizing the need for frequent thread changes. “How To Use Large Spools of Thread on a Sewing Machine” involves a strategic approach to ensure smooth and hassle-free stitching.
Follow this detailed guide to make the most of large thread spools and optimize your sewing machine’s performance.
Step 1: Assess Your Sewing Machine Compatibility
Before diving into using large spools, check your sewing machine’s manual to confirm compatibility. Some machines may require additional accessories, such as a thread stand or a cone holder, to accommodate large spools.
Step 2: Gather Supplies
Collect the necessary supplies, including the large spool of thread, your sewing machine, and any additional accessories recommended by the machine’s manual. Ensure the thread is appropriate for your project.
Step 3: Set Up a Thread Stand
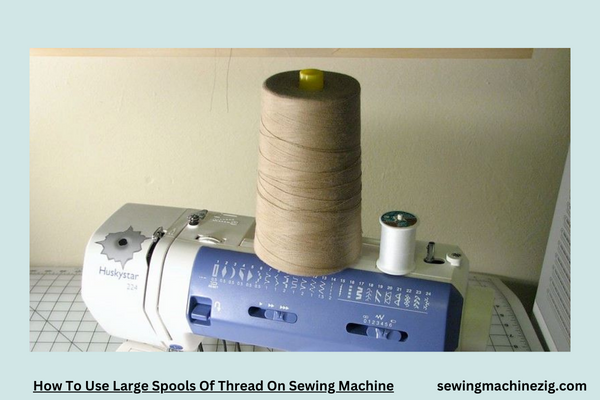
If your machine doesn’t have a built-in holder for large spools, consider using a thread stand. Place the stand behind or beside the machine and position the large spool securely on the stand’s spindle.
Step 4: Thread Path Adjustment
Adjust the thread path to accommodate the large spool. Guide the thread through the machine’s thread guides, tension discs, and any additional guides according to your machine’s manual.
Step 5: Tension Adjustment
Large spools of thread may exert more tension, affecting your stitching. Check and adjust the tension settings on your machine to accommodate the specific characteristics of the large thread spool. Test stitches on scrap fabric to ensure balanced tension.
Step 6: Use a Cone Holder
If your machine requires a cone holder for large spools, attach it as per the manual’s instructions. The cone holder provides stability and ensures the thread flows smoothly without tangling.
Step 7: Position the Spool Correctly
Place the large spool on the designated spindle or holder, ensuring it rotates freely. Correct positioning prevents thread snags and ensures consistent thread flow during sewing.
Step 8: Thread the Machine as Usual
Follow the standard threading procedure outlined in your machine’s manual. Pay attention to the specific threading path recommended for large spools, making any necessary adjustments to accommodate the increased thread size.
Step 9: Monitor Thread Tension
Throughout your sewing project, monitor the thread tension. Large spools may impact tension consistency. Make any adjustments as needed to maintain even stitches.
Step 10: Utilize Spool Caps
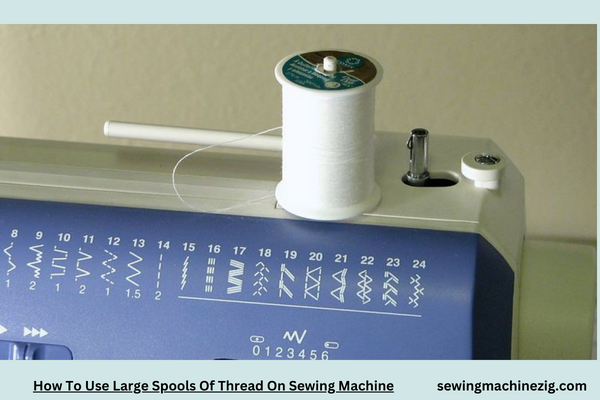
Some machines come with spool caps designed for large spools. Place these caps on the spool pin to prevent the thread from tangling or catching as it unwinds from the large spool.
Step 11: Secure Loose Ends
Large spools often have loose ends that can unravel. Use a thread net or create a small thread holder to secure the loose end and prevent it from tangling during sewing.
Step 12: Test Stitch on Scrap Fabric
Before starting your actual project, perform test stitches on scrap fabric to ensure the machine handles the large spool smoothly. Adjust settings as needed for optimal results.
Step 13: Store Large Spools Properly
When not in use, store large spools in a cool, dry place to prevent thread deterioration. Ensure they remain free from dust and direct sunlight.
Step 14: Troubleshoot as Needed
If you encounter any issues during sewing, consult your machine’s troubleshooting guide. Address problems promptly to maintain the quality of your stitches.
Step 15: Enjoy Uninterrupted Sewing
With the large spool properly set up and your machine adjusted accordingly, enjoy uninterrupted sewing sessions without the need for frequent thread changes.
By following these comprehensive steps, you’ll confidently navigate “How To Use Large Spools of Thread on a Sewing Machine.” Maximize the benefits of large spools, streamline your sewing process, and embark on projects with extended stitching capacity and efficiency.
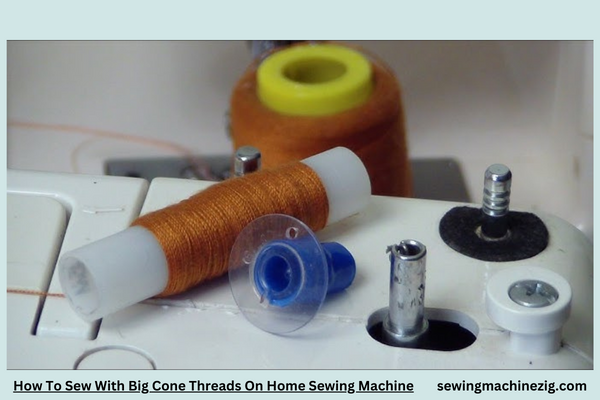
How To Sew With Big Cone Threads On Home Sewing Machine

Sewing with large cone threads on a home sewing machine might seem tricky, but with a few simple steps, you can master the process. Let’s explore “How To Use Large Spools Of Thread On Sewing Machine” in an easy-to-understand way.
Step 1: Check Compatibility:
Before diving in, ensure your home sewing machine is compatible with large cone threads. Some machines might require an additional thread stand for better support.
Step 2: Thread Stand Setup:
If needed, set up a thread stand to hold the large cone thread. This ensures a smooth and consistent thread flow, preventing tension issues during sewing.
Step 3: Tension Adjustment:
Large cone threads may require a slight adjustment in tension. Experiment with your machine’s tension settings to achieve the optimal balance for the specific thread you’re using.
Step 4: Thread Path Guidance:
Follow the machine’s threading path as outlined in the manual. Ensure the thread passes through all necessary guides, tension disks, and the needle bar. This is crucial for preventing thread snags and ensuring even stitches.
Step 5: Slow and Steady:
When starting a project with a large cone thread, sew at a slow and steady pace. This allows you to monitor the thread tension and catch any issues before they become significant.
Step 6: Bobbin Compatibility:
Check if your sewing machine’s bobbin is compatible with the large thread. Using a bobbin specifically designed for thicker threads ensures smoother stitching.
Step 7: Needle Selection:
Choose a needle suitable for the type of fabric you’re working with and the large cone thread. A needle with a larger eye accommodates thicker threads more effectively.
Step 8: Thread Guide Attachment:
Some home sewing machines come with additional thread guides for larger threads. If your machine has this feature, use it to enhance the thread’s stability and prevent tangling.
Step 9: Regular Maintenance:
Keep your sewing machine well-maintained. Regularly clean out any accumulated lint, and oil moving parts, and check for any wear and tear. A well-maintained machine operates more smoothly.
Step 10: Test on Scrap Fabric:
Before starting your main project, conduct a test on scrap fabric. This allows you to fine-tune tension settings and ensures the large cone thread behaves as expected.
Step 11: Experiment with Stitches:
Explore different stitches and stitch lengths with the large cone thread. This experimentation helps you understand how the thread interacts with various sewing techniques.
Step 12: Seek Guidance:
If you encounter challenges or have specific questions about using large cone threads on your sewing machine, seek guidance from sewing experts, online forums, or your machine’s customer support.
By following these steps on “How To Use Large Spools Of Thread On Sewing Machine,” you can confidently incorporate large cone threads into your home sewing projects, unlocking new possibilities for creativity and versatility.
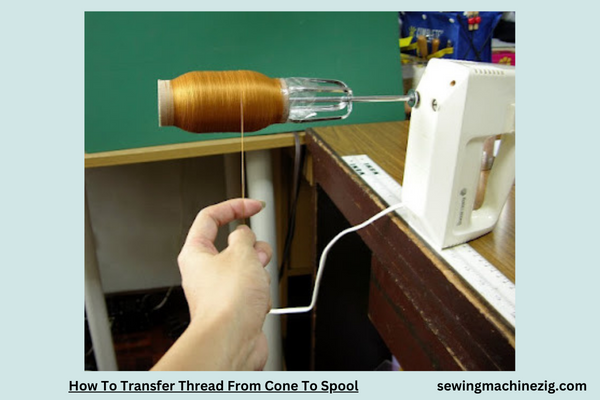
How To Transfer Thread From Cone To Spool

Transferring thread from a cone to a spool is a straightforward process that ensures smooth sewing on your machine. Let’s explore “How To Use Large Spools Of Thread On Sewing Machine” by focusing on the simple steps to transfer thread effectively.
Step 1: Gather Your Supplies:
Before starting, gather the necessary supplies – the cone thread, an empty spool, and a bobbin.
Step 2: Thread Stand Setup:
If your sewing machine doesn’t have a built-in stand for large cones, set up a separate thread stand. This ensures the thread unwinds smoothly without causing tension issues.
Step 3: Identify the End of the Thread:
Locate the end of the thread on the cone. It’s often tucked into the cone’s center or hanging loose. Carefully pull it out.
Step 4: Attach the Thread to the Spool:
Insert the end of the thread through the hole at the base of the spool. Tie a secure knot, ensuring the thread is firmly attached to the spool.
Step 5: Wind the Thread:
Place the spool on your sewing machine’s spool pin and secure it in place. Begin winding the thread onto the spool by turning the handwheel on your machine. Hold the thread lightly to guide it and ensure even winding.
Step 6: Tension Adjustment:
As you wind the thread, monitor the tension. Adjust the tension dial if needed to prevent the thread from becoming too loose or too tight.
Step 7: Wind the Bobbin:
If your machine allows for bobbin winding during sewing, wind a small amount of thread onto an empty bobbin. This helps maintain consistent tension.
Step 8: Monitor Thread Flow:
Keep an eye on how the thread unwinds from the cone and winds onto the spool. Ensure it doesn’t snag or loop, as this can lead to tension issues during sewing.
Step 9: Fill the Spool:
Continue winding until the spool is filled with the desired amount of thread. Leave a bit of space at the top to prevent the thread from catching.
Step 10: Secure the Thread:
Once the spool is filled, cut the thread, leaving a tail. Tie a knot around the spool to secure the thread in place.
Step 11: Test on Scrap Fabric:
Before starting your main sewing project, test the threaded spool on scrap fabric. This allows you to identify and address any tension issues before working on your actual project.
Step 12: Use the Transferred Thread:
Now that you’ve successfully transferred the thread from the cone to the spool, you can confidently use it in your sewing machine for various projects.
By following these steps on “How To Use Large Spools Of Thread On Sewing Machine” and effectively transferring thread from a cone to a spool, you ensure a seamless and trouble-free sewing experience with your home sewing machine.
Conclusion
In conclusion, mastering “How To Use Large Spools Of Thread On Sewing Machine” is a gateway to expanding creative possibilities. By understanding the unique requirements of large cone threads and implementing proper techniques, users unlock the potential for diverse sewing projects. This skill ensures smooth thread flow, preventing tension issues, and allows for the seamless incorporation of large spools into various sewing endeavors.
Embracing the versatility of large threads enhances a sewer’s ability to express creativity, resulting in beautifully stitched and professionally finished projects.
FAQS
Q1: How do I use large spools of thread on my sewing machine?
A1: To use large spools of thread on your sewing machine, first, ensure you have a suitable thread stand or cone holder. Place the large spool on the stand, guiding the thread through the machine’s threading path. Adjust the tension settings if needed and proceed with threading your machine as usual.
Q2: Can I use large spools of thread on any sewing machine?
A2: Most sewing machines can accommodate large spools of thread with the appropriate accessories. However, it’s essential to check your machine’s manual or consult the manufacturer to ensure compatibility and to learn about any specific requirements.
Q3: Are there specific thread guides for using large spools?
A3: Yes, some sewing machines come with built-in thread guides designed for large spools. If your machine doesn’t have this feature, you can use an external thread stand or cone holder to facilitate the smooth unwinding of the thread. “How To Use Large Spools Of Thread On Sewing Machine“
Q4: Do I need to adjust the tension when using large spools?
A4: Yes, adjusting the tension may be necessary when using large spools of thread. Experiment with the tension settings to achieve optimal thread flow and prevent issues like thread breakage or uneven stitches. “How To Use Large Spools Of Thread On Sewing Machine“
Q5: Are there any threading techniques for large spools?
A5: When threading your machine with a large spool, ensure the thread follows the correct path indicated in your machine’s manual. Additionally, guide the thread through any provided thread guides or tension disks to maintain consistent tension. “How To Use Large Spools Of Thread On Sewing Machine“
Q6: Can I use large spools for both the upper and bobbin threads?
A6: Large spools are typically used for the upper thread. For the bobbin, it’s advisable to use standard-sized spools. Some machines may offer larger bobbin options, but it’s essential to follow the manufacturer’s recommendations. “How To Use Large Spools Of Thread On Sewing Machine“


