Embarking on a sewing project involves decoding various terms, and understanding the significance of “notches” is key to achieving a polished finish. What are notches in sewing, and why do they play a crucial role in your stitching endeavors? These small, often overlooked markings on sewing patterns hold the secret to proper alignment and pattern matching.
In this guide,” What are notches in sewing” we’ll delve into the significance of notches, unraveling their importance in ensuring precision, symmetry, and a seamless assembly of fabric pieces in your sewing projects. Let’s demystify the role of notches for more refined craftsmanship.
What Are Notches in Sewing Detailed Answer
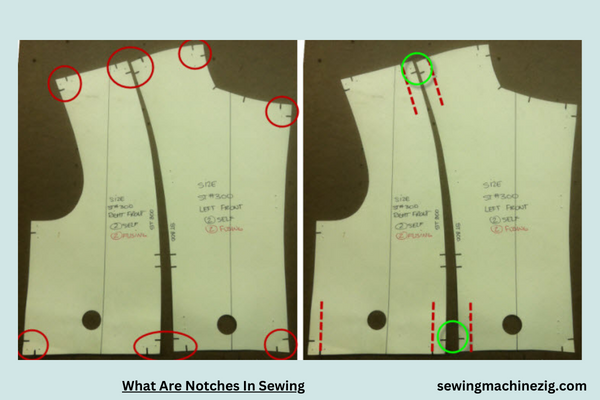
Embarking on a sewing project involves navigating a tapestry of terms, and understanding the significance of “notches” is crucial for achieving a polished finish.
In this detailed guide, we will delve into the world of sewing notches, unraveling their purpose and providing a step-by-step explanation of how to use and work with notches in your sewing projects. Whether you’re a seasoned seamstress or a newcomer to the craft, comprehending the role of notches is key to elevating your stitching endeavors.
Step 1: Defining Notches
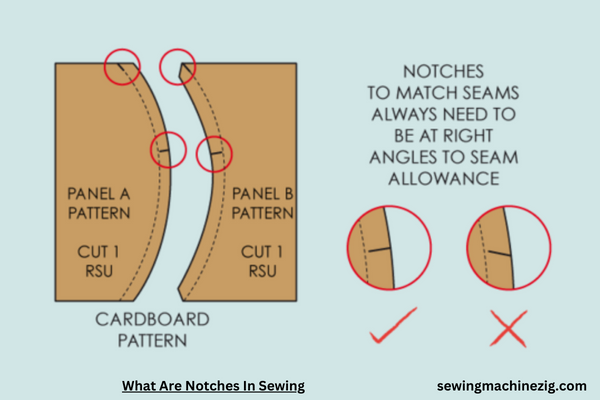
Notches, in sewing terminology, are small, triangular marks on sewing patterns. They serve as indicators for matching and aligning pattern pieces during the garment assembly process. Notches come in various shapes, such as single, double, or even triple, each conveying specific information about pattern alignment.
Step 2: Understanding Notch Types
Single notches often signify the front of a garment or a specific point on a pattern piece, while double notches indicate the back or another distinct point. Triple notches may signify the center back or a unique alignment point. Familiarizing yourself with these notch types is essential for accurate pattern matching.
Step 3: Transferring Notches to Fabric
Once you’ve cut out your pattern pieces, the next step is transferring notches to your fabric. Use tailor’s chalk, fabric markers, or small clips to mark the notches directly onto the fabric. Ensure precision, as accurate placement is critical for seamless pattern alignment.
Step 4: Matching Notches during Pinning
When assembling garment pieces, pay close attention to matching notches. Begin by aligning the notches on corresponding pattern pieces, and pinning them together securely. This ensures that the fabric pieces match seamlessly, preventing any distortion in the final garment.
Step 5: Sewing Along Notched Seams
As you stitch your garment pieces together, use the notches as guides for maintaining alignment. Pin and sew along the designated seam, making sure to match notches accurately. This results in a well-constructed garment with precisely aligned pattern elements.
Step 6: Clipping Notches on Curves
For curved seams, such as armholes or neckline curves, clip into the notches without cutting into the seam allowance. This allows the fabric to ease into the curve smoothly, ensuring a professional and tailored finish.
Step 7: Utilizing Notches for Pattern Adjustments
Notches are not only alignment markers but can also convey information about pattern adjustments. Some patterns use notches to indicate where to lengthen or shorten a garment. Consult your pattern instructions to interpret additional meanings associated with notches.
Step 8: Test the Fit
After sewing along notched seams, test the fit of your garment. The precision achieved through proper notch alignment contributes to a well-fitted and aesthetically pleasing finished product.
Step 9: Pattern Review
Upon completing your project, take note of how effectively the notches facilitated pattern alignment. Assess any adjustments needed for future projects and use the experience to enhance your overall sewing skills.
Step 10: Troubleshooting Notch Misalignment
If you encounter discrepancies in notch alignment, carefully reevaluate your cutting and marking processes. Double-check your pattern pieces, ensuring accurate transfer of notches to fabric. This attention to detail prevents misalignments that may affect the final garment.
In the intricate world of sewing, understanding What are notches in sewing and how to use them is pivotal for achieving precision and a professional finish. By following this comprehensive guide and incorporating notches into your sewing projects, you’ll elevate your craftsmanship and create garments that showcase meticulous attention to detail.
Whether you’re a seasoned sewist or a beginner, mastering the art of notches is a key step toward honing your sewing skills and achieving exceptional results in every project.
Do You Cut Notches In Sewing Patterns
Embarking on a sewing project involves navigating a plethora of techniques, and one often encounters the question: Do you cut notches in sewing patterns? In this comprehensive guide, we will explore the significance of cutting notches, answering the ‘why’ and ‘how’ behind this practice.
Whether you’re a seasoned seamstress or a novice to the craft, understanding when and how to cut notches is essential for achieving precision and a polished finish in your sewing endeavors.
Step 1: Deciphering Notches in Sewing Patterns
Notches in sewing patterns are minute, strategically placed marks designed to aid in pattern alignment during the garment assembly process. These unassuming indicators hold crucial information about the placement and matching of fabric pieces, contributing to the overall accuracy of the finished garment.
Step 2: Types of Notches
Notches come in various forms, including single, double, and triple notches. Each type serves a unique purpose, signifying specific information about the pattern, such as front and back placement, matching points, or critical alignment indicators. Familiarizing yourself with these types is key to accurate pattern assembly.
Step 3: When to Cut Notches
The process of cutting notches is typically carried out during the pattern preparation stage, once the pattern pieces have been transferred or pinned onto the fabric. Notches are essential guides for matching and shaping the garment during construction, making them a crucial component of the cutting process.
Step 4: Transferring Notches to Fabric
After pinning or tracing the pattern onto the fabric, the next step involves transferring notches. Utilize tailor’s chalk, fabric markers, or small clips to mark these indicators directly onto the fabric. Precision in transferring notches is paramount to ensure accurate alignment during assembly.
Step 5: Single, Double, and Triple Notches
Understanding the language of notches involves recognizing the distinctions between single, double, and triple notches. Single notches often signify the front of a garment or a specific point, double notches indicate the back or another critical point, and triple notches may denote the center back or a unique alignment point.
Step 6: The Art of Cutting Notches
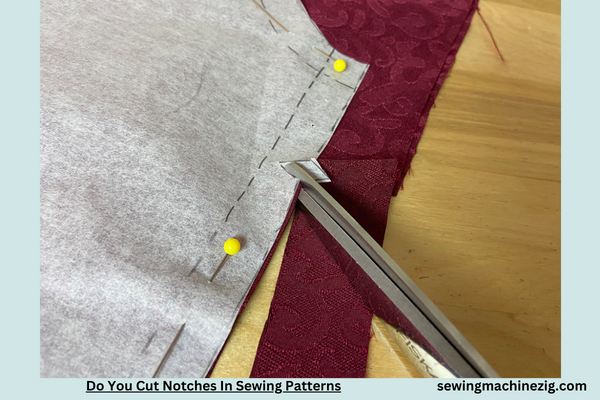
With the fabric marked, it’s time to cut notches. Carefully incise small triangles or wedges at the locations of the notches. Importantly, avoid cutting into the seam allowance, as notches are typically placed just outside this area. The precision in cutting notches facilitates easy identification during the sewing process.
Step 7: Matching Notches During Construction
As you proceed to assemble garment pieces, the notches become your guiding stars. Align the notches on corresponding pattern pieces and secure them with pins. This meticulous process ensures accurate pattern matching, preventing any distortion in the final garment.
Step 8: Benefits of Cutting Notches
The benefits of cutting notches extend beyond mere alignment. Notches aid in easing fabric along curves, contribute to accurate adjustments during fitting, and ensure a professional finish. The attention to detail in cutting notches contributes significantly to the overall precision of the sewing project.
Step 9: Troubleshooting Misaligned Notches
Encountering misaligned notches during sewing may necessitate a review of your cutting and marking processes. Double-check the accuracy of your pattern pieces and confirm that notches are transferred correctly to the fabric. This diligence helps prevent misalignments that could compromise the final garment.
Step 10: Final Inspection and Fit Testing
Upon completing the sewing project, conduct a final inspection, paying attention to how effectively the notches facilitated pattern alignment. Perform a fit test to ensure the garment drapes and fits as intended, showcasing the advantages of accurately cut notches in achieving a professional finish.
The practice of cutting notches in sewing patterns is more than a technicality; it is a nuanced skill that significantly contributes to the precision and professionalism of your creations. By following this comprehensive guide and embracing the importance of cutting notches, you’ll elevate your craftsmanship and create garments that showcase meticulous attention to detail. Whether you’re a seasoned sewist or a beginner, incorporating the art of cutting notches is a key step toward achieving accuracy and exceptional results in every sewing project.
What Is A Pattern Notcher
In the intricate world of sewing, mastering the tools at your disposal is essential for achieving accuracy and efficiency. One such tool that often raises questions is the pattern notcher. In this comprehensive guide,”What are notches in sewing” we will explore the purpose and utility of a pattern notcher, answering the crucial question:
What is a pattern notcher? Whether you’re a seasoned seamstress or a newcomer to the craft, understanding this tool and its application is fundamental for enhancing your pattern-cutting skills. “What are notches in sewing“
Step 1: Defining a Pattern Notcher
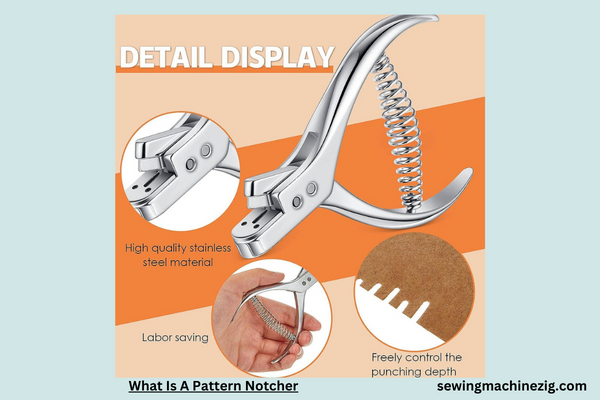
A pattern notcher is a specialized tool designed for marking fabric patterns with precision. It is equipped with a V-shaped cutting mechanism that creates small, strategically placed notches along the edges of a paper pattern. These notches serve as alignment markers during the garment assembly process.
Step 2: Understanding the Purpose of Notches
Notches are integral to pattern cutting as they convey critical information about pattern alignment, matching points, and orientation. By using a pattern notcher, you can effortlessly create these notches, ensuring a consistent and accurate reference system for assembling your garments.
Step 3: Differentiating Notchers from Scissors
While scissors are a staple in any sewing toolkit, a pattern notcher serves a unique purpose. Unlike scissors, which may inadvertently cut into the seam allowance, a pattern notcher creates precise notches just outside the seam allowance, preserving the integrity of the pattern and preventing confusion during assembly.
Step 4: Selecting the Right Pattern Notcher
Pattern notchers come in various designs and sizes. Choose a notcher that suits your specific needs and the scale of your projects. Some notchers create single notches, while others may produce double or triple notches, offering versatility in conveying different types of information on your patterns.
Step 5: Setting Up Your Workspace
Before using a pattern notcher, ensure that your workspace is well-lit and organized. Lay out your pattern paper on a flat surface, and have the notcher and any additional pattern-cutting tools within reach.
Step 6: Positioning the Pattern Notcher
With your pattern laid out, position the pattern notcher over the edge of the paper where you want to create a notch. The V-shaped cutting mechanism should align with the edge of the pattern without extending into the seam allowance.
Step 7: Applying Even Pressure
To create a clean and precise notch, apply even pressure to the pattern notcher handles. Press down firmly and smoothly, allowing the notcher blades to cut through the paper. Avoid using excessive force to prevent tearing or distorting the pattern.
Step 8: Creating Multiple Notches
If your pattern requires multiple notches along a single edge, repeat the process, spacing the notches according to your pattern instructions. The consistent spacing ensures accurate alignment during garment assembly.
Step 9: Verifying Notch Placement
After notching, visually inspect your pattern to confirm the placement and alignment of the notches. This step is crucial for avoiding errors during the subsequent stages of cutting and sewing.
Step 10: Incorporating Notches into Sewing Projects
As you progress with your sewing project, use the notches as guides for aligning pattern pieces during cutting and assembly. The precision offered by pattern notches contributes to the overall accuracy and professionalism of your finished garment.
Step 11: Cleaning and Maintaining Your Pattern Notcher
After use, clean your pattern notcher to remove any paper residue. Ensure that the blades remain sharp for optimal performance. Regular maintenance enhances the longevity and effectiveness of your pattern notcher.
Step 12: Exploring Advanced Notching Techniques
As you become more proficient with pattern notching, explore advanced techniques, such as creating different types of notches to convey specific information or experimenting with notching placements for customized patterns.
Understanding what a pattern notcher is and mastering its use is a valuable skill for any sewing enthusiast. By following this comprehensive guide “What are notches in sewing” and incorporating pattern notching into your workflow, you’ll enhance the precision and efficiency of your pattern-cutting process.
Whether you’re working on simple projects or intricate designs, a pattern notcher proves to be an indispensable tool in achieving professional and accurate results.
Conclusion
In the symphony of sewing, “What are notches in sewing” notches compose the harmonious language between pattern and precision. These unassuming marks, guiding the assembly of fabric pieces, play a pivotal role in achieving impeccable garment construction.
Understanding, What are notches in sewing transcends a mere technicality; it unveils the nuanced artistry behind every stitch. So, the next time you encounter notches on your pattern, embrace them as the navigational stars leading you toward a seamless and professionally finished creation, where meticulous attention to detail reigns supreme.
FAQS
Q1: What purpose do notches serve in sewing patterns?
A1: Notches in sewing patterns act as alignment markers, guiding the precise joining of fabric pieces. They help match corresponding sections during assembly, ensuring accurate garment construction.
Q2: How can I identify notches on a sewing pattern?
A2: Notches are usually small, triangular symbols or diamond-shaped cutouts on pattern pieces. Look for them along the edges of pattern pieces or at specific points, such as the midpoint of a sleeve or the center of a neckline. “What are notches in sewing“
Q3: Are notches only found on clothing patterns, or do they appear on other sewing projects as well?
A3: Notches are commonly used in clothing patterns but can also be present in various sewing projects like bags, accessories, and home decor items. They provide alignment assistance regardless of the project type.
Q4: What do double notches indicate on a sewing pattern?
A4: Double notches signify specific points of alignment, often distinguishing between the front and back pattern pieces or indicating the placement of sleeves. Pay attention to the pattern’s key to interpret the purpose of double notches. “What are notches in sewing“
Q5: Can notches be skipped, or are they essential for accurate sewing?
A5: Notches play a crucial role in achieving precise and well-fitted garments. Skipping notches may result in misalignment during assembly, affecting the overall fit and appearance of the finished piece. “What are notches in sewing“
Q6: How do I transfer notches from a sewing pattern to fabric?
A6: Use tailor’s chalk, fabric markers, or small snips to mark notches on the fabric. Match these markings when joining corresponding pieces. Always transfer notches accurately to ensure proper alignment during sewing. “What are notches in sewing“

