Embark on a sewing journey with clarity as we unravel the significance of the term “with nap” in the world of sewing. This insightful guide will demystify the concept, answering the question, ” what does with nap mean in sewing?” Understanding how nap influences fabric direction is crucial for achieving impeccable results in your sewing projects.
Whether you’re a beginner or an experienced sewist, this guide promises to shed light on this nuanced aspect, empowering you to make informed decisions and elevate the quality of your creations.
What Does With Nap Mean In Sewing Detailed Answer
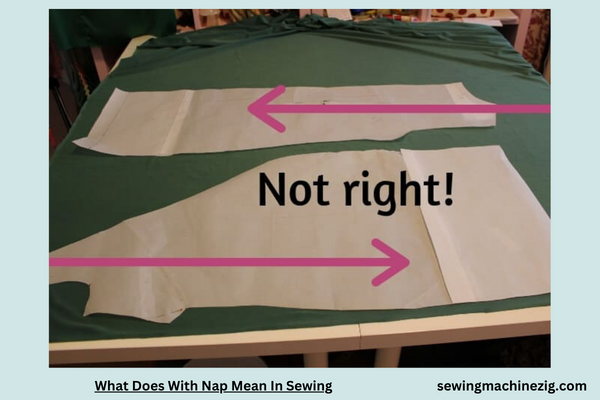
Understanding the concept of what does with nap mean in sewing is crucial for achieving professional and visually appealing results, especially when working with fabrics like velvet, corduroy, or any material with a distinct texture or pattern. Here’s a comprehensive step-by-step guide to demystify what does with nap mean in sewing:
Step 1: Grasp the Concept
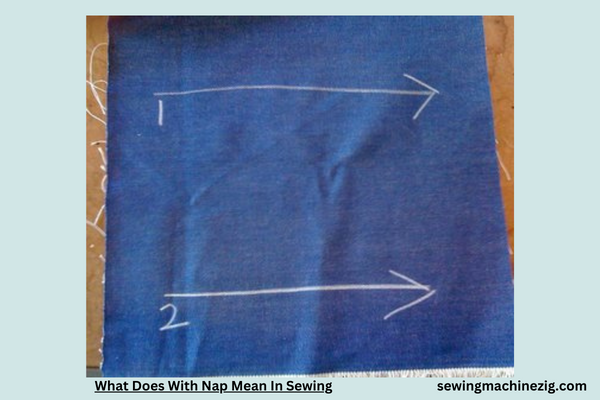
“In what does with nap mean in sewing, refers to a directional layout of fabric pieces, considering the texture, pattern, or pile of the material. Fabrics with a nap have a noticeable surface texture, and cutting all pattern pieces in the same direction ensures a uniform appearance.”
Step 2: Choose the Right Fabric
“Select a fabric that has a discernible nap. Common examples include velvet, corduroy, fur, and certain upholstery fabrics. Fabrics with nap often appear darker or lighter depending on the direction of the fibers, making it essential to maintain consistency in cutting.”
Step 3: Examine the Fabric
“Carefully examine the fabric to identify the direction of the nap. Run your hand across the fabric, and notice how the texture or color changes when you stroke it in different directions. The direction that feels smooth or looks consistent is considered the ‘with nap’ direction.”
Step 4: Identify Pattern Pieces
“Check your sewing pattern for any specific instructions regarding nap. Some patterns may indicate which pieces should be cut ‘with nap’ or provide a layout guide for achieving the desired visual effect. Pay close attention to markings on the pattern indicating nap direction.”
Step 5: Lay Out Fabric
“Spread out your fabric on a flat surface, ensuring it is wrinkle-free. If your pattern pieces specify ‘with a nap,’ position them on the fabric accordingly. Align the arrows or markings on the pattern with the direction of the nap to maintain consistency.”
Step 6: Pin and Cut
“Secure your pattern pieces to the fabric with pins, making sure they align with the ‘with nap’ direction. Double-check the orientation before cutting. Precision is crucial to ensure that all pieces, when sewn together, exhibit a cohesive and visually pleasing finish.”
Step 7: Mark Pieces as Needed
“To avoid confusion during the sewing process, mark your fabric pieces with a discreet symbol or notation that indicates the ‘with nap’ direction. This extra step ensures that you remain consistent when assembling the garment.”
Step 8: Follow Seam Allowances
“Keep in mind that the ‘with nap’ layout may affect seam allowances, especially if you need to match patterns or textures. Adjust your cutting and sewing techniques accordingly, being mindful of how the fabric’s nap aligns when seams are joined.”
Step 9: Test Before Sewing
“If you’re unsure about the ‘with nap’ layout, perform a test by basting pieces together and evaluating how the fabric’s texture or pattern appears. This allows you to make adjustments before committing to permanent stitching.”
Step 10: Enjoy a Uniform Appearance
“By adhering to the what does with nap mean in sewing guidelines, your finished garment will showcase a uniform appearance, with the fabric’s texture or pattern consistently running in the desired direction. This attention to detail enhances the overall quality and aesthetic of your sewing project.”
Understanding what does with nap mean in sewing empowers you to work confidently with textured fabrics, ensuring your creations exhibit a polished and professional look. Incorporate this knowledge into your sewing practice to elevate the visual impact of garments and projects with fabrics that have a discernible nap.
What Does It Mean When Your Pattern
Understanding sewing patterns is akin to deciphering a creative code. This comprehensive guide will walk you through the intricacies of interpreting sewing patterns, ensuring that the next time your pattern leaves you puzzled, you can confidently navigate through the confusion.
Step 1: Choose the Right Pattern
Begin by selecting a sewing pattern appropriate for your skill level. Novice sewists should opt for patterns labeled “easy” or “beginner” to avoid unnecessary complications.
Step 2: Read the Pattern Envelope
The pattern envelope is your first source of information. It typically displays an image of the finished garment, fabric suggestions, required notions, and sometimes a skill level indicator.
Step 3: Unravel the Instructions
Once you’ve acquired your pattern, carefully read through the provided instructions. Familiarize yourself with the terminology used and make note of any specific techniques or skills required.
Step 4: Take Proper Measurements
Accurate measurements are crucial. Follow the pattern’s measurement guide to ensure the garment fits perfectly. This step is fundamental to achieving a polished final product.
Step 5: Choose the Right Fabric
Understanding the recommended fabric is vital. The pattern will suggest suitable fabrics to ensure the drape, stretch, or structure required for the design.
Step 6: Marking and Cutting
Follow the pattern’s guidelines for marking and cutting your fabric. Pay attention to notches, grainlines, and any additional markings that aid in aligning pattern pieces.
Step 7: Transferring Pattern Markings
Transferring markings is often overlooked but essential for assembling the garment accurately. Use tailor’s chalk or washable fabric markers to transfer markings to your fabric.
Step 8: Seam Allowances
Patterns include specific seam allowances. Pay attention to these, as they impact the overall fit. Some patterns might require you to add seam allowances, while others include them.
Step 9: Follow the Pattern Symbols
Patterns use symbols to indicate various instructions. Familiarize yourself with common symbols such as circles for notches, dots for pattern alignment, and arrows for grainlines.
Step 10: Interface When Necessary
If your pattern indicates interfacing, understand where and how to apply it. Interfacing adds structure and stability to certain garment areas.
Step 11: Test Fit Along the Way
Don’t wait until the end to check the fit. Perform test fits after major steps, especially if you’re working with a new pattern or adjusting for personal preferences.
Step 12: Finishing Techniques
Patterns often guide you on finishing touches, such as hemming, closures, or decorative elements. Pay close attention to these details to achieve a professional-looking garment.
Step 13: Pattern Adjustments
Feel confident making adjustments if needed. Patterns serve as a foundation, but individual body shapes may require tweaks for a personalized fit.
Step 14: Consult Online Resources
If you encounter difficulties, consult online sewing communities or tutorials. Fellow sewists often share insights and solutions to common pattern-related challenges.
Step 15: Learn from Mistakes
Embrace the learning process. If a pattern doesn’t turn out perfectly the first time, analyze what went wrong, and use that knowledge for improvement in future projects.
Deciphering sewing patterns is an empowering skill that evolves with practice. By following these comprehensive steps, you’ll not only navigate through pattern confusion but also gain the confidence to tackle more intricate designs. Remember, each project contributes to your growth as a skilled sewist, turning sewing pattern puzzles into delightful creations.
What Does With Nap Mean In Sewing Patterns
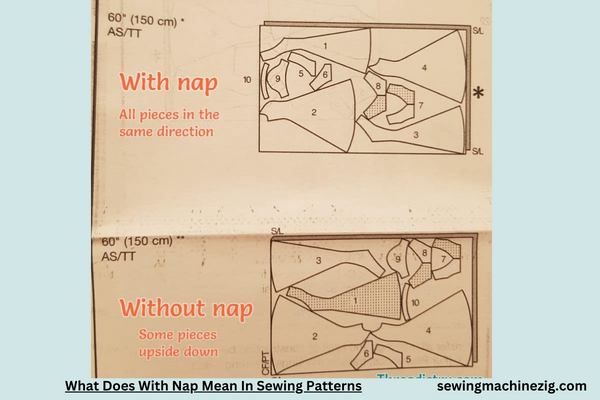
Understanding the term what does with nap mean in sewing patterns is crucial for achieving impeccable results in your sewing projects. This detailed guide will walk you through the intricacies of what “with nap” means and how to navigate it seamlessly.
What Does “With Nap” Mean? “When a sewing pattern specifies ‘with a nap,’ it indicates that the fabric used in the project has a directional design or texture that requires specific attention to how the pattern pieces are laid out and cut.”
Step-by-Step Guide:
Step 1: Select Your Fabric
Choose a fabric with a distinct nap. This can include materials like velvet, corduroy, or any fabric with a noticeable pattern or texture that runs in one direction.
Step 2: Examine the Fabric
Thoroughly examine the fabric to identify its nap. Run your hands over the surface to feel for any texture or check for a noticeable pattern that repeats in one direction.
Step 3: Identify Pattern Pieces
Check your sewing pattern to identify pieces marked “with nap.” These markings are crucial for ensuring that the directional elements of the fabric align correctly in the finished garment.
Step 4: Layout Considerations
When laying out your pattern pieces on the fabric, take into account the nap direction. Arrange the pieces so that the nap runs consistently in the same direction across all elements of the garment.
Step 5: Mark Nap Arrows
Many patterns will include nap arrows or symbols to indicate the direction in which the nap should run. Mark these arrows on your fabric to guide your cutting and sewing.
Step 6: Single Layer Cutting
To maintain nap consistency, consider cutting your fabric pieces one layer at a time. This allows you to pay close attention to the nap direction on each piece.
Step 7: Pin and Cut Carefully
Secure your pattern pieces to the fabric with pins, aligning the nap arrows as needed. Cut along the outlines, being mindful of maintaining the specified nap direction.
Step 8: Test Layouts
Before finalizing your layout and cutting all the pieces, perform a test layout on scrap fabric. This ensures that you have correctly interpreted the nap direction and that the pattern pieces align as intended.
Step 9: Additional Considerations
When sewing “with a nap,” take extra care in matching seams and ensuring that the directional elements flow seamlessly across the garment. This attention to detail enhances the overall professional appearance of your project.
Step 10: Pressing and Final Touches
Once your garment is assembled, use caution when pressing. Follow the nap direction to avoid flattening or altering the texture of the fabric. This is especially important for textured or pile fabrics.
Mastering the concept of what does with nap mean in sewing sewing patterns opens up opportunities to work with a variety of fabrics and textures. By following this comprehensive guide, you’ll confidently navigate the intricacies of directional designs, ensuring that your finished projects showcase meticulous attention to detail.
Whether you’re crafting garments, accessories, or home decor items, understanding and embracing “with nap” enriches your sewing expertise.
Conclusion
In summary, comprehending “what does with nap mean in sewing” is pivotal for achieving impeccable results in your fabric projects. This guide has shed light on the significance of nap, guiding you through its definition and impact on pattern layouts.
By grasping this crucial aspect, you empower yourself to make informed decisions, ensuring your sewing endeavors yield professional and aesthetically pleasing outcomes. So, as you embark on future projects, consider the nap of your fabric to elevate the quality and precision of your creations.
FAQS
Q1: What does “with nap” mean in sewing patterns, and why is it important?
A: In sewing, “with nap” refers to the directional layout of fabric pieces to ensure they all run in the same direction. Fabrics with nap, like velvet or corduroy, have a distinct texture or pattern that appears when the fabric is brushed or touched. It’s crucial to follow the “with nap” instructions in your pattern to achieve uniformity in the finished garment, as cutting pieces in different directions can result in variations in color or texture.
Q2: Can I ignore the “with nap” instructions in a sewing pattern?
A: It’s not recommended to ignore “with nap” instructions in sewing patterns, especially when working with fabrics that have a distinct texture or pattern. Ignoring the nap can result in variations in the appearance of the fabric, affecting the overall aesthetic of the garment. Following the recommended layout ensures a cohesive and professional-looking finished product.
Q3: How do I identify the nap of a fabric?
A: To identify the nap of a fabric, run your hand across the surface. You’ll notice a different feel or sheen in one direction compared to the other. If the fabric has a noticeable texture or pattern, the nap direction is crucial. Pay attention to any specific instructions in your pattern regarding the placement of pattern pieces concerning the nap.
Q4: Are there specific fabrics that always require consideration of nap?
A: Fabrics like velvet, corduroy, fur, and other textured materials almost always have a nap that should be taken into account. Additionally, fabrics with a directional print or pattern may also require attention to nap. Always check your sewing pattern for any “with nap” indications and follow them diligently to achieve the best results.
Q5: What should I do if I accidentally cut fabric pieces against the nap?
A: If you accidentally cut fabric pieces against the nap, assess the impact on the appearance of the garment. In some cases, it might not be noticeable or may have a minimal effect. However, if the texture or pattern is significantly affected, consider recutting the pieces with the correct nap direction to ensure a more satisfactory result in your finished project.

