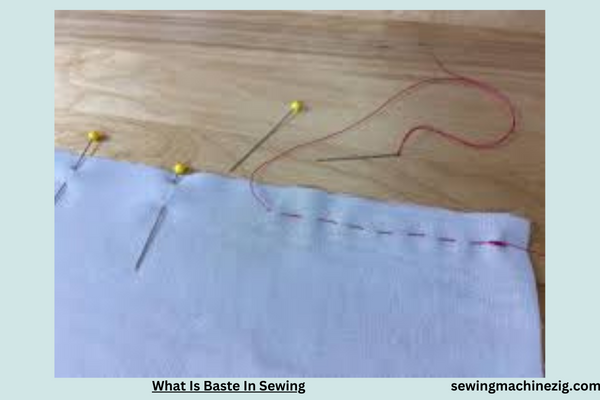
In the symphony of sewing, understanding the terminology is key, and for many, the question arises: “What Is Baste In Sewing?” Basting, a fundamental technique, involves temporarily stitching fabric together with long, easily removable stitches. This method serves as a preliminary step, securing pieces for fitting or ensuring alignment before permanent stitches.
Join us in unraveling the stitches of this essential sewing maneuver, exploring how basting threads itself through the fabric of garment construction. Mastering the art of basting opens a gateway to precision, ensuring that each seam aligns seamlessly before the final stitches are set in place.
What Is Baste In Sewing Detailed Answer

Step-by-Step Guide: Demystifying the Art of Basting in Sewing
Embarking on a sewing project often involves mastering a repertoire of techniques, and one fundamental skill is understanding “What Is Baste In Sewing.” In this comprehensive guide, we will unravel the intricacies of basting, providing a step-by-step journey into the world of temporary stitches and their crucial role in garment construction.
Step 1: Grasping the Concept of Basting
Begin your exploration by comprehending the concept of basting. In sewing, basting refers to the temporary stitching used to hold fabric pieces together before the final, permanent stitches are applied. It serves as a guiding framework for accurate alignment and ensures that the final seams and details align seamlessly.
Step 2: Gather Essential Tools
Before diving into basting, gather the essential tools for the task. You’ll need needles, thread, and fabric pins. Choose a contrasting thread color to easily distinguish the temporary basting stitches from the final sewing. Ensure your needles are appropriate for the fabric weight.
Step 3: Prepare Your Fabric Pieces
Lay out the fabric pieces you intend to baste, ensuring they are cut and marked according to your pattern. Before applying basting stitches, pin the fabric sections together to secure their alignment. This initial pinning provides stability and a foundation for the basting process.
Step 4: Thread the Needle
Thread your needle with a length of thread appropriate for basting. A single strand is often sufficient. Tie a secure knot at one end of the thread, ensuring it doesn’t pull through the fabric during the basting process.
Step 5: Choose the Basting Stitch
Select a basting stitch suitable for your project. A simple running stitch or a longer stitch length on your sewing machine works well for most basting applications. The goal is to create a secure but easily removable stitch.
Step 6: Baste Along Seam Allowances
Commence the basting process along the seam allowances of your fabric pieces. Seam allowances are the designated areas where the final stitching will occur. Basting within these allowances ensures that the temporary stitches won’t interfere with the final seam construction.
Step 7: Maintain Consistent Stitch Length
As you baste, maintain a consistent stitch length to achieve uniformity. The purpose of basting is to provide accurate alignment, and consistent stitch length contributes to the stability and precision of the basted seams.
Step 8: Baste Critical Areas First
If your sewing project involves intricate details or complex curves, baste these critical areas first. This strategic approach allows you to address challenging sections with greater precision before tackling the broader seams.
Step 9: Check Alignment Periodically
Throughout the basting process, periodically check the alignment of your fabric pieces. Adjust and correct as needed, ensuring that the basting stitches serve their purpose of holding the components securely together in preparation for final stitching.
Step 10: Remove Basting Stitches After Final Sewing
Once you’ve completed the final sewing of your project, carefully remove the basting stitches. Gently pull the thread, and the temporary stitches should come out easily. Take care not to snag the fabric or distort the final seams during this removal process.
Mastering the art of basting in sewing is a foundational skill that contributes to the precision and success of your projects. By following this step-by-step guide on “What Is Baste In Sewing,” you’ll gain confidence in using this temporary stitching technique as a valuable tool in your sewing repertoire.
How To Sew Basting Stitch, When & Why To Baste Seams
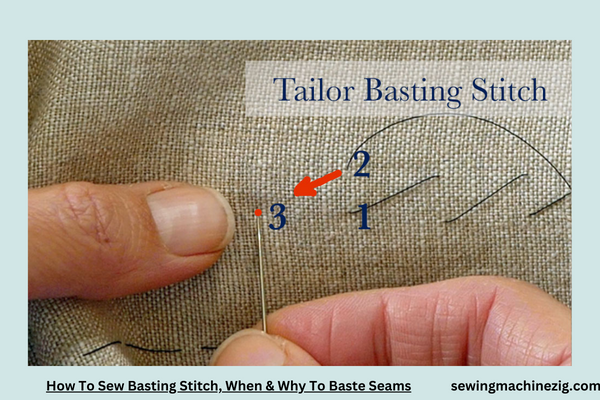
Mastering the Basics: A Comprehensive Guide on How To Sew Basting Stitch, When & Why To Baste Seams
Embarking on the journey of sewing involves mastering various stitches, and the basting stitch is a fundamental skill every sewer should have in their repertoire.
In this in-depth, step-by-step guide, we will explore “How To Sew Basting Stitch,” unraveling the intricacies of when and why to employ this technique in your sewing projects.
Step 1: Understand the Basting Stitch
Begin by grasping the concept of the basting stitch. In essence, it is a temporary and long-running stitch used to hold fabric layers together before permanent stitching. Basting provides stability during the sewing process and facilitates adjustments without the commitment of a permanent seam.
Step 2: Where to Learn About Basting Stitch – Sewing Basics Tutorials or Classes
If you’re new to sewing, delve into sewing basics tutorials or consider taking sewing classes. Understanding the fundamentals of stitches, particularly the basting stitch, lays a solid foundation for your sewing endeavors.
Step 3: Gather Essential Tools
Assemble the necessary tools for basting stitch. You’ll need a sewing machine or needle, appropriate thread, and fabric pins or clips for securing the layers together. Ensure your tools are in good condition for optimal results.
Step 4: Where to Find Essential Tools – Local Fabric or Sewing Supply Stores
Source your tools from local fabric or sewing supply stores. Consult with experienced staff to choose the right thread and needles for your fabric type. Quality tools contribute to the success of your basting stitch.
Step 5: Choose the Right Thread and Needle
Select a thread color that contrasts with your fabric for easy visibility. Opt for a lightweight thread suitable for temporary stitches. Choose a needle that complements the thread size and smoothly penetrates the fabric layers.
Step 6: Where to Find Thread and Needle Information – Thread and Needle Packaging
Refer to the packaging of your thread and needles for information on the recommended fabric types. This ensures compatibility and enhances the effectiveness of your basting stitch.
Step 7: Prepare Your Fabric Layers
Lay out the fabric layers you intend to baste. Smooth them to eliminate wrinkles or folds. Align the edges accurately, and use fabric pins or clips to secure them in place. Proper preparation sets the stage for a precise basting stitch.
Step 8: Where to Learn About Fabric Preparation – Sewing Patterns or Tutorials
Explore sewing patterns or tutorials for guidance on proper fabric preparation. Understanding the importance of well-prepared fabric contributes to the overall success of your sewing projects.
Step 9: Set Up Your Sewing Machine or Thread Your Needle
If using a sewing machine, set it up for straight stitching. Thread your machine with the chosen basting thread, ensuring proper tension. If hand-sewing, thread your needle and knot the end securely.
Step 10: Where to Find Sewing Machine Setup Information – Machine Manual or Online Resources
Consult your sewing machine manual for instructions on setting up for straight stitching. If you’re unsure, online resources often provide step-by-step guides for various sewing machine models.
Step 11: Begin Stitching
Commence the basting stitch by positioning your fabric under the presser foot. If using a sewing machine, lower the foot, align the needle with the starting point, and begin stitching. For hand-sewing, insert the needle through the fabric layers and pull it through.
Step 12: Where to Learn About Stitching Techniques – Sewing Books or Online Tutorials
Explore sewing books or online tutorials to enhance your stitching techniques. Understanding the nuances of stitching contributes to the quality of your basting stitch.
Step 13: Stitch in a Straight Line
Maintain a straight line as you baste. If using a sewing machine, guide the fabric evenly. If hand-sewing, use a ruler or guidelines to ensure a straight basting stitch. Consistency is key to a reliable temporary seam.
Step 14: Where to Find Straight Stitching Tips – Sewing Communities or Forums
Engage with sewing communities or forums to exchange tips on achieving straight stitching. Fellow sewers often share valuable insights and techniques for improving stitching precision.
Step 15: Space Stitches Appropriately
Space your basting stitches appropriately, considering the nature of your project. For general basting, a longer stitch length is suitable. However, adjust the spacing based on the specific requirements of your sewing task.
Step 16: Where to Find Stitch Length Guidelines – Sewing Guides or Manuals
Refer to sewing guides or manuals for recommendations on stitch length. Different fabrics and projects may call for variations in stitch length, so understanding these guidelines enhances your basting proficiency.
Step 17: Baste Seams as Needed
Baste the seams of your project as required. Common scenarios include setting in sleeves, attaching collars, or preparing intricate patterns. The basting stitch allows you to make adjustments before committing to permanent seams.
Step 18: Where to Learn About Basting Specific Seams – Pattern Instructions or Sewing Classes
Consult pattern instructions for specific guidance on basting seams. If uncertain, consider attending sewing classes that focus on advanced techniques, including basting for specialized seams.
Step 19: Test Fit and Make Adjustments
After basting, conduct a test fit of your project. The temporary nature of the basting stitch allows for easy adjustments. Identify areas that need refinement and make alterations before proceeding to permanent stitching.
Step 20: Where to Find Fit Adjustment Tips – Sewing Experts or Online Communities
Seek advice from sewing experts or participate in online sewing communities to gather tips on fit adjustments. Learning from experienced sewers enhances your ability to achieve the desired outcome.
Step 21: Remove Basting Stitches
Once satisfied with the fit and adjustments, remove the basting stitches. Use a seam ripper or gently pull the threads, taking care not to damage the fabric. Removing basting stitches ensures a clean finish for your final seams.
Step 22: Where to Learn About Stitch Removal Techniques – Sewing Guides or Demonstrations
Explore sewing guides or online demonstrations for effective stitch removal techniques. Proper removal prevents damage to the fabric and preserves the integrity of your final seams.
Step 23: Secure Permanent Seams
With adjustments made and basting stitches removed, secure your seams permanently. Use the appropriate stitching technique for your project, whether it’s a straight stitch, zigzag stitch, or other suitable seam finish.
Step 24: Where to Learn About Permanent Seam Techniques – Sewing Classes or Tutorials
Enroll in sewing classes or explore online tutorials that focus on permanent seam techniques. Understanding various stitching methods ensures your projects have durable and professional-looking seams.
Step 25: Practice and Refine Your Basting Skills
Becoming proficient in basting stitch requires practice. Dedicate time to refining your skills on scrap fabric or sample projects. Consistent practice enhances your confidence and precision in using the basting stitch technique.
Step 26: Where to Practice Basting – Sewing Workshops or Practice Projects
Participate in sewing workshops or create small practice projects specifically for basting. Hands-on experience accelerates your learning curve and hones your basting skills.
Step 27: Incorporate Basting Into Complex Projects
As you gain confidence, incorporate basting into more complex projects. Whether sewing garments, quilts, or intricate crafts, the basting stitch remains a valuable tool for achieving precise results.
Step 28: Where to Seek Project-Specific Basting Tips – Project-Specific Guides or Experienced Sewers
Refer to project-specific guides or seek advice from experienced sewers when tackling complex projects. Tailoring your basting approach to the unique requirements of each project ensures success.
Step 29: Troubleshoot Basting Challenges
Address any challenges you encounter while basting. Whether dealing with tension issues, fabric puckering, or other complications, troubleshoot and refine your technique to overcome obstacles.
Step 30: Where to Seek Troubleshooting Tips – Sewing Troubleshooting Guides or Sewing Communities
Consult sewing troubleshooting guides or engage with sewing communities to seek tips for overcoming specific basting challenges. Learning from others’ experiences enhances your problem-solving skills.
In mastering “What Is Baste In Sewing, When & Why To Baste Seams” involves a step-by-step journey from understanding the basics to incorporating basting into diverse sewing projects. By following this comprehensive guide, you’ll develop a versatile skill set that enhances your overall sewing proficiency. Happy sewing!
Basting Stitch On Janome Sewing Machine
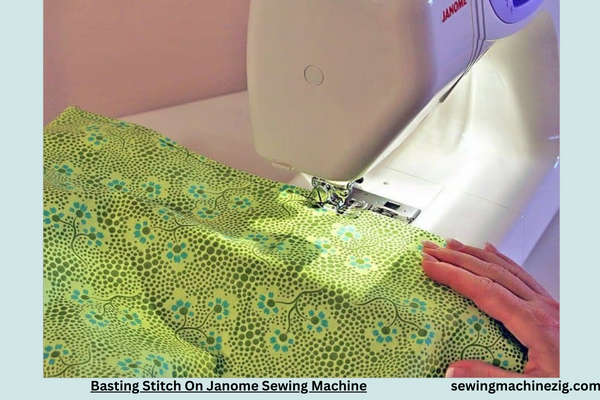
Mastering Precision: A Comprehensive Guide on Executing Basting Stitch on a Janome Sewing Machine
Embarking on the journey of sewing with a Janome machine involves unlocking the full potential of your equipment. In this detailed step-by-step guide, we will delve into the intricacies of executing the versatile basting stitch on a Janome sewing machine, exploring its applications and providing valuable insights for optimal results.
Step 1: Familiarize Yourself With Janome Machine Controls
Before diving into basting, acquaint yourself with the controls of your Janome sewing machine. Locate the stitch selector, stitch length dial, and any relevant features specific to your model. Refer to the machine manual for detailed information.
Step 2: Where to Find Janome Machine Information – Machine Manual or Online Resources
Consult the machine manual for your Janome model to understand its features and controls. Online resources, including video tutorials and forums, can also offer valuable insights into operating Janome machines.
Step 3: Choose the Right Needle and Thread
Select an appropriate needle and thread for basting. Opt for a lightweight thread in a contrasting color for visibility. Ensure the needle size is compatible with the fabric you’re working on, as recommended in the machine manual.
Step 4: Where to Find Needle and Thread Recommendations – Machine Manual or Sewing Supply Stores
Refer to the machine manual for needle and thread recommendations. Additionally, seek guidance from sewing supply stores or online resources to match the right needle and thread to your Janome machine.
Step 5: Prepare Your Fabric Layers
Lay out the fabric layers you intend to baste. Smooth out any wrinkles or folds, ensuring accurate alignment. Secure the layers with fabric pins or clips, preparing them for the basting process.
Step 6: Where to Learn About Fabric Preparation – Sewing Patterns or Tutorials
Explore sewing patterns or online tutorials for guidance on proper fabric preparation. Understanding the importance of well-prepared fabric sets the stage for successful basting on your Janome machine.
Step 7: Set Up Your Janome Sewing Machine
Power up your Janome sewing machine and thread it according to the machine manual. Ensure the bobbin is properly wound and inserted. Set the stitch selector to the straight stitch position.
Step 8: Where to Find Janome Machine Threading Instructions – Machine Manual or Online Demonstrations
Follow the threading instructions provided in the Janome machine manual. Online demonstrations, especially on the official Janome website or reputable sewing channels, can offer visual guidance for threading your specific model.
Step 9: Adjust Stitch Length for Basting
Locate the stitch length dial on your Janome machine. For basting, set the stitch length to a longer setting. A length of around 4mm to 5mm is suitable for creating temporary basting stitches.
Step 10: Where to Find Stitch Length Recommendations – Machine Manual or Sewing Guides
Refer to the machine manual or sewing guides for recommendations on stitch length. Understanding the ideal settings ensures that your basting stitches serve their temporary purpose effectively.
Step 11: Test the Basting Stitch on Scrap Fabric
Before basting your actual project, conduct a test on scrap fabric. This allows you to assess the stitch length and make any necessary adjustments to achieve the desired basting effect.
Step 12: Where to Test Basting Stitch – Scrap Fabric or Sewing Workshops
Use leftover fabric scraps or participate in sewing workshops to practice basting stitches. Hands-on testing enhances your familiarity with the Janome machine settings and improves your stitching precision.
Step 13: Position Your Fabric Under the Presser Foot
Once satisfied with the test basting, position your fabric layers under the presser foot of your Janome machine. Lower the presser foot to secure the fabric in place, ready for stitching.
Step 14: Initiate the Basting Stitch
Start the basting stitch by gently pressing the foot pedal or engaging the start button, depending on your Janome model. Guide the fabric evenly to maintain a straight line, ensuring consistency in your basting.
Step 15: Where to Find Start/Stop Instructions – Machine Manual or Online Tutorials
Refer to the machine manual for instructions on starting and stopping your Janome machine. Online tutorials specific to Janome models can provide additional insights into the operation of your machine.
Step 16: Space Stitches Appropriately
Adjust the speed of your Janome machine to control the spacing between basting stitches. Consistent spacing is crucial for creating a stable temporary seam. Practice controlling the speed for optimal results.
Step 17: Where to Find Speed Control Instructions – Machine Manual or Sewing Classes
Consult the machine manual for information on speed control settings. If available, attend sewing classes or workshops that focus on using Janome machines to refine your speed control skills.
Step 18: Complete the Basting Stitch Line
Continue stitching until you reach the end of the basting line. Lift the presser foot and gently pull the fabric away from the machine. Trim the thread, leaving a tail for easy removal later.
Step 19: Where to Find End-of-Line Procedures – Machine Manual or Sewing Experts
Follow the end-of-line procedures outlined in the machine manual. Seek advice from sewing experts or online communities for tips on concluding a basting stitch line smoothly.
Step 20: Inspect the Basting Stitch
Examine the basting stitch line for uniformity and proper tension. Ensure that the stitches are holding the fabric layers together securely while allowing for easy removal when needed.
Step 21: Where to Learn About Stitch Inspection – Sewing Experts or Workshops
Engage with sewing experts or attend workshops to learn effective methods for inspecting stitches. Understanding the nuances of stitch inspection enhances your overall sewing proficiency.
Step 22: Make Adjustments as Needed
If the basting stitches require adjustments, don’t hesitate to make them. This could involve tweaking the stitch length, checking thread tension, or addressing any issues that may affect the stability of the temporary seam.
Step 23: Where to Seek Adjustment Tips – Sewing Forums or Janome Support
Visit sewing forums or reach out to Janome support for guidance on making adjustments. Learning from experienced sewers and receiving manufacturer support ensures effective troubleshooting.
Step 24: Remove Basting Stitches When Necessary
Once your project is ready for permanent seams, remove the basting stitches. Use a seam ripper or gently pull the threads, taking care not to damage the fabric. Removing basting stitches leaves your final seams clean and professional.
Step 25: Where to Find Stitch Removal Techniques – Sewing Guides or Demonstrations
Explore sewing guides or online demonstrations for effective stitch removal techniques. Proper removal prevents damage to the fabric and ensures a smooth transition to permanent seams.
Step 26: Explore Basting Applications on Janome Machine
Experiment with various applications of basting stitches on your Janome machine. Whether for garment construction, quilting, or intricate crafts, the versatility of the basting stitch makes it a valuable tool in your sewing repertoire.
Step 27: Where to Learn About Basting Applications – Sewing Classes or Project-Specific Guides
Enroll in sewing classes or explore project-specific guides to discover the diverse applications of basting. Tailoring your approach to different projects enhances your creativity and sewing capabilities.
Step 28: Troubleshoot Janome Basting Challenges
If you encounter challenges specific to basting on your Janome machine, troubleshoot and refine your technique. Seek advice from fellow Janome users or consult the machine manual for solutions.
Step 29: Where to Seek Janome-Specific Tips – Janome User Communities or Official Support
Engage with Janome user communities or seek assistance from official Janome support channels for specific tips on overcoming challenges. Manufacturer insights and user experiences can offer valuable solutions.
Step 30: Practice Regularly for Mastery
To master the art of basting on your Janome machine, practice regularly. Dedicate time to hone your skills, explore new techniques, and embrace the versatility that Janome machines offer for achieving precise and professional basting stitches.
In executing basting stitch on a Janome sewing machine involves a systematic approach, from machine setup to stitch removal. By following this comprehensive guide, you’ll unlock the full potential of your Janome machine and elevate your sewing projects with precise and effective basting. Happy sewing!
Conclusion
In conclusion, unraveling the significance of “What Is Baste In Sewing” adds a valuable thread to the rich tapestry of sewing techniques. Basting, a temporary and versatile stitch, serves as a cornerstone in garment construction and crafting.
Mastering this skill allows sewists to create precise and adjustable seams, paving the way for impeccable final results. As the needle weaves through layers, the art of basting embodies the meticulous balance between planning and adaptability, ensuring each project unfolds seamlessly.
FAQS
Q1: What does the term “baste” mean in sewing?
A1: In sewing, “baste” refers to a temporary stitching technique used to hold fabric layers together before the final, permanent stitches are applied. Basting stitches are typically long and easy to remove, allowing for adjustments during the sewing process. “What Is Baste In Sewing“
Q2: When is basting commonly used in sewing projects?
A2: Basting is commonly used in various sewing projects, such as garment construction, quilting, or any instance where precise alignment is crucial. It helps secure fabric layers for fitting, prevents shifting, and aids in maintaining the intended design. “What Is Baste In Sewing“
Q3: What type of stitches are used for basting in sewing?
A3: Basting stitches are typically long, straight stitches. They can be done by hand with a needle and thread or by using a sewing machine with a longer stitch length setting. The key is to make the stitches easily removable without causing damage to the fabric. “What Is Baste In Sewing“
Q4: Can basting be done with a sewing machine?
A4: Yes, basting can be done with a sewing machine using a longer stitch length setting. It provides a quicker alternative to hand basting and is especially useful when working on larger projects. :What Is Baste In Sewing
Q5: Why is basting important in the sewing process?
A5: Basting is crucial in the sewing process because it allows for temporary placement and adjustments. It helps ensure that fabric layers stay in position, facilitating accurate fitting and alignment before finalizing the permanent stitches. “What Is Baste In Sewing“
Q6: How do I remove basting stitches after completing a sewing project?
A6: Basting stitches are easily removable. You can gently pull the thread, and the stitches should come out without damaging the fabric. Alternatively, use small scissors or a seam ripper to cut the basting stitches carefully. “What Is Baste In Sewing“

