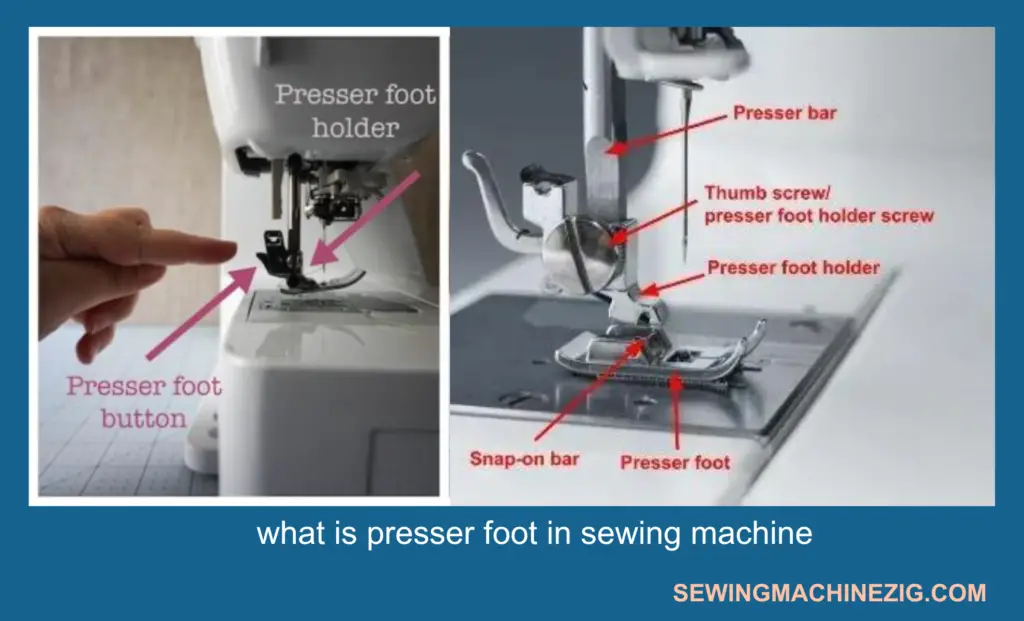
The presser foot is an essential part of a sewing machine that helps to hold the fabric in place while sewing. It is a small mechanism that is located at the base of the needle and is responsible for keeping the fabric taut and steady during the stitching process. Now that you know little by little what is presser foot in sewing machine, let me tell you the presser foot is an important component of the sewing machine, as it ensures that the fabric is held securely in place, and the stitches are formed accurately. In this article, We will discuss what is presser foot in sewing machine. Its Usage difference and importance.
Different Types of Presser Feet for Your Sewing Machine
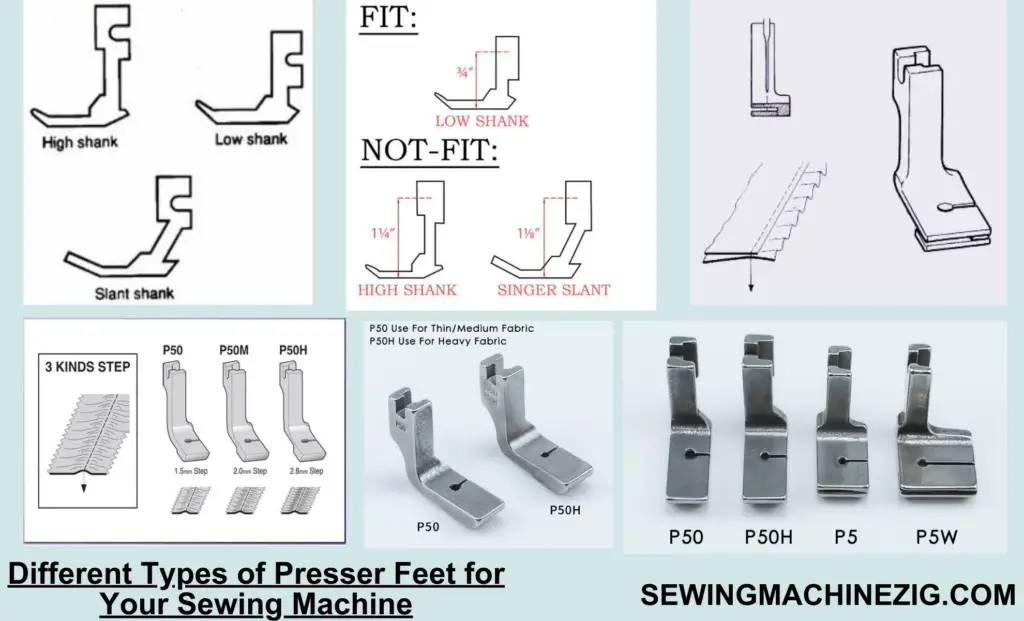
The presser foot comes in different shapes and sizes, and each one is designed to serve a specific purpose. For instance, a straight-stitch presser foot is ideal for sewing straight lines, while a zipper foot is used to attach zippers to the fabric. Additionally, some presser feet have adjustable heights, allowing you to accommodate thicker fabrics.
Understanding the Importance of Presser Foot in Sewing
Using the presser foot correctly is essential for achieving a professional finish in your sewing projects. What is presser foot in sewing machine and how to use it, to use it, you first need to select the appropriate foot for your fabric and stitch type. Then, you need to ensure that the fabric is positioned correctly under the foot and that the presser foot is lowered before starting to sew. The amount of pressure applied by the presser foot can be adjusted to suit the thickness of the fabric you are sewing.
5 Types of presser foot in sewing machines:
- All-Purpose Presser Foot
- Zipper Foot
- Buttonhole Foot
- Overcasting Foot
- Walking Foot
The all-purpose presser foot
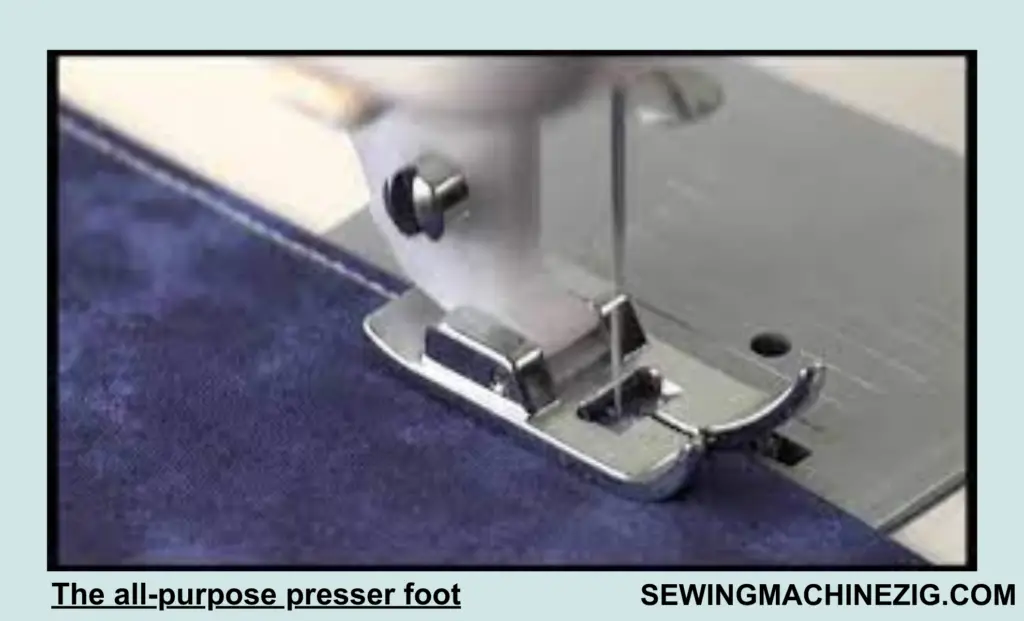
The all-purpose presser foot is an essential component of any sewing machine. It is a standard foot that comes with most machines and is used for general-purpose stitching on a variety of fabrics. This versatile foot can be used for straight stitching, zigzag stitching, and other basic sewing techniques. It is easy to use and provides reliable results, making it a favorite among beginners and experienced sewists alike.
The advantages of using all-purpose presser foot
The all-purpose presser foot is designed to hold the fabric in place while the needle stitches the fabric together. It has a flat sole that helps to guide the fabric and prevent it from shifting during sewing. The foot is adjustable and can be raised or lowered depending on the thickness of the fabric being used. This allows for greater control and precision when sewing.
Using Specialized Presser Feet for Quilting
Whether you are making clothing, quilts, or home decor projects, the all-purpose presser foot is an indispensable tool for achieving professional-looking results. Its versatility and ease of use make it a must-have accessory for any sewing machine. With a little practice, you can master the use of this foot and knows what is presser foot in sewing machine, and later you can create beautiful, high-quality projects that you will be proud to show off.
How to use all-purpose presser foot
Step 1: Remove the Existing Presser
Foot Before attaching the all-purpose presser foot, remove any existing presser foot from your sewing machine. To remove the presser foot, lift the presser foot lever and slide the foot away from the machine.
Step 2: Align the All-Purpose Presser Foot
Align the all-purpose presser foot with the presser foot holder, making sure that the foot’s front is under the needle. The presser foot holder is located on the machine’s shank, just above the needle.
Step 3: Lower the Presser Foot Lever
Lower the presser foot lever to secure the all-purpose presser foot in place. The presser foot lever is usually located at the back of the machine, behind the needle.
Step 4: Position the Fabric
Place the fabric under the presser foot, making sure that the edge of the fabric aligns with the edge of the foot. Lower the presser foot lever to hold the fabric in place. You can adjust the presser foot pressure to suit the fabric thickness.
Step 5: Select the Stitch
Choose the appropriate stitch for your project. For straight stitching, select the straight stitch, and for zigzag stitching, select the zigzag stitch. You can adjust the stitch length and width according to your requirements.
Step 6: Sew
Start sewing by pressing the foot pedal gently. Use your hands to guide the fabric in a straight line or a curve, depending on your project’s requirements. Make sure to keep the fabric aligned with the edge of the presser foot for accurate stitching.
Attaching and using the all-purpose presser foot on your sewing machine is a simple process. By following these steps, you can achieve accurate and uniform stitches on a range of fabrics and I hope that now you are well aware of what is presser foot in sewing machine, Remember to adjust the presser foot pressure and stitch settings according to the fabric thickness and project requirements for best results.
Zipper Foot Presser
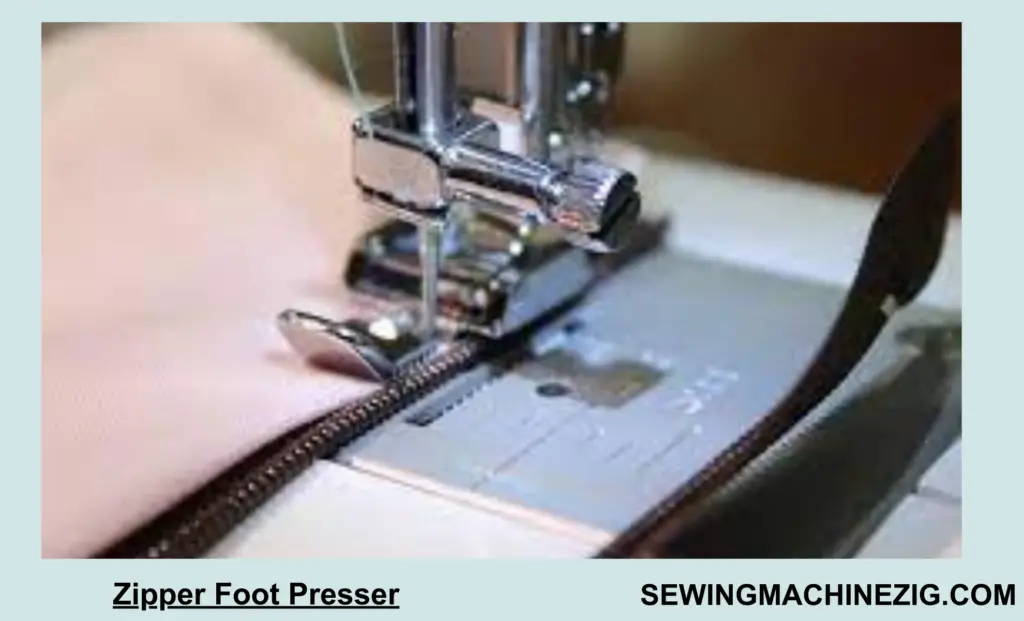
A zipper foot is an indispensable accessory for sewing machines that enables you to insert a zipper into a garment with precision and ease. It is a narrow foot that can glide along the edge of the zipper tape, allowing the needle to get as close to the zipper teeth as possible, resulting in neat and professional-looking zippers.
Sewing Techniques that Require Special Presser Feet
Have you ever struggled to insert a zipper into a garment, only to end up with a crooked or uneven finish? Well, the zipper foot is here to save the day! But did you know that the zipper foot can also be used for other sewing techniques besides inserting zippers? That’s right, this versatile foot can help you create piping, attach bindings, and even sew in tight spaces like cuffs and collars.
The Advantages of Using a Zipper Foot in Sewing
The unique thing about the zipper foot is that it is designed to fit on one side of the needle, allowing you to sew close to the edge of the fabric while keeping the needle away from the zipper teeth or other bulky materials. This makes it an excellent tool for a wide range of sewing projects, from clothing alterations to home decor and accessories. So, if you haven’t explored the full potential of your zipper foot yet, don’t know what is presser foot in sewing machine, now is the time to do so! With a little creativity and experimentation, you might discover new ways to enhance your sewing skills and expand your project repertoire.
How to use Zipper Foot presser in sewing machine
Step 1: Remove the Existing Presser Foot
Before attaching the zipper foot, remove any existing presser foot from your sewing machine. To remove the presser foot, lift the presser foot lever and slide the foot away from the machine.
Step 2: Attach the Zipper Foot
Attach the zipper foot to the presser foot holder, making sure that the foot’s front is facing the needle. The presser foot holder is located on the machine’s shank, just above the needle. Make sure that the needle passes through the hole on the zipper foot.
Step 3: Position the Fabric
Position the fabric right side up, with the zipper tape facing down. Align the edge of the fabric with the edge of the zipper tape. Pin the zipper tape to the fabric to hold it in place.
Step 4: Sew the First Side
Lower the zipper foot onto the fabric, making sure that the foot’s edge is lined up with the fabric edge. Stitch along the edge of the zipper tape until you reach the bottom. Remove the pins as you sew.
Step 5: Sew the Second Side
Flip the fabric over and align the other side of the zipper tape with the edge of the fabric. Pin the zipper tape to the fabric, making sure that the fabric edges are aligned. Lower the zipper foot onto the fabric and stitch along the edge of the zipper tape until you reach the bottom.
Step 6: Finish the Seam
Once you have sewn both sides of the zipper tape, open the zipper and pin the fabric’s right sides together. Sew the remaining seam, making sure to backstitch at the beginning and end.
Using the zipper foot may seem daunting at first, but with a little practice and patience, you’ll be inserting zippers like a pro in no time. Remember to adjust the needle position and stitch length according to the width and type of zipper you are using. So go ahead, give it a try, and add a touch of professionalism to your sewing projects! I hope to know you’re aware of How to use Zipper Foot presser in sewing machine which is also part of what is presser foot in sewing machine,
Buttonhole Presser Foot
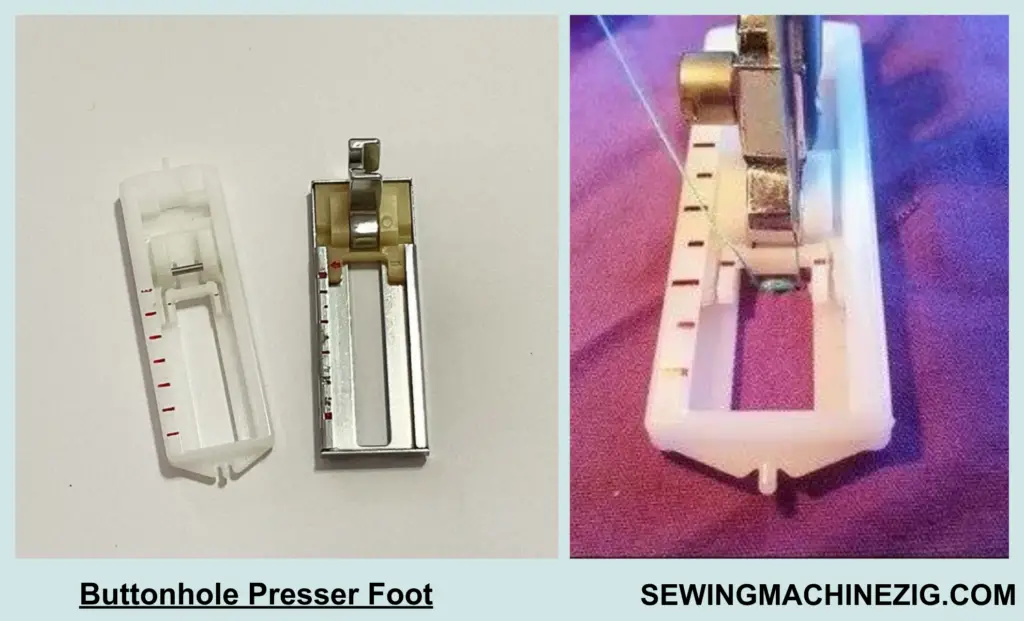
Sewing is an art that requires precision and accuracy, and with the advent of modern technology, sewing machines have become essential tools for sewers worldwide. These machines come with a range of accessories and attachments, including the buttonhole foot presser.
The buttonhole foot presser is a specialized attachment that allows the user to create buttonholes of various sizes and shapes with ease. It attaches to the sewing machine and works by guiding the fabric through a precise path, creating a buttonhole that is the perfect size for the button. The presser foot also ensures that the fabric is held securely in place while the buttonhole is being created, preventing any slippage or misalignment.
Buttonhole foot pressers come in different sizes, depending on the size of the button that needs to be accommodated. Some machines also offer automatic buttonhole settings, where the machine measures the button and creates the perfect buttonhole automatically.
The Advantages of Using a Buttonhole Foot in Sewing
Using a buttonhole foot presser has several advantages. It makes creating buttonholes much easier and faster, saving time and effort. The presser foot also ensures that the buttonhole is neat and tidy, with consistent results every time. This is especially important in the garment industry, where mass production requires uniformity and precision.
How to use Button foot presser in sewing machine
Steps:
Step 1: To use a buttonhole foot presser, begin by selecting the appropriate size and style of buttonhole that you need to create. Next, make sure to adjust the settings on your machine to the appropriate stitch length and width for the buttonhole you want to create.
Step 2: Once you have your machine set up, place your fabric under the presser foot, ensuring that it is lined up straight and secure. Hold the fabric in place, and lower the presser foot onto the fabric. Begin sewing, following the path of the buttonhole that has been marked on the fabric.
Step 3: As you sew, the buttonhole foot presser will guide the fabric in a precise path, creating a buttonhole that is the perfect size and shape for the button. The presser foot will also ensure that the fabric is held securely in place, preventing any slippage or misalignment.
Step 4: Once you have completed the buttonhole, lift the presser foot and remove the fabric from the machine. Trim any loose threads and use a seam ripper or scissors to carefully cut the opening of the buttonhole.
Using a buttonhole foot presser is an excellent way to create buttonholes of various sizes and shapes with precision and ease. By following the manufacturer’s instructions and adjusting the settings on your machine, you can quickly and efficiently create perfect buttonholes for any sewing project. With practice, you will be able to use a buttonhole foot presser confidently and produce professional-quality results every time. How to use overcasting foot presser
The overcasting foot presser
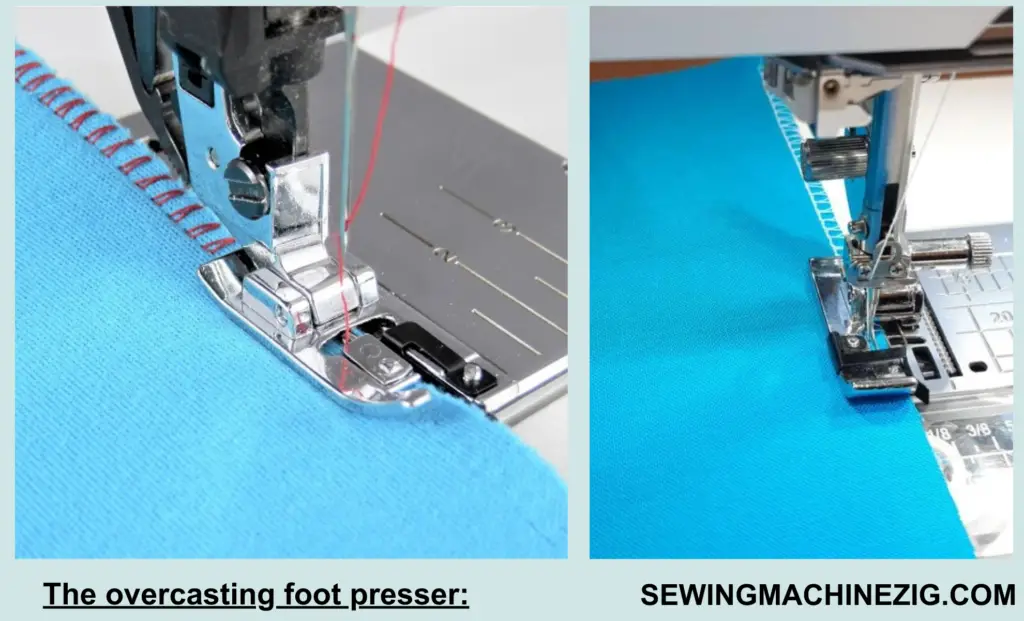
The overcasting foot presser is a specialized attachment that is used to finish the edges of the fabric to prevent fraying. It attaches to the sewing machine and works by guiding the fabric through a precise path while a specialized stitch is applied to the edge. The presser foot ensures that the stitch is applied evenly and consistently, providing a neat and professional-looking edge.
Overcasting foot pressers come in different sizes, depending on the thickness of the fabric being used. They are typically used on lightweight to medium-weight fabrics, such as cotton, linen, and silk. The stitch applied by the overcasting foot presser is also known as the overlock stitch or the serger stitch. The overcasting foot presser is also a part of what is presser foot in sewing machine
The Advantages of Using an Overcasting Foot in Sewing
Using an overcasting foot presser has several advantages. It makes finishing the edges of fabric much easier and faster, saving time and effort. The presser foot also ensures that the stitch is applied evenly and consistently, preventing any unraveling or fraying of the fabric. This is especially important when working with fabrics that have a tendency to fray, such as wool or tweed.
How to use overcasting foot presser
Step 1: To use an overcasting foot presser, start by selecting the correct size of foot for the weight and thickness of the fabric you are using. Attach the foot to the sewing machine according to the manufacturer’s instructions.
Step 2: Once the overcasting foot presser is attached, select the overcasting stitch on your sewing machine. This stitch is typically indicated on the machine by a symbol that looks like a zig-zag stitch with an added line on top.
Step 3: Place the edge of the fabric under the overcasting foot presser, ensuring that the fabric is aligned straight and the edge is positioned within the guide. Lower the presser foot and begin sewing.
Step 4: As you sew, the overcasting foot presser will guide the fabric in a precise path, applying the overcast stitch along the edge of the fabric. The stitch will wrap around the edge, encasing it and preventing it from fraying.
Step 5: Ensure that you are using the appropriate tension and stitch length settings for the fabric you are working with, as this will affect the quality of the finished edge. Experiment with different settings to find the best results for your project.
Step 6: Once you have finished sewing, trim any loose threads and admire your beautifully finished edge. The overcasting foot presser is a fantastic tool for creating neat and professional-looking finishes on your sewing projects with ease.
The overcasting foot presser is an essential accessory for any sewing enthusiast or professional. With a little practice, it is easy to use and can save you time and effort in finishing your sewing projects. Its ability to provide neat and professional-looking finishes on fabric edges is invaluable for any sewing project, whether for personal use or in a professional capacity. I hope know you’re aware of How to use overcasting foot presser which is also part of what is presser foot in sewing machine,
The walking foot presser
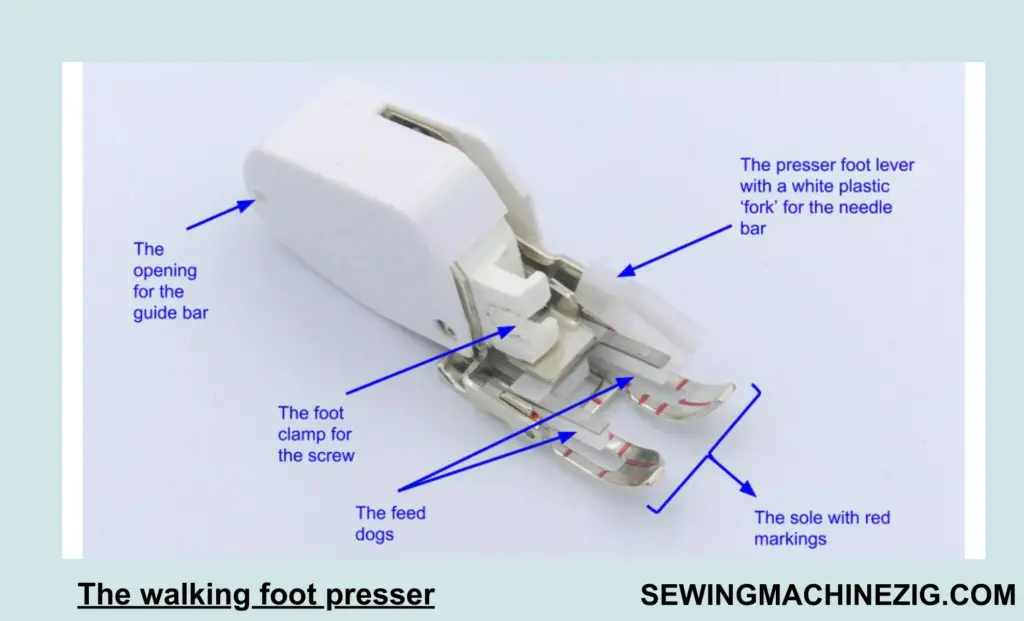
Sewing enthusiasts and professionals alike understand the importance of having the right tools to achieve their desired results. One such tool is the walking foot presser, a device that can make all the difference when working with difficult fabrics.
The walking foot presser, also known as a quilting foot or even feed foot, is an attachment for sewing machines that allows for more precise and controlled sewing. It is particularly useful when working with fabrics that have a tendency to slip or stretch, such as leather, velvet, or jersey knits.
The unique design of the walking foot presser ensures that all layers of fabric are fed through the machine evenly, resulting in a more polished and professional-looking finished product. Unlike a regular presser foot that relies on the machine’s feed dogs to move the fabric, the walking foot presser has its own set of feed dogs that move in conjunction with the machine’s feed dogs, allowing for more consistent stitching.
Using Specialized Presser Foot for Quilting
This attachment is particularly helpful for quilters who work with multiple layers of fabric, batting, and backing, as it prevents the layers from shifting or bunching up during the sewing process. It is also useful for garment construction, particularly when sewing on knit fabrics or attaching trims and bindings.
How to use walking foot presser
Step 1: Check your sewing machine’s manual to ensure that it’s compatible with a walking foot presser. Not all machines are, so it’s important to check this first. Remove the standard presser foot from your sewing machine.
Step 2: Align the walking foot presser with the presser foot holder and lower it onto the holder, making sure it’s secure. Tighten the screw that holds the presser foot in place.
Step 3: Once the walking foot presser is secured in place, thread your sewing machine with the desired thread and select the appropriate needle for your fabric.
Step 4: To use the walking foot presser, place the fabric layers under the walking foot presser, ensuring that the edges are aligned.
Step 5: Lower the presser foot onto the fabric and begin sewing. The walking foot presser will ensure that the top and bottom layers of fabric feed through the machine evenly. When you reach the end of your seam, lift the presser foot and remove your fabric.
Step 6: It’s important to note that the walking foot presser is particularly useful when sewing thick or bulky fabrics, such as quilts, as it helps to prevent the layers from shifting or bunching. It’s also ideal for sewing materials like leather or vinyl, which can be challenging to work with using a standard presser foot.
The walking foot presser is an invaluable tool for sewists who want to achieve professional-looking results. By using this attachment, you can ensure that your fabric layers feed through the machine smoothly and evenly, resulting in a polished finished product. How to use walking foot presser which is also part of what is presser foot in sewing machine,
Conclusion:
A presser foot is a crucial component of a sewing machine that holds the fabric in place and guides it through the machine during the stitching process. what is presser foot in sewing machine, and what types, there are various types of presser feet available, each designed for specific sewing techniques and fabric types. Choosing the right presser foot can improve the quality of your sewing and prevent issues like skipped stitches or puckering.
It’s essential to read your sewing machine manual and follow the recommended guidelines for selecting and adjusting the presser foot to achieve the best possible results. With the right presser foot and technique, you can create beautiful and professional-looking garments, home decor items, and accessories. I hope to know you’re fully aware of what is presser foot in sewing machine,
FAQs:
Q 1: What is a presser foot in a sewing machine?
A: A presser foot is a component of a sewing machine that holds the fabric down against the feed dogs and keeps it flat as it moves through the machine during the stitching process.
Q 2: What are the different types of presser feet available for sewing machines?
A: There are various types of presser feet available, including standard presser feet, zipper feet, buttonhole feet, blind hem feet, walking feet, and overcasting feet.
Q 3: How do I know which presser foot to use for a specific sewing project?
A: The presser foot you choose depends on the type of fabric you are working with, the type of stitch you want to create, and the specific sewing technique you are using. Most sewing machine manuals will have a chart that shows which presser foot to use for different types of fabrics and sewing projects.
Q 4: Can I use a different brand of presser foot on my sewing machine?
A: Most sewing machines are designed to work with specific types of presser feet that are made by the same manufacturer. However, some sewing machines are compatible with generic or third-party presser feet, so it’s important to check your sewing machine manual to see what types of presser feet are recommended.
Q 5: How do I change the presser foot on my sewing machine?
A: To change the presser foot, you typically need to raise the presser foot lever, release the current presser foot by pressing a release button or lever, and then attach the new presser foot by sliding it into place and securing it with a screw or clip.
Q 6: Can a presser foot affect the quality of my sewing?
A: Yes, using the wrong type of presser foot or not adjusting the presser foot pressure correctly can lead to uneven or skipped stitches, puckering or stretching of fabric, or other issues with the quality of your sewing.
Q 7: How do I adjust the pressure of my presser foot?
A: Most sewing machines have a dial or lever that allows you to adjust the pressure of the presser foot. Higher pressure is needed for thicker fabrics, while lighter pressure is better for lighter-weight fabrics. It’s important to adjust the pressure correctly to prevent the fabric from being crushed or stretched during the sewing process.

