Delving into the realm of sewing techniques, understanding “What is Whip Stitch in Sewing” unveils a versatile and essential method. The whip stitch, known for its simplicity and effectiveness, is a go-to for joining fabric edges or seams. Whether you’re working on seams, appliqué, or crafting, mastering this stitch is fundamental.
This guide will unravel the intricacies of the whip stitch, providing insights into its applications and step-by-step execution. Embrace the versatility of this stitch, adding finesse and durability to your sewing projects with precision and a touch of handcrafted elegance.
What Is Whip Stitch In Sewing Detailed Answer
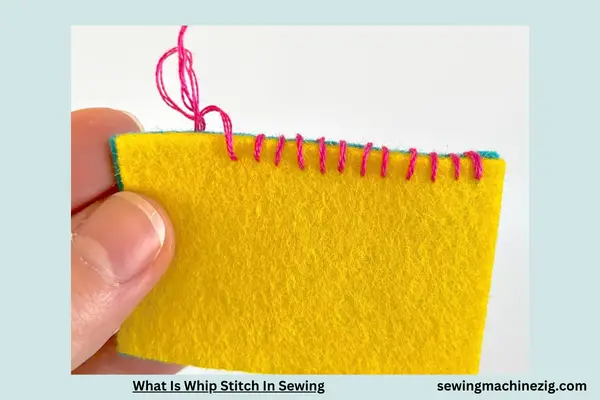
Understanding what whip stitch is and mastering this versatile hand-sewing technique is an invaluable skill for any sewing enthusiast.
In this comprehensive guide, we’ll delve into the intricacies of whip stitching, providing you with a detailed step-by-step process What is Whip Stitch in Sewing, to elevate your sewing projects.
Step 1: Gather Your Materials
To embark on your whip stitching journey, assemble the necessary materials: a threaded needle, fabric or pieces to be joined, and a thimble for added comfort during the sewing process.
Step 2: Thread the Needle
Thread your needle with a suitable thread color that complements your fabric. A single strand of thread is typically sufficient for most whip-stitching applications.
Step 3: Knot the thread
Secure a knot at the end of the threaded needle to prevent it from pulling through the fabric. This knot should be large enough to anchor the thread securely.
Step 4: Align the Edges
Place the fabric pieces you intend to join side by side, ensuring their edges align precisely. Pinning or basting the pieces in place can aid in maintaining alignment throughout the whip stitching process.
Step 5: Begin Stitching
Insert the needle from the backside of the fabric, bringing it to the front along the edge. Pull the thread until the knot rests against the fabric.
Step 6: Create the First Stitch
Move the needle diagonally across the seam, inserting it back into the fabric from front to back, creating a diagonal stitch. Ensure the stitch length is consistent for a neat appearance.
Step 7: Repeat the Process
Continue the whip stitching by creating diagonal stitches along the entire length of the seam. The stitches should be close together, forming a continuous and secure seam.
Step 8: Tie Off the End
Once you reach the end of the seam, secure the thread by creating a small knot on the backside of the fabric. Ensure the knot is tight to prevent unraveling.
Step 9: Conceal the Thread Tail
If desired, weave the thread tail back through the stitches on the backside of the fabric to conceal it. This adds a professional touch to your finished whip-stitched seam.
Step 10: Press the Seam
After completing the whip stitching, press the seam with an iron to set the stitches and create a polished finish. This step is especially crucial for garments and projects where a flat seam is desired.
Tips for Mastering Whip Stitch:
- Practice on scrap fabric before working on your main project.
- Choose a thread color that blends seamlessly with the fabric for a discreet finish.
- Adjust the stitch length based on the weight and thickness of your fabric.
By following these detailed steps What is Whip Stitch in Sewing, and practicing the art of whip stitching, you’ll enhance your sewing repertoire, creating strong and visually appealing seams in a variety of projects.
Whether you’re joining fabric pieces, closing openings, or attaching trims, whip stitching proves to be a versatile and reliable hand-sewing technique in your crafting toolkit.
What Is A Whip Stitch In Sewing By Hand
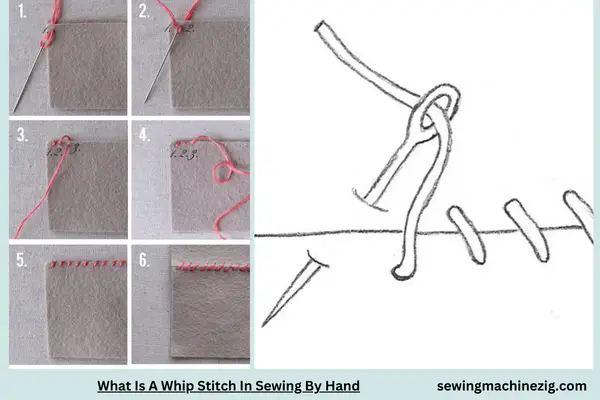
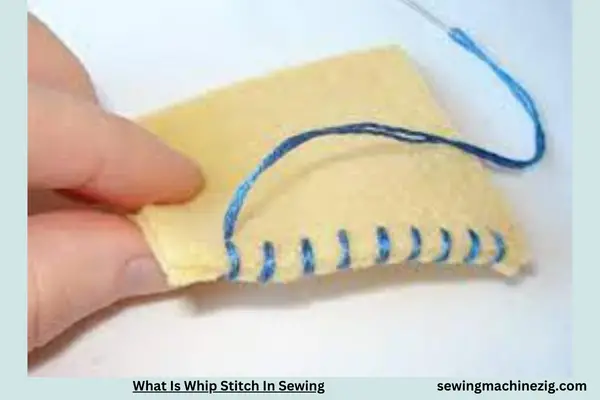
A whip stitch is a basic hand-sewing technique that’s incredibly versatile and useful for joining fabric pieces together with a neat and durable finish. Here’s a straightforward guide to understanding and using the whip stitch in hand sewing.
What is a Whip Stitch: A whip stitch is a simple and quick way to sew fabric edges together. It’s commonly used for hemming, appliqué, or joining fabric pieces when you want a visible but secure seam.
How to Whip Stitch:
Step 1: Gather Your Materials
Make sure you have a threaded needle with a knot at the end and the fabric pieces you want to join.
Step 2: Position the Fabric
Align the edges of the fabric pieces you’re stitching together. Hold them with the right sides facing each other if you want the seam to be hidden, or with the wrong sides facing each other for a visible seam.
Step 3: Start from the Back
Insert the needle from the back of the fabric to the front, starting at one end of the seam.
Step 4: Stitch Over the Edge
Bring the needle over the edge of the fabric and insert it back down from front to back, creating a diagonal stitch that secures the edges together.
Step 5: Repeat the Process
Continue stitching along the seam, keeping your stitches evenly spaced. The needle should go over the edge and then back through the fabric, creating a series of diagonal stitches that resemble a “whip.”
Step 6: Tie Off the Thread
When you reach the end of the seam or want to secure your stitches, tie a knot on the backside of the fabric. This ensures your whip stitch stays in place.
Tips for a Neat Whip Stitch:
- Keep your stitches evenly spaced for a tidy finish.
- Adjust the tension of your stitches based on the fabric type; looser tension works well for stretchy fabrics.
- Practice on scrap fabric before working on your main project.
Uses of Whip Stitch:
- Hemming: Use whip stitches to secure folded hems neatly.
- Appliqué: Attach fabric shapes onto a base fabric with a visible seam.
- Seaming: Join fabric pieces together, especially in projects where you want a visible seam.
In summary, What is Whip Stitch in Sewing, the whip stitch is a straightforward and versatile hand-sewing technique that’s perfect for various applications in your sewing projects. Whether you’re hemming, appliquéing, or seaming, the whip stitch provides a secure and visible finish that’s easy to master with a bit of practice.
Whip Stitch VS Blanket Stitch
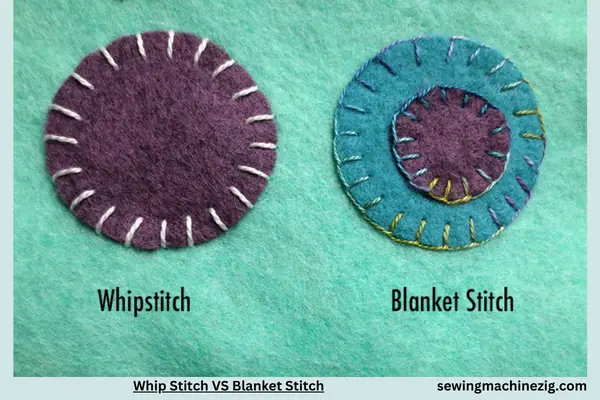
Both the whip stitch and blanket stitch are hand-sewing techniques used to secure fabric edges, but they differ in appearance and applications. Let’s explore the key distinctions between the whip stitch and blanket stitch in sewing.
Whip Stitch:
The whip stitch is a basic and versatile sewing method used to join fabric pieces or secure hems. Here’s how to distinguish and use the whip stitch:
Technique:
- In whip stitching, the needle passes over the edge of the fabric, creating a diagonal stitch that binds the fabric together. The result is a series of angled stitches resembling a “whip.”
Appearance:
- The whip stitch produces a straightforward, functional seam. It’s often used when the seam doesn’t need to be decorative or when a quick and secure finish is desired.
Applications:
- Common uses of the whip stitch include hemming, joining fabric pieces, or securing folded edges. It’s practical for projects where the seam may not be highly visible or doesn’t require intricate detailing.
Blanket Stitch:
The blanket stitch, on the other hand, is a decorative and functional hand-sewing technique that creates a distinctive edge. Here’s what sets the blanket stitch apart:
Technique:
- In blanket stitching, the needle goes through the fabric from back to front, and a loop is created before securing the thread. This looped effect forms a border around the fabric edge.
Appearance:
- The blanket stitch has a more decorative and ornamental look. Its looped structure adds a finished and often contrasting border to the fabric, making it suitable for visible seams and decorative edges.
Applications:
- Blanket stitching is frequently used for decorative edging on blankets, quilts, and felt projects. It adds a charming detail to the fabric and is often chosen when a more ornate finish is desired.
Choosing Between Whip Stitch and Blanket Stitch:
- If you need a simple, quick, and secure seam with a functional purpose, opt for the whip stitch.
- For decorative edges or visible seams where a more elaborate finish is desired, the blanket stitch is an excellent choice.
In summary, What is Whip Stitch in Sewing the whip stitch and blanket stitch serve different purposes in sewing. The whip stitch is practical and straightforward, while the blanket stitch adds a decorative touch to fabric edges. Consider your project’s requirements and aesthetics when choosing between these two hand-sewing techniques.
Conclusion
In conclusion, What is Whip Stitch in Sewing, grasping the concept of a whip stitch in sewing unveils a versatile and practical hand-sewing technique. Whether hemming, appliquéing, or joining fabric pieces, the whip stitch’s simplicity and effectiveness shine through.
Its ease of execution makes it an excellent choice for both beginners and seasoned sewists. Embrace the whip stitch to add a secure and tidy finish to your sewing projects, and explore its varied applications for a seamless and professional touch to your creations.
FAQS
Q1: What is a whip stitch used for in sewing?
A1: A whip stitch is a versatile hand-sewing technique commonly used for hemming, joining fabric pieces, and appliqué work. It provides a secure and tidy finish, making it suitable for various sewing projects.
Q2: Is a whip stitch suitable for visible seams?
A2: Yes, the whip stitch is often chosen for visible seams where a neat and visible finish is desired. Its simplicity adds a decorative touch to fabric edges.
Q3: How is a whip stitch different from other hand-sewing techniques?
A3: Unlike hidden stitches, the whip stitch creates visible diagonal stitches, making it practical for projects where the seam is intentionally showcased. What is Whip Stitch in Sewing
Q4: Can beginners master the whip stitch easily?
A4: Absolutely! The whip stitch is considered one of the easiest hand-sewing techniques, making it accessible for beginners. Practice on scrap fabric to enhance your skills. What is Whip Stitch in Sewing
Q5: What types of projects benefit from a whip stitch?
A5: Hemming projects, appliqué work, and joining fabric pieces, especially when a visible seam is desired, are ideal for employing the whip stitch. It adds a professional touch to various creations. What is Whip Stitch in Sewing

