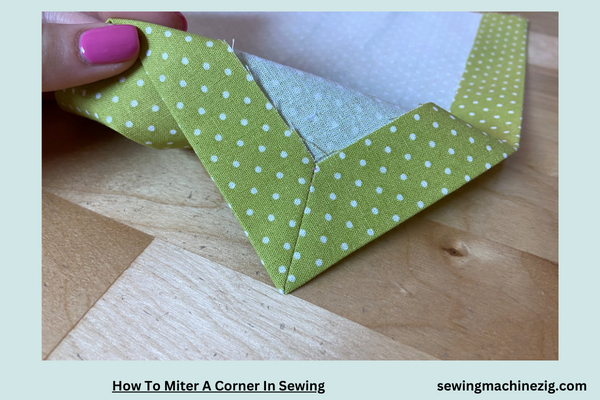
Embarking on the journey of sewing often involves encountering various techniques that elevate your craftsmanship, and one such essential skill is knowing “How to Miter a Corner in Sewing.” Mitering corners adds a professional touch to your projects, providing clean and polished seams. Whether you’re working on quilts, garments, or home decor, mastering this technique enhances the overall aesthetic appeal.
In this guide,”How to Miter a Corner in Sewing“, We’ll delve into the step-by-step process of achieving perfectly mitered corners, ensuring your sewing projects reflect precision and attention to detail.
How To Miter A Corner In Sewing Detailed Answer
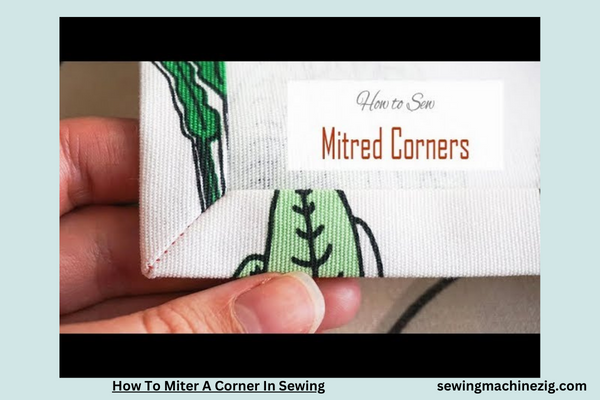
Mitering corners in sewing adds a professional touch, elevating your projects to a new level of precision. Here’s a comprehensive guide on how to miter a corner seamlessly, ensuring clean and polished results.
Materials Needed:
- Fabric
- Sewing machine
- Matching thread
- Iron
Step 1: Prepare Your Fabric:
Begin by cutting your fabric pieces to the desired size, ensuring you have clean, squared edges for the corners you plan to miter.
Step 2: Mark the Mitering Line:
On the wrong side of the fabric, mark a line at a 45-degree angle from the corner. Use a fabric pencil or chalk for clear visibility.
Step 3: Stitch the Seam:
Sew along the marked line, starting and stopping precisely at the corner. Backstitch at the beginning and end to secure the seam.
Step 4: Trim Excess Fabric:
Trim the excess fabric, leaving a 1/4-inch seam allowance. Be cautious not to cut into the stitched line.
Step 5: Press Open the Seam:
Use a hot iron to press open the seam allowance. This helps create a crisp and flat mitered corner.
Step 6: Fold and Align:
Fold the fabric along the stitched line, aligning the raw edges of the fabric on both sides of the seam.
Step 7: Pin the Folded Edge:
Secure the folded edge with pins, ensuring it stays aligned and the corner remains sharp.
Step 8: Stitch the Mitered Corner:
Stitch along the folded edge, starting at the inner corner and sewing towards the outer edge. Backstitch at both ends for added durability.
Step 9: Press the Mitered Corner:
Press the mitered corner one final time to set the stitches and ensure a polished finish.
Step 10: Repeat for Other Corners:
Repeat the process for all corners that require mitering, maintaining consistency across your project.
Tips:
- Practice on scrap fabric before tackling your main project.
- Use a pressing cloth to protect delicate fabrics during ironing.
- Choose a thread color that matches your fabric for a seamless look.
Mitering corners in sewing may seem intricate at first, but with practice, it becomes a valuable skill that enhances the quality and aesthetic appeal of your finished pieces. Incorporate this technique into your sewing repertoire, and witness how perfectly mitered corners elevate the overall professionalism of your projects.”How to Miter a Corner in Sewing“
How To Fold A Mitered Corner
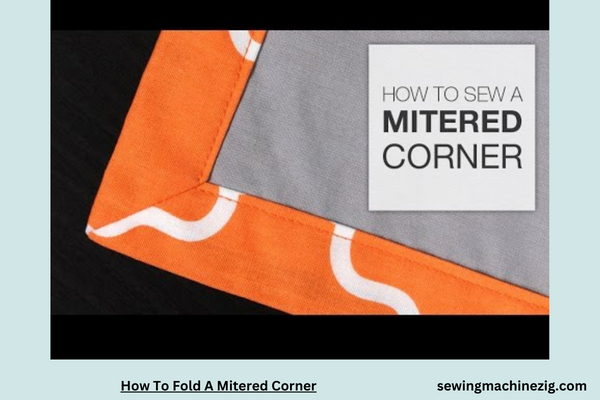
Folding a mitered corner in sewing might sound intricate, but with a straightforward approach, it becomes an accessible skill. Follow these easy steps to achieve a clean and polished mitered corner in your sewing projects.
Step 1: Gather Your Materials
Before diving into the folding process, ensure you have your fabric, a flat surface, and an iron. Choosing a lightweight fabric for practice can make the learning process smoother.
Step 2: Mark the Corner
Lay your fabric on the flat surface with the wrong side facing up. Identify the corner you want to miter and mark a small dot or line on the wrong side with a fabric pencil or chalk.
Step 3: Fold Diagonally
Fold the fabric diagonally, aligning the marked dot with the adjacent corner. This creates a triangle with the marked corner as the apex.
Step 4: Pin the Folded Edge
Secure the folded edge with pins to keep it in place. This helps maintain the alignment during the next steps.
Step 5: Sew Along the Diagonal Fold
With the folded edge secured, stitch along the diagonal fold. Use a straight stitch and backstitch at both ends for added durability.
Step 6: Trim Excess Fabric
Trim the excess fabric, leaving a 1/4-inch seam allowance. Be cautious not to cut into the stitched line to preserve the integrity of the mitered corner.
Step 7: Press Open the Seam
Open the stitched seam and press it open with a hot iron. This step sets the stitches and creates a crisp and flat mitered corner.
Step 8: Fold and Align the Edges
Now, fold the fabric along the stitched line, aligning the raw edges on both sides of the seam. Pin the edges in place.
Step 9: Stitch Along the Folded Edge
Stitch along the folded edge, starting at the inner corner and sewing towards the outer edge. Backstitch at both ends for a secure finish.
Step 10: Press the Mitered Corner
Give the mitered corner a final press with the iron. This helps set the stitches and ensures a professional and polished appearance.
Additional Tips:
- Practice on scrap fabric before attempting mitered corners on your main project.
- Use a pressing cloth to protect delicate fabrics during ironing.
- Choose a thread color that blends seamlessly with your fabric for a neat finish.
With these easy-to-follow steps, folding a mitered corner becomes a manageable and rewarding part of your sewing repertoire. Whether you’re working on quilts, napkins, or other projects, mastering this technique adds a touch of finesse to your finished creations.”How to Miter a Corner in Sewing“
How To Make A Mitered Quilt Border
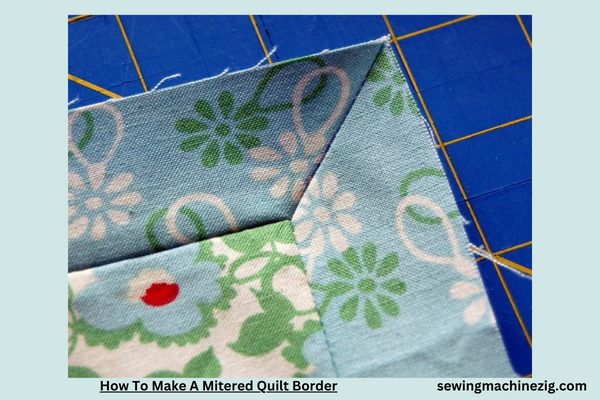
Creating a mitered quilt border may seem daunting, but with a straightforward approach, you can achieve a polished and professional look. Follow these easy steps to master the art of adding a mitered border to your quilt.
Step 1: Prepare Your Quilt Edges
Ensure your quilt top is complete, and the edges are squared off. If necessary, trim and square the quilt to your desired dimensions.
Step 2: Measure and Cut Border Strips
Measure the sides of your quilt to determine the length of the border strips. Cut fabric strips for the borders, ensuring they are long enough for each side.
Step 3: Fold and Press the Strips
Fold each border strip in half lengthwise, wrong sides together, and press with an iron. This creates a crease along the center of each strip.
Step 4: Mark the Quilt and Borders
Lay your quilt flat, right side up. Mark the center points on each side of the quilt and the corresponding center points on the border strips.
Step 5: Align and Pin the Borders
Place each border strip along one side of the quilt, aligning the center crease with the center point on the quilt. Pin the border in place, matching the ends and corners.
Step 6: Sew the Border
Sew the border to the quilt using a quarter-inch seam allowance. Start and stop a quarter-inch away from the quilt corners. Repeat this process for all sides.
Step 7: Create Mitered Corners
To achieve mitered corners, fold the border strips at a 45-degree angle away from the quilt corner, forming a neat diagonal line. This creates a triangle with the excess fabric.
Step 8: Mark and Sew Diagonally
Mark a line along the fold of the border strip. Sew along this marked line, starting and stopping a quarter-inch away from the quilt edge. Repeat this process for all four corners.
Step 9: Trim Excess Fabric
Trim the excess fabric from each corner, leaving a quarter-inch seam allowance. Be cautious not to cut into the quilt.
Step 10: Press the Borders
Press the borders and mitered corners with an iron. This sets the stitches and gives your quilt a crisp and finished appearance.
Additional Tips:
- Take your time to align and pin borders accurately for a professional finish.
- Use a matching thread color to seamlessly blend with your quilt fabric.
- Practice mitered corners on scrap fabric before attempting them on your quilt.
With these simplified steps, adding a mitered quilt border becomes an achievable and rewarding part of your quilting journey. Embrace this technique to enhance the overall aesthetic of your quilt, giving it a clean and polished look that showcases your sewing skills.
Conclusion
In conclusion, mastering how to miter a corner in sewing is an invaluable skill that elevates the quality and aesthetics of your projects.
Whether you’re working on quilts, garments, or home decor, precise corners contribute to a polished finish. With attention to detail and practice, achieving clean and well-aligned miters becomes second nature.
Embrace this technique, “How to Miter a Corner in Sewing“, experiment with different fabrics, and enhance your sewing prowess for projects that boast professional craftsmanship and eye-catching corners.
FAQS
Q1: What is mitering in sewing, and why is it essential?
A1: Mitering involves creating a diagonal seam at a corner, providing a clean and professional finish. It’s crucial for achieving polished edges on projects like quilts, tablecloths, and garments.”How to Miter a Corner in Sewing“
Q2: Can I miter corners on any sewing machine?
A2: Yes, mitering corners is a technique applicable to all sewing machines. The key lies in precise stitching and folding, which can be achieved with a basic sewing machine.How to Miter a Corner in Sewing
Q3: Are there specific projects where mitered corners are commonly used?
A3: Mitered corners are frequently used in quilting, napkin and tablecloth hems, and various garment designs. They add a tailored and refined look to the finished product.“How to Miter a Corner in Sewing“
Q4: What’s the best way to ensure accurate mitered corners?
A4: Accurate measurements, precise stitching, and careful pressing are essential for achieving perfect mitered corners. Take your time and use tools like rulers and fabric markers for accuracy.
Q5: Can beginners successfully miter corners in their sewing projects?
A5: Yes, with practice, beginners can master mitering corners. Start with small projects and follow step-by-step instructions to build confidence and skill in this essential sewing technique.


