Embarking on the sewing journey can be both exciting and daunting, especially when confronted with the intricacies of specialized tools. One such tool that often perplexes beginners is the hemming foot for a sewing machine.
Many aspiring seamstresses wonder, “How to use a hemming foot on a sewing machine?” Fear not, as this guide aims to unravel the mystery behind this essential device. Through a burst of information, we’ll delve into the intricacies, providing a comprehensive understanding of the hemming foot and empowering you to master this indispensable sewing technique.
How To Use A Hemming Foot On A Sewing Machine Detailed Answer
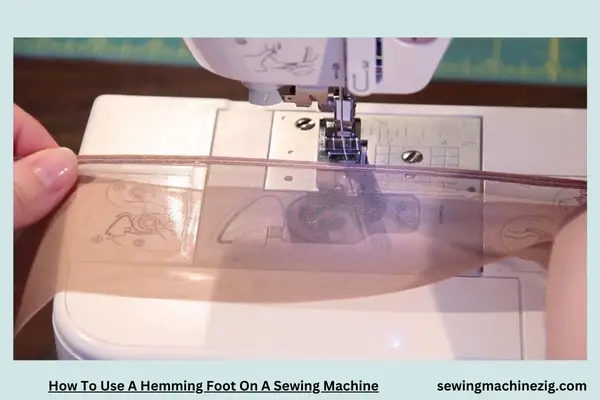
Mastering the art of sewing often involves delving into the intricacies of specialized tools, and one such tool that can elevate your sewing game is the hemming foot for a sewing machine.
If you’ve ever found yourself wondering, “How to use a hemming foot on a sewing machine?” fear not, as we embark on a comprehensive step-by-step guide to demystify this valuable accessory.
Step 1: Gather Your Materials
Before diving into the world of hemming with your sewing machine foot, gather your materials. This includes the fabric you want to hem, the hemming foot, matching thread, and your sewing machine.
Step 2: Select the Right Hemming Foot
Hemming feet come in various sizes, each designed for different hem widths. Select the hemming foot that corresponds to your desired hem size. Check your sewing machine manual if you’re unsure which foot is appropriate.
Step 3: Set Up Your Sewing Machine
Ensure your sewing machine is set up for straight stitching. Thread the machine with the appropriate thread color and install the chosen hemming foot. Refer to your sewing machine manual for guidance on installing feet if needed.
Step 4: Mark Your Hem
Before you start sewing, mark the hemline on your fabric. You can use fabric chalk or pins to create a visible guide for stitching. Precision at this stage ensures an even and professional-looking hem.
Step 5: Position the Fabric
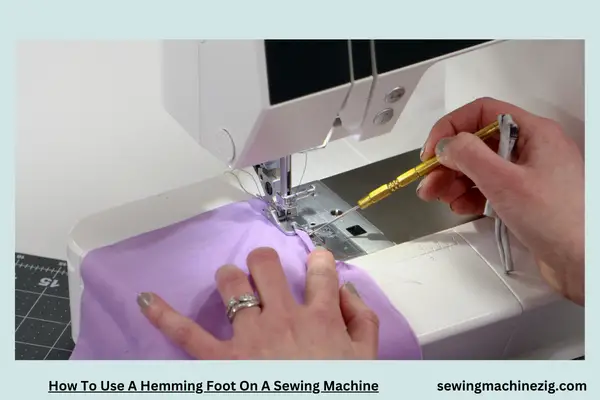
Fold the fabric along the marked hemline, positioning it under the hemming foot. The hemming foot has a guide that helps you align the folded edge of the fabric, ensuring a consistent hem width as you sew.
Step 6: Lower the Presser Foot
Lower the presser foot onto the fabric. The hemming foot is designed to hold the fabric securely in place, allowing for precise stitching. Make sure the fabric is smooth and taut before starting to sew.
Step 7: Begin Stitching
Start stitching at a slow to moderate pace, allowing the hemming foot to guide the fabric. The foot will automatically fold and stitch the fabric, creating a neat and even hem. Keep your eye on the guide to maintain a consistent hem width.
Step 8: Continue Hemming
Continue stitching along the entire hemline. The hemming foot streamlines the process, making it efficient and ensuring a professional finish. Take your time and maintain a steady pace for the best results.
Step 9: Backstitch and Finish
When you reach the end of your hem, backstitch to secure the stitches. Trim any excess thread, and you’re done! Admire your beautifully hemmed fabric, courtesy of the hemming foot and your sewing machine.
Step 10: Practice Makes Perfect
If you’re new to using a hemming foot, practice on scrap fabric before working on your actual project. This allows you to familiarize yourself with the foot’s operation and refine your technique for optimal results.
Mastering How to use a hemming foot on a sewing machine adds a valuable skill to your repertoire. With precision and practice, you can achieve beautifully hemmed garments and projects, elevating the overall quality of your sewing endeavors.
How To Sew Rolled Hems With The Narrow Hemmer Foot
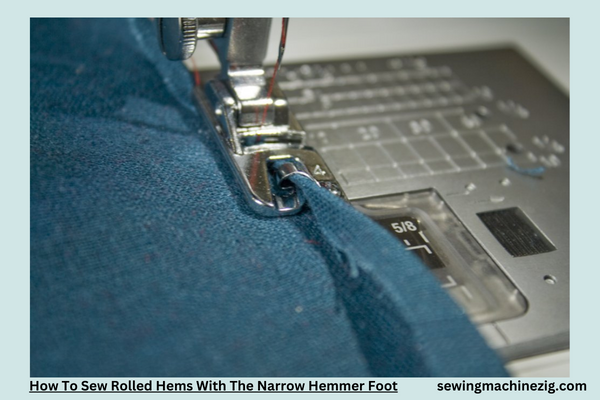
Let’s explore how to sew rolled hems with the narrow hemmer foot on a sewing machine in an easy-to-understand manner.
How To Sew Rolled Hems With The Narrow Hemmer Foot: A Simple Guide
Gather Your Materials:
- Begin by gathering the materials you’ll need: your sewing machine, fabric, matching thread, and the narrow hemmer foot. Ensure your fabric is prepared for sewing.
Select the Narrow Hemmer Foot:
- Choose the narrow hemmer foot for your sewing machine. This foot is designed to create a small, neat hem, making it ideal for rolled hems.
Thread Your Sewing Machine:
- Thread your sewing machine with the desired thread color. Follow your machine’s threading guide to ensure proper threading.
How To Sew Rolled Hems With The Narrow Hemmer Foot: Setup Steps
Attach the Narrow Hemmer Foot:
- Attach the narrow hemmer foot to your sewing machine. If your machine uses a snap-on system, lift the presser foot, align the narrow hemmer foot, and lower the presser foot lever to secure it in place.
Set Your Machine to Straight Stitch:
- Set your sewing machine to a straight stitch. The straight stitch is commonly used for narrow hems, providing a clean and secure finish.
How To Sew Rolled Hems With The Narrow Hemmer Foot: Hemming Steps
Fold the Fabric Edge:
- Fold the edge of your fabric to the desired width of the rolled hem. The narrow hemmer foot will automatically roll the fabric as you sew.
Position the Fabric Under the Foot:
- Place the folded fabric under the narrow hemmer foot. Ensure that the fold is against the guide or scroll on the foot, allowing it to roll the fabric neatly.
Lower the Presser Foot:
- Lower the presser foot onto the fabric. The narrow hemmer foot will hold the fold in place as you sew.
Start Sewing:
- Begin sewing at a slow and steady pace. The narrow hemmer foot will guide the fabric, creating a beautifully rolled hem as you go.
Maintain Even Tension:
- Keep a consistent and even tension on the fabric as you sew. This helps in achieving a uniform and neat rolled hem.
Follow the Guide:
- Watch the fabric’s alignment with the guide on the narrow hemmer foot. This ensures that your rolled hem remains straight and well-formed.
Complete the Hem:
- Continue sewing until you reach the end of the fabric or the desired length of your rolled hem. Backstitch a few stitches to secure the end.
Cut the Thread:
- Cut the thread and lift the presser foot. Gently remove the fabric from the machine, and you should have a neatly sewn rolled hem.
Press the Rolled Hem:
- After sewing, press the rolled hem with an iron to set the stitches and give it a polished look.
How To Sew Rolled Hems With The Narrow Hemmer Foot: Additional Tips
Practice on Scrap Fabric:
- If you’re new to using a narrow hemmer foot for rolled hems, practice on scrap fabric first to get a feel for how the foot guides the fabric.
Experiment with Fabric Types:
- Different fabrics may require slight adjustments. Experiment with scraps of the same fabric to find the optimal settings for your specific project.
Enjoy the Versatility:
- The narrow hemmer foot is versatile and can be used on a variety of projects, from garments to home decor items. Enjoy exploring its capabilities!
By following these steps “How to use a hemming foot on a sewing machine” for sewing rolled hems with the narrow hemmer foot on a sewing machine, you can achieve professional-looking finishes on your projects. With a bit of practice, you’ll be able to add beautifully rolled hems to a variety of sewing creations.
Hemming Foot For Industrial Sewing Machine
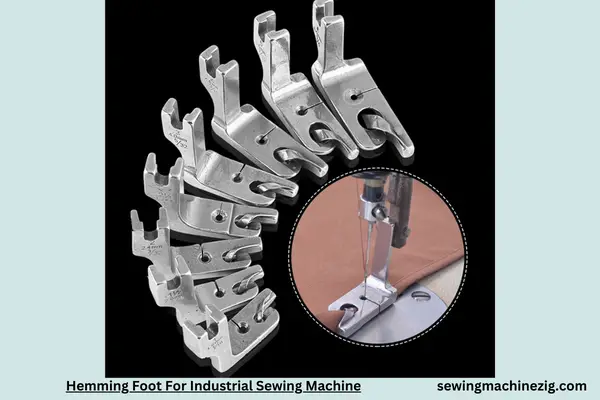
Let’s discuss how to use a hemming foot for an industrial sewing machine in a simple and straightforward manner.
How To Use a Hemming Foot for an Industrial Sewing Machine: Easy Guide
Understand the Hemming Foot:
- A hemming foot for an industrial sewing machine is a specialized presser foot designed to create precise hems on fabric. It often has a guide or a curl that helps fold and stitch the fabric for a neat finish.
Prepare Your Materials:
- Start by preparing the materials you’ll be working with. This includes the industrial sewing machine, fabric, matching thread, and the hemming foot designed for industrial use.
Thread Your Sewing Machine:
- Thread the industrial sewing machine with the appropriate thread color. Follow the threading guide specific to your machine to ensure proper threading.
How To Use a Hemming Foot for an Industrial Sewing Machine: Setup Steps
Select the Hemming Foot:
- Choose the hemming foot designed for industrial sewing machines. Industrial hemming feet may vary in design, but they all serve the purpose of creating efficient and professional-looking hems.
Attach the Hemming Foot:
- Attach the hemming foot to the industrial sewing machine. Industrial machines often have a quick-change or screw-on mechanism for attaching presser feet. Follow your machine’s manual for precise instructions on attaching the hemming foot.
How To Use a Hemming Foot for an Industrial Sewing Machine: Hemming Steps
Fold the Fabric Edge:
- Fold the edge of your fabric to the desired width of the hem. The hemming foot for an industrial sewing machine will guide the fabric as you sew, ensuring accuracy and efficiency.
Position the Fabric Under the Foot:
- Place the folded fabric under the hemming foot. Ensure that the fold aligns with the guide or curl on the hemming foot, allowing it to create a precise and even hem.
Lower the Presser Foot:
- Lower the presser foot onto the fabric. The industrial hemming foot will securely hold the fabric in place as you sew.
How To Use a Hemming Foot for an Industrial Sewing Machine: Sewing Steps
Start Sewing:
- Begin sewing at a steady pace. The industrial hemming foot will guide the fabric smoothly, allowing for efficient and uniform stitching.
Follow the Guide:
- Keep an eye on the fabric’s alignment with the guide on the hemming foot. This ensures that your hem remains straight and consistent throughout the sewing process.
Continue Hemming:
- Continue sewing until you reach the end of the fabric or the desired length of your hem. Industrial machines are designed for high-speed and efficient sewing, making the process faster.
How To Use a Hemming Foot for an Industrial Sewing Machine: Finishing Steps
Complete the Hem:
- Finish sewing your hem, and if necessary, backstitch a few stitches to secure the end. The industrial hemming foot provides a professional finish.
Cut the Thread:
- Cut the thread and lift the presser foot. Remove the fabric from the industrial sewing machine, and you should have a neatly hemmed edge.
Press the Hem:
- After sewing, press the hem with an iron to set the stitches and give it a polished appearance.
How To Use a Hemming Foot for an Industrial Sewing Machine: Additional Tips
Explore Machine Settings:
- Industrial sewing machines often have various settings for stitch length and tension. Explore these settings to achieve the desired result on different fabrics.
Practice on Scrap Fabric:
- If you’re new to using a hemming foot for an industrial sewing machine, practice on scrap fabric first to get a feel for how the foot works with your specific machine.
Utilize Industrial Machine Features:
- Take advantage of any additional features your industrial sewing machine may offer, such as automatic thread trimming or adjustable presser foot pressure, to enhance the efficiency of your hemming process.
By following these steps and tips, you can effectively use a hemming foot for an industrial sewing machine to achieve professional and efficient hems on a variety of fabrics. Always refer to your machine’s manual for specific instructions and settings.
Conclusion
In conclusion, mastering How to use a hemming foot on a sewing machine is a valuable skill that enhances the finishing touches of your sewing projects. With the right technique, this presser foot simplifies the process of creating neat and professional hems.
Whether you’re working on garments, home decor, or accessories, the hemming foot proves to be a versatile tool, providing efficiency and precision. Elevate your sewing prowess by incorporating this essential skill, ensuring your creations boast polished and well-crafted edges.
FAQS
Q1: What is a hemming foot, and how does it work on a sewing machine?
A1: A hemming foot is a presser foot designed for creating neat hems. It works by folding and stitching the fabric, providing a polished finish. “How to use a hemming foot on a sewing machine“
Q2: How do I attach a hemming foot to my sewing machine?
A2: To attach a hemming foot, lift the presser foot, align the foot with the machine’s attachment point, and lower the presser foot lever to secure it in place. “How to use a hemming foot on a sewing machine“
Q3: Can I use a hemming foot on any sewing machine?
A3: Hemming’s feet are designed to fit specific sewing machine models. Check your machine’s compatibility and use a foot that matches your model. “How to use a hemming foot on a sewing machine“
Q4: What types of hems can I create with a hemming foot?
A4: A hemming foot is versatile, allowing you to create various hems, including rolled hems, blind hems, and narrow hems. “How to use a hemming foot on a sewing machine“
Q5: Do I need a special needle for using a hemming foot?
A5: While a standard needle can be used, using a needle suitable for your fabric type and project can enhance the results when using a hemming foot. “How to use a hemming foot on a sewing machine“
Q6: How do I adjust the stitch length when using a hemming foot?
A6: Refer to your sewing machine’s manual for instructions on adjusting stitch length. Typically, you can use the machine’s settings to achieve the desired stitch length. “How to use a hemming foot on a sewing machine“

